The Brightlayer Remote Maintenance service enables users to set up secure remote connections to machines and other applications. The service is based on the VPN technology and allows to manage and monitor device and user-groups.
Overview
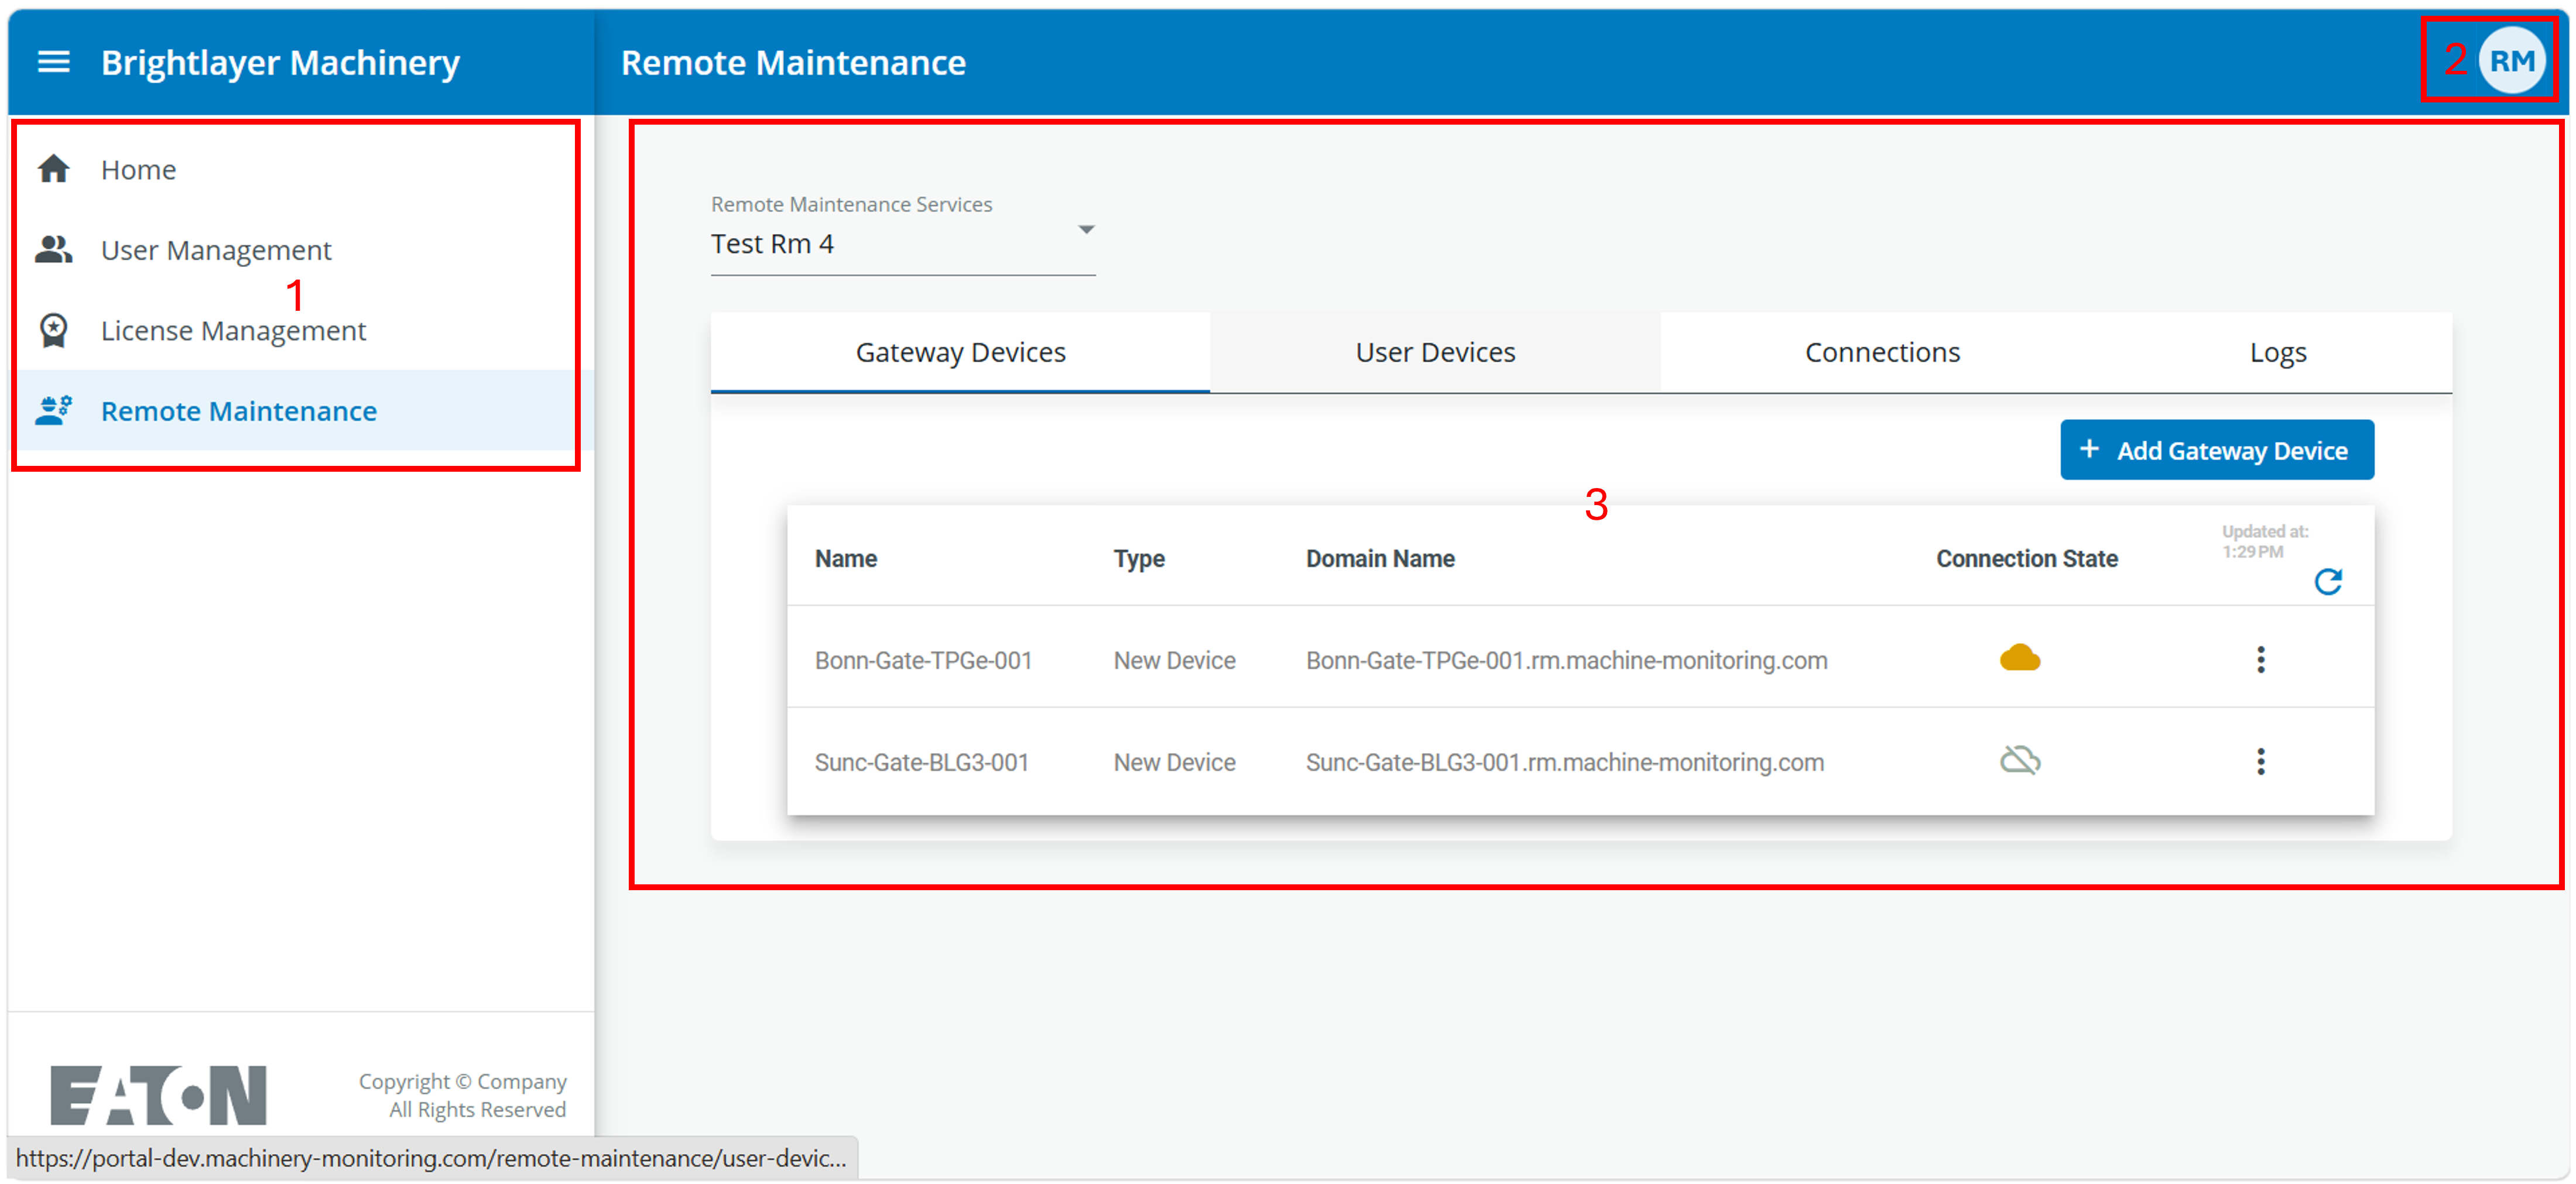
The main window on the Brightlayer Portal consists of the following sections:
To fully manage the Remote Maintenance service the main drawer would have 4 elements. The visibility of those elements to users would depend on user rights:
Home. Clicking this element would bring the user to the home screen
User management would open the user management to add users to an organization and assign roles to those users.
License Management is the section to manage all Eaton services and software licenses
Remote Maintenance would open the main screen of the Remote Maintenance service
The User Menu in the top right corner of the screen would allow the user to manage his account settings, language settings and log out. Users, with the role of Organization Admin, could access the Organization setup via their user menu as well.
The main screen contains the application. It will change depending on the selected element in the main drawer.
The following sections will walk you through the process of managing users, adding a Remote Maintenance service to an organization and how to use the Remote Maintenance service. For your convenience find an overview on the content of this document below.
| Section | Content |
|---|---|
| Accessing the Remote Maintenance service | Activate single sign on feature |
| Managing gateway devices | Add GW devices to RM service, Special settings for Gateway devices |
| Managing user devices | Add user device, OpenVPN Client for remote maintenance and connect to a GW device, Configuration Files for the OpenVPN Client, delete the User Device |
| Managing connections | Connection status of Gateway device, User Device and Connections |
Brightlayer Machinery Portal User Management
Registration
There are several ways to get access to the Brightlayer Machinery Portal. These options mainly depend on how or by whom the platform is used. Here is our recommendation for getting access:
- For single users Single users that are not part of any organization can use the Self Register option on the portal login screen. Once the self registration process is completed, those users would become part of a single-user-organization. With this setup they would automatically become the Organization Admin of this single-user-organization. Within this setup all features would be available as described in this documentation. There is no limitation a single-user-organization would have compared to an Organization with several members / users.
- Organizations with several users For those organizations it is also recommended that an admin user would complete the self registration process as described above. As Organization Admin the admin user could invite other users to his Organization. During this process the Organization Admin can already assign roles to those users. The invited users would receive an invitation by e-mail and follow the registration process that is described in the e-mail.
The portal login screen:

Upon successful registration or invitation the user can choose the login option on the portal login screen.
User Management
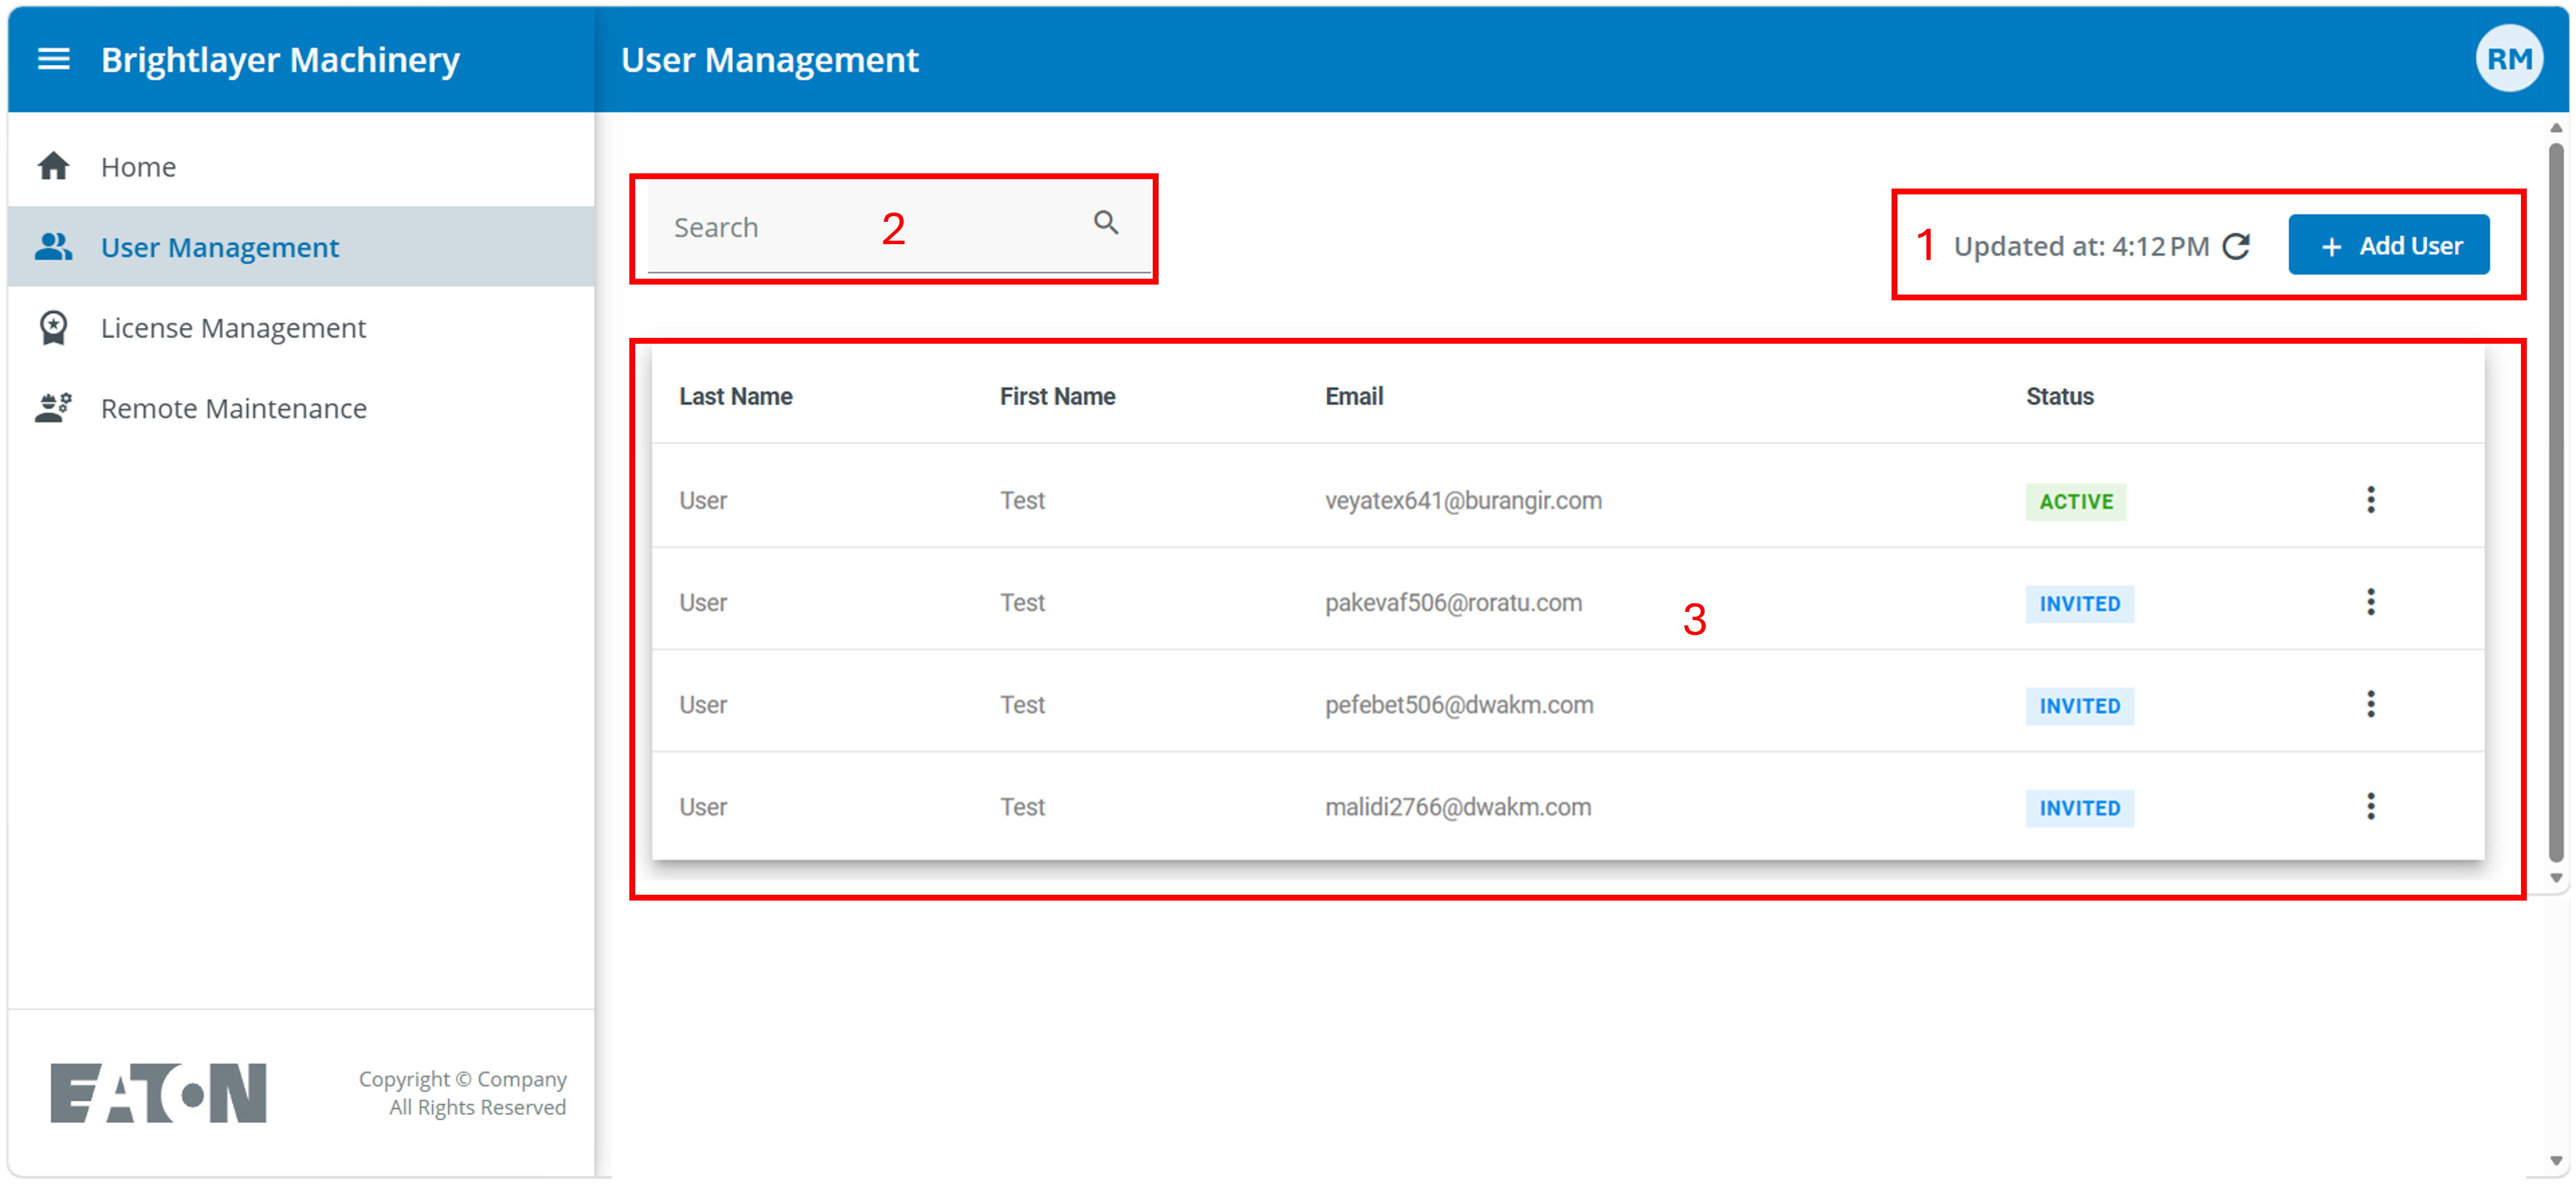
The main window on the User Management consists of the following sections:
Adding user / update screen section The “Add user” button and the “Refresh” button can be found in the upper left part of the screen.
The search field Enter user name or e-mail address into this field to search for a user.
The User List The User List shows all users of an organization and their Status. During the invitation process the user status can change to “Invited” and “Expired”. Once the invitation process is finalized, the status would be “Active”. There is no other status than these 3.
The status Invited shows the user has been invited by e-mail to join the organization. In this e-mail user has to click on “Registration” and follow the instructions.Manager).
Important: If an Organization has several Organization Admins, only the Organization Admin that has invited the user will see the user in the status “Invited” in the User List. Only the Organization Admin that has invited the user can see if the invitation turns into the status “Expired”. This happens if a user fails to complete the registration process within 30 minutes. Only the Organization Admin that has invited the user can re-send the invitation in case of an expiry. To see the status change it may be necessary for the Organization Admin to refresh his screen using the refresh button.
Only when the new User has completed the registration process successfully, other Organization Admin would see him in the User List of the User Management screen with the status “Active”.
Important: One User should not be invited by 2 Organization Admins simultaneously. This may lead to problems in the registration process. If this happens accidently the invited user should not click on both registration links. He could use one registration link and ignore the other one.
Important: When an invitation was send to a user the process can not be cancelled! If the user completes the registration process in time and correctly he would become part of the organization. If the user was invited by mistake the Organization Admin needs to remove him from the Organization as soon as the user is in the “Active” status.
The status Expired is shown when the invited use has not finished the registration process or has not opened the e-mail within 12 hours after it was sent. In this case the Organization Admin could send a new invitation via the context / 3-dot menu.
The status Active is shown when the user has been successfully added to the organization. Once the user has achieved this status he can be assigned roles in the Organization.
Two (2) ways of adding a user
When a user should be added to an organization it needs to be considered if this user has already self-registered himself in the Brightlayer portal or he is member of another organization. In this case he can’t be invited with the “Add User” button.
Important: Users can only be part of one organization in the Brightlayer portal.
If a user is part of an organization and wants to join another organization he can do so by clicking the “Leave Organization” button in the organization info screen. Only then he can join a new organization.
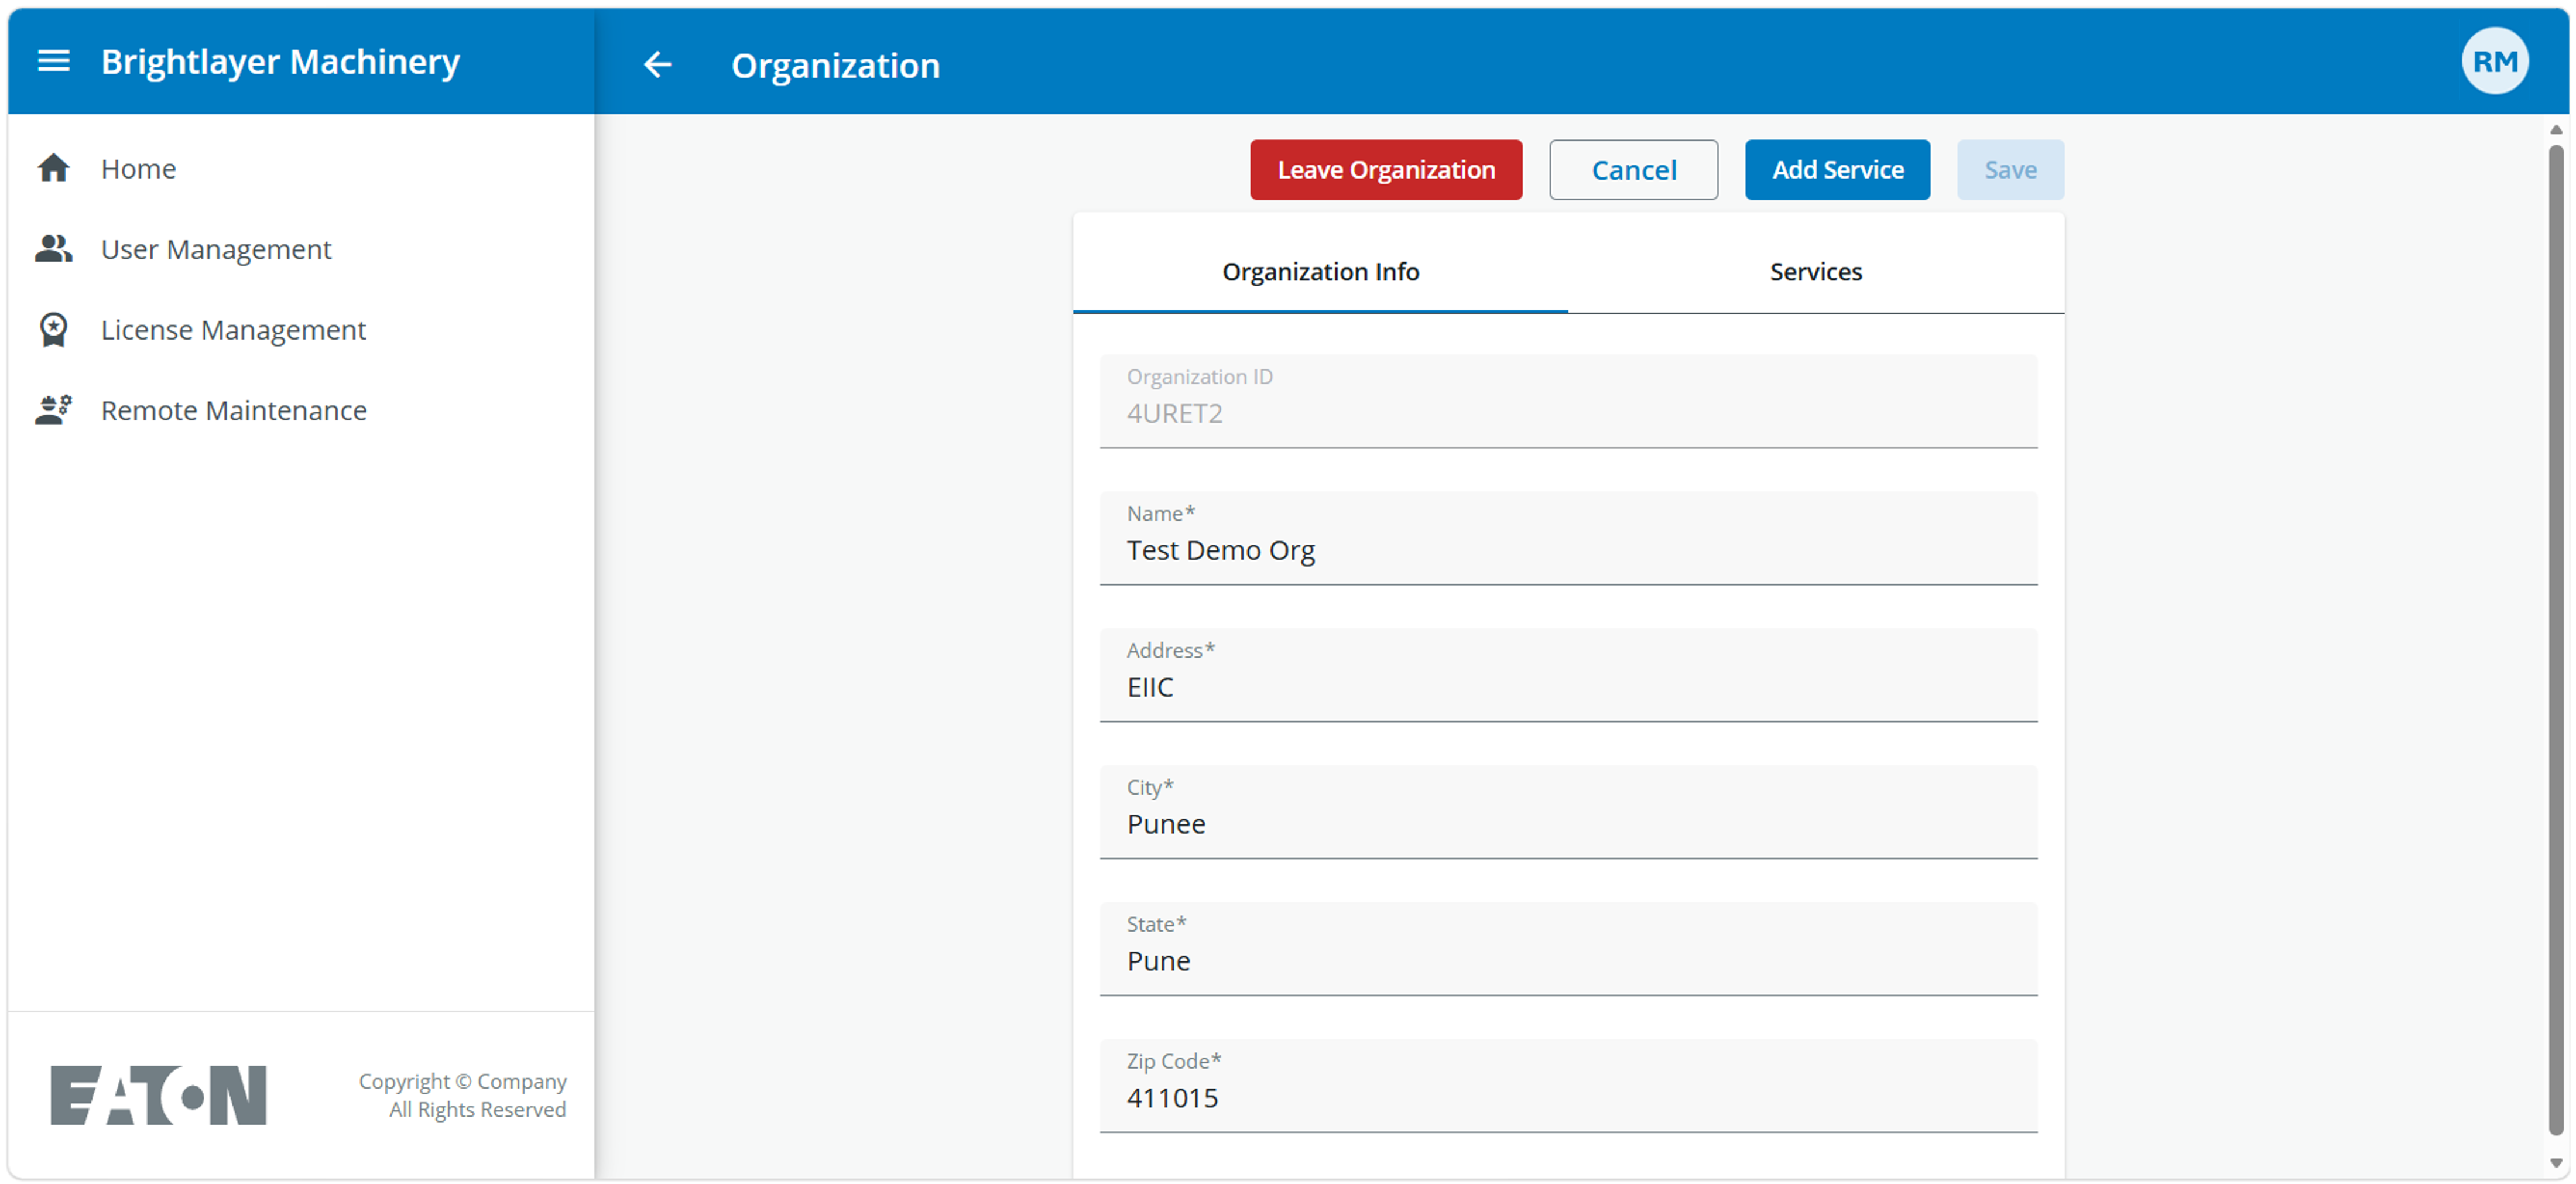
When a user left an organization or when he self-registers he would become member of his own single-user-organization. Now the user can join another organization by receiving the Organization ID of the organization he wants to join. The OrganizationID can be found in the first line of the Organization Info tab (see picture above). This Organization ID can be shared with a user, that is already registered at the Brightlayer portal and is not part of another organization. He can click on “Join Organization” in his Organization menu, copy the OrganizationID into the text field and “Send” the application. When the application is received in the new Organization, the Organization Admin would see the application to join in the User List. The new user would be shown with the status Pending. The Organization Admin can Approve or Cancel the invite by opening the context menu (3 dots).
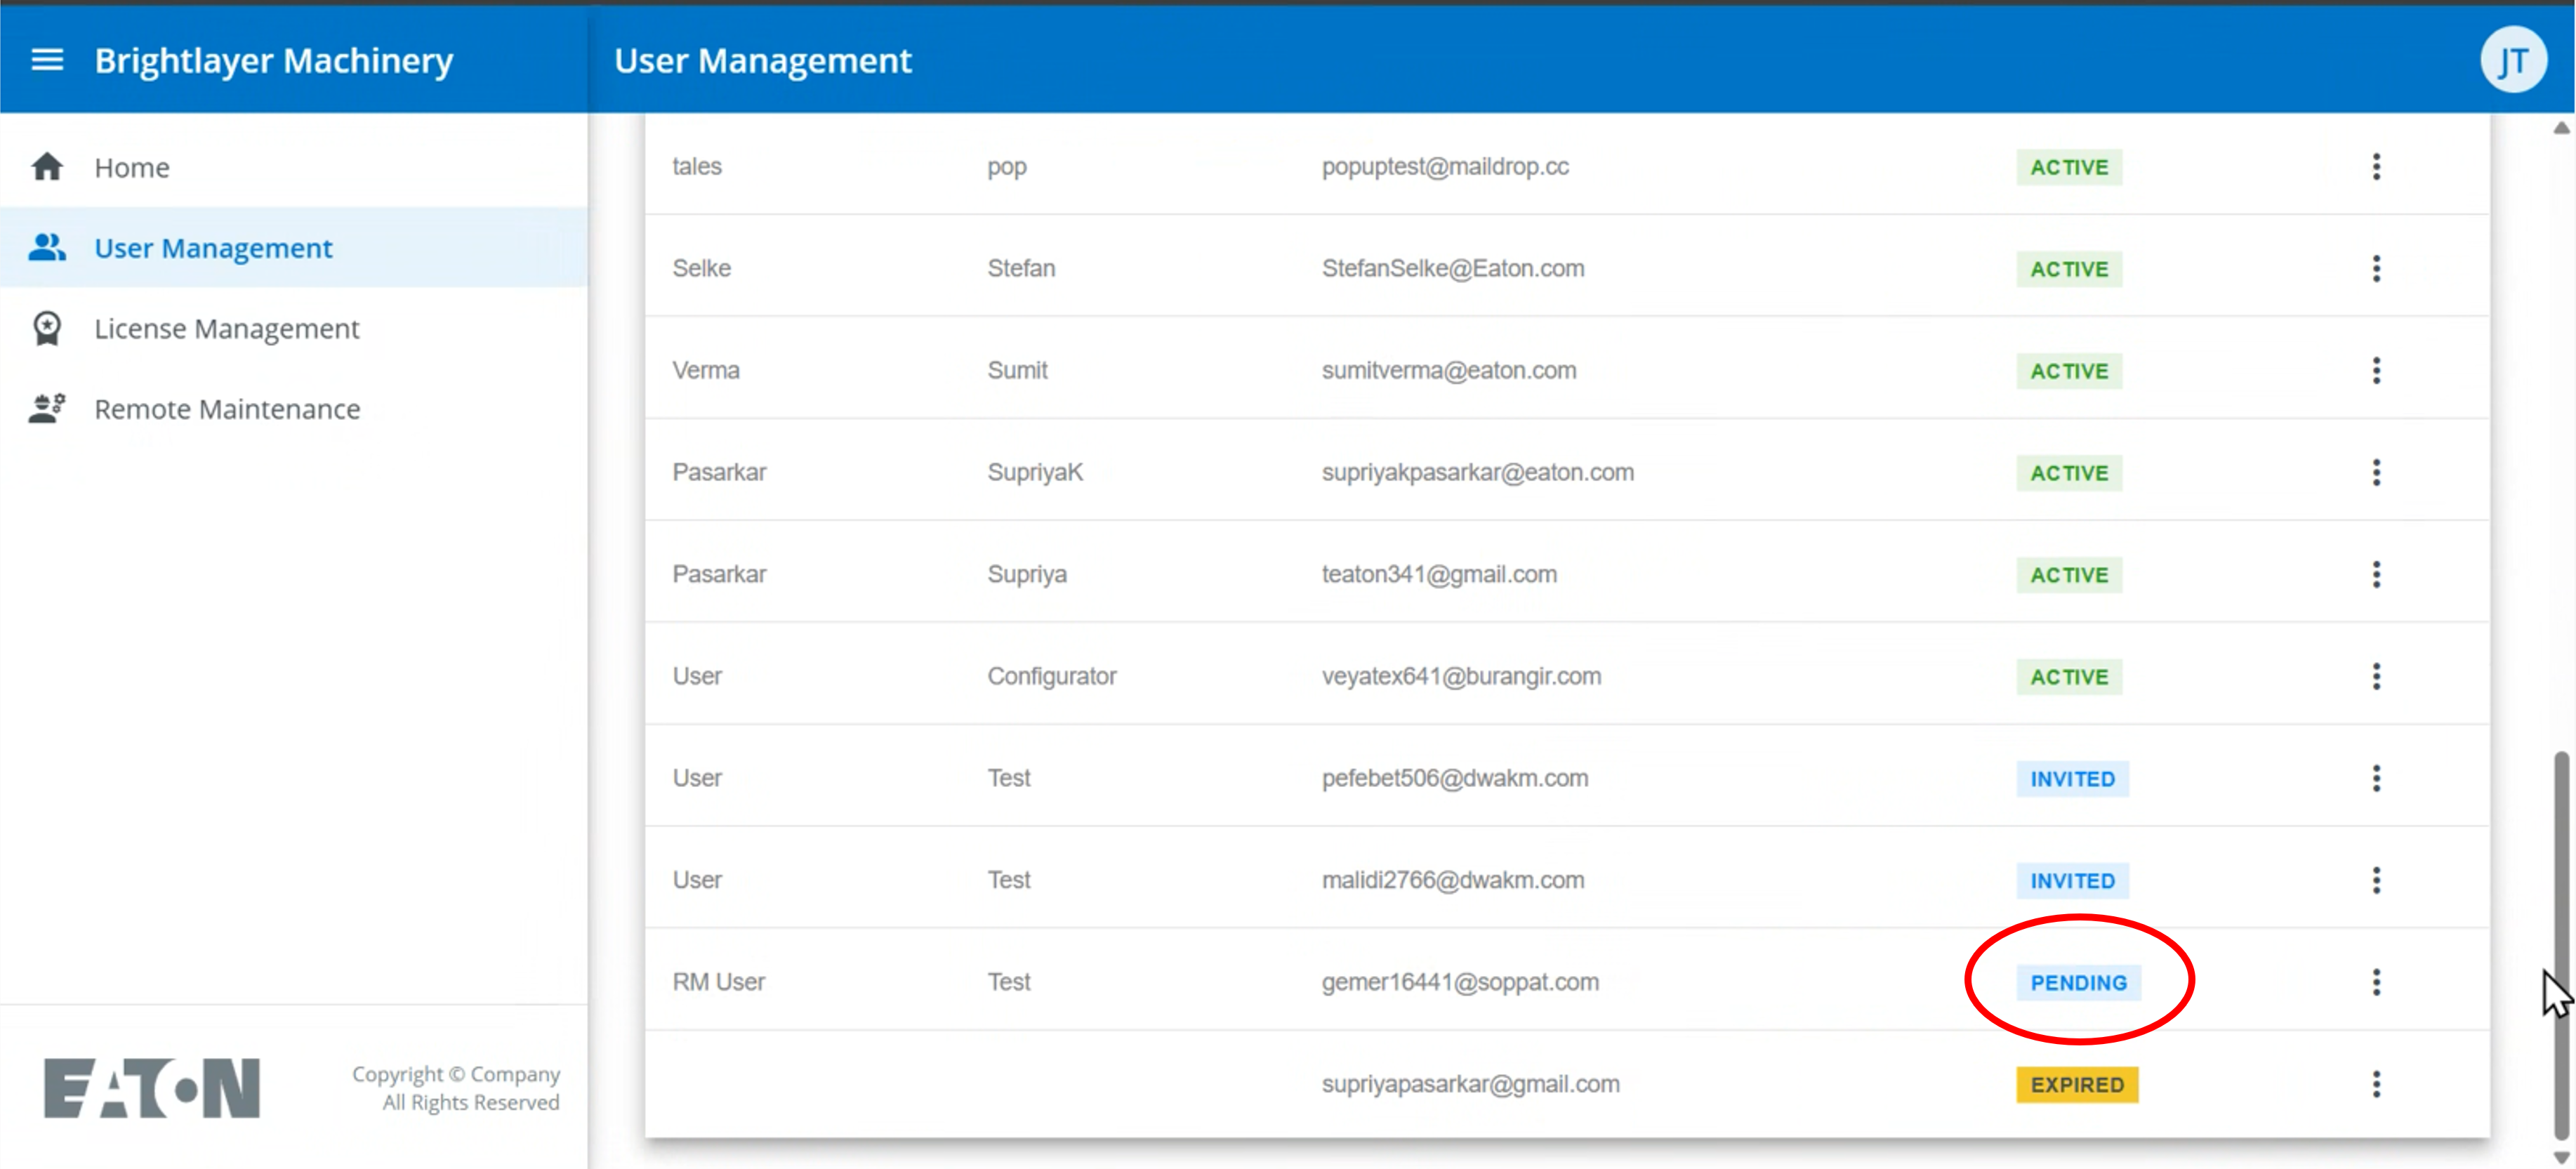
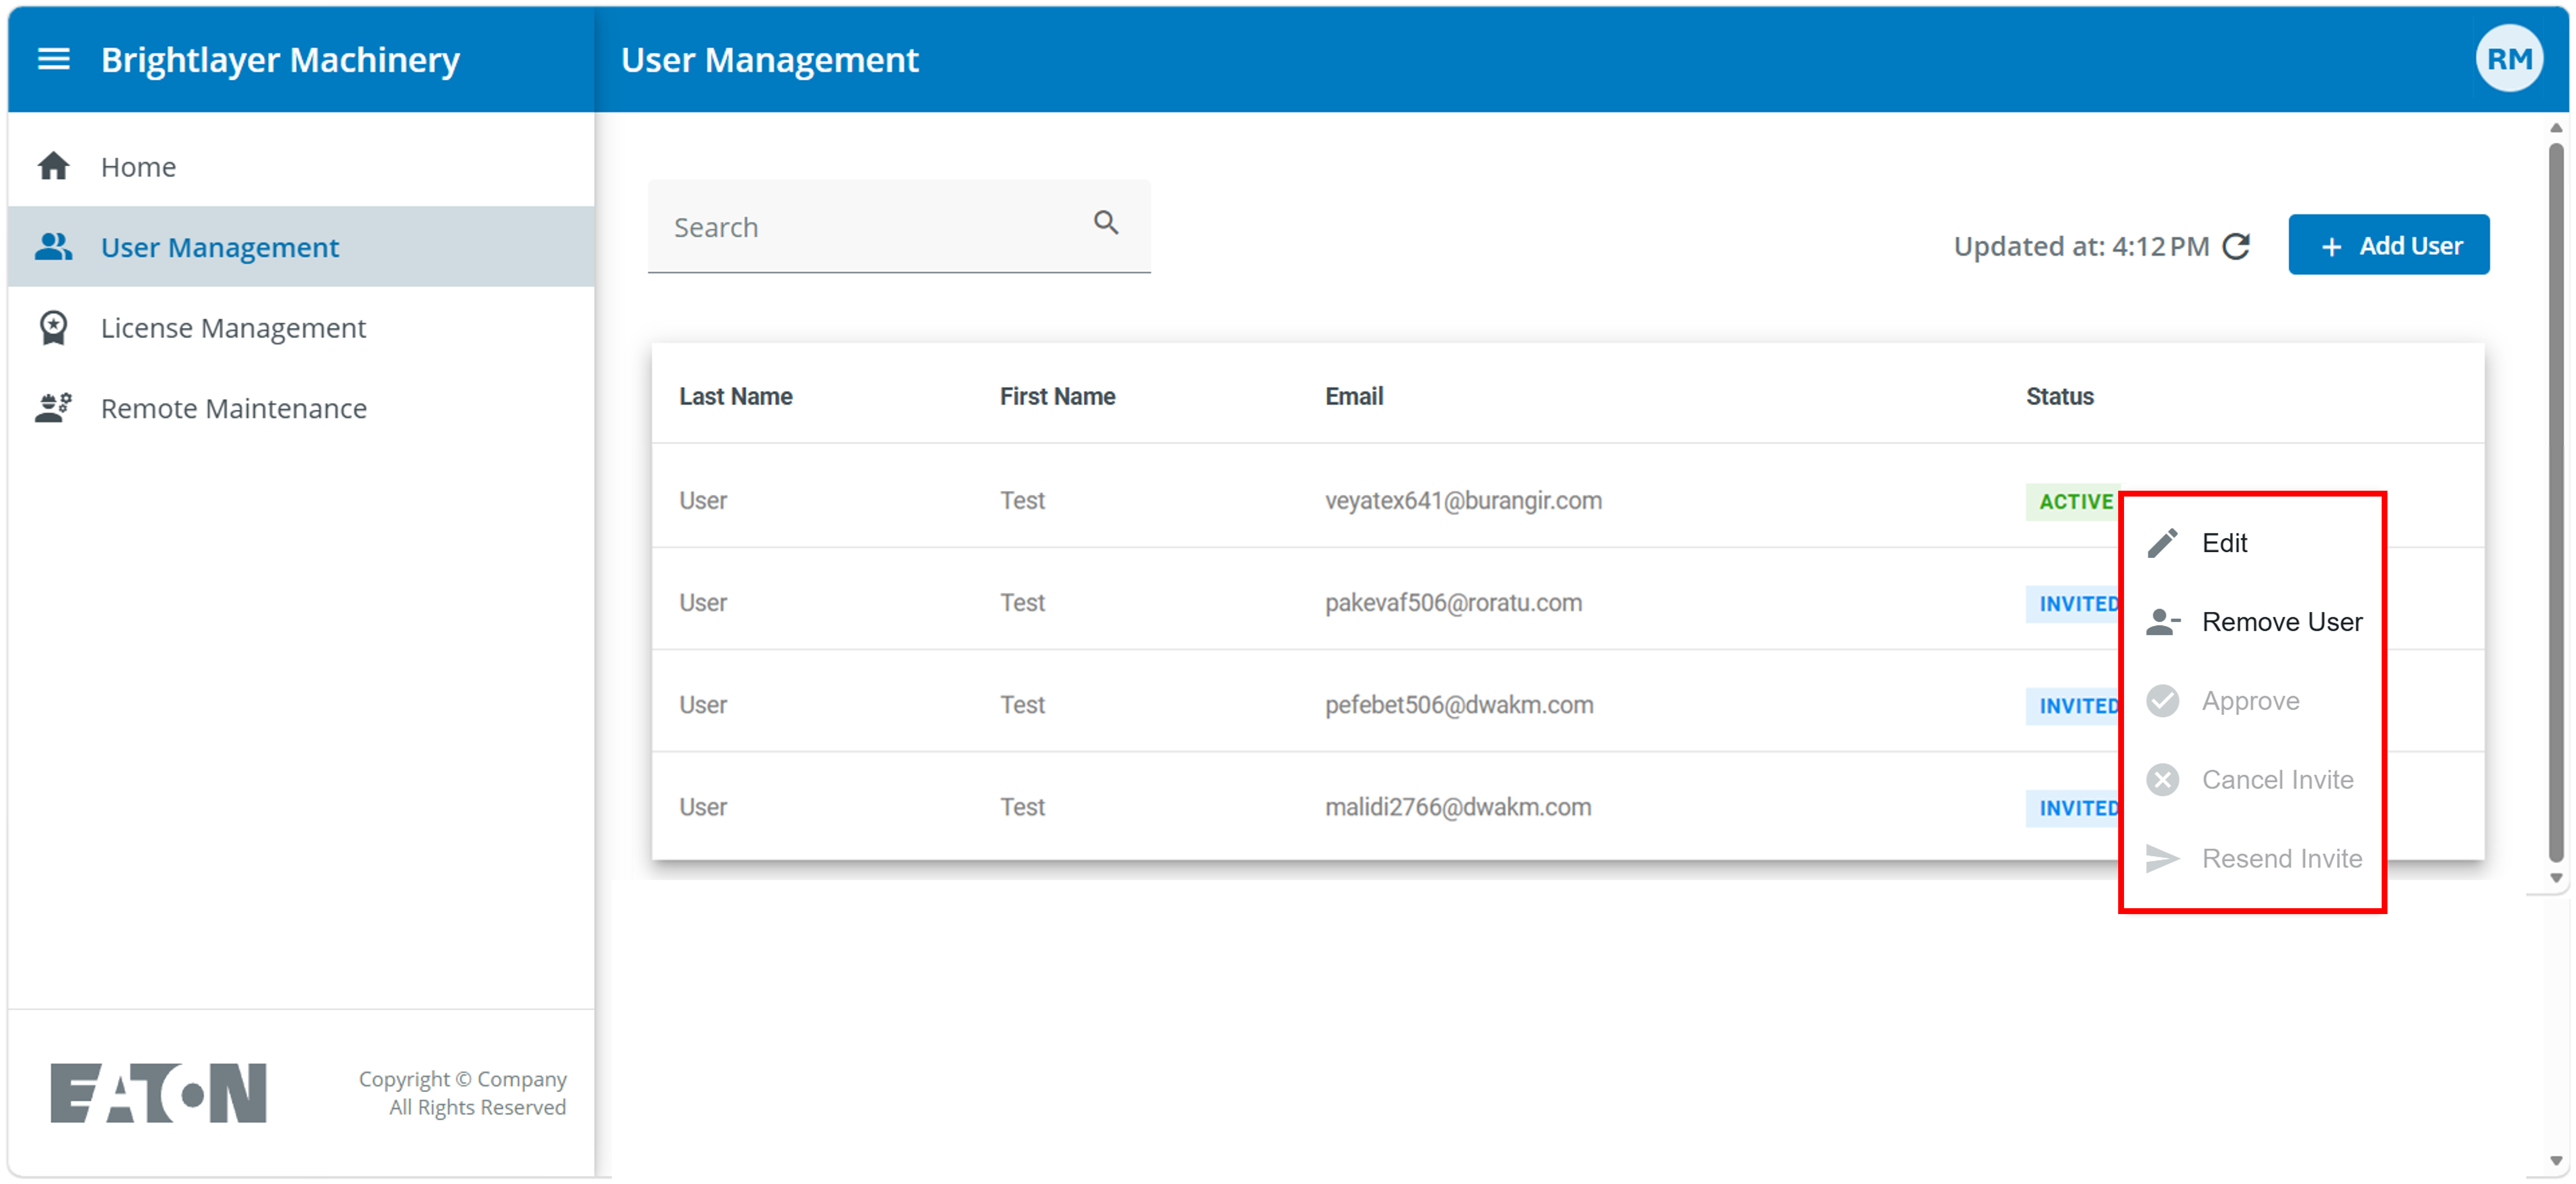
The user context menu (3 dots)
Editing a User Opens the User menu and allows to modify the user data and roles.
Remove User Completely removes the user from the organization. The user account would not be deleted by this activity. The user would still be able to access the Brightlayer portal within his single-user-organization. In this status the user can delete his account himself.
Approve request to join organization when a user wants to join from another organization, he has to follow a special workflow and send a request. The Organization Admin has to approve this request.
Cancel Invite Alternatively the Organization Admin could cancel the invite. This cancellation would also work for new users that have been invited by e-mail.
Resend Invite when an invitation to a new user has expired, it can be resend by using this option.
Editing a User
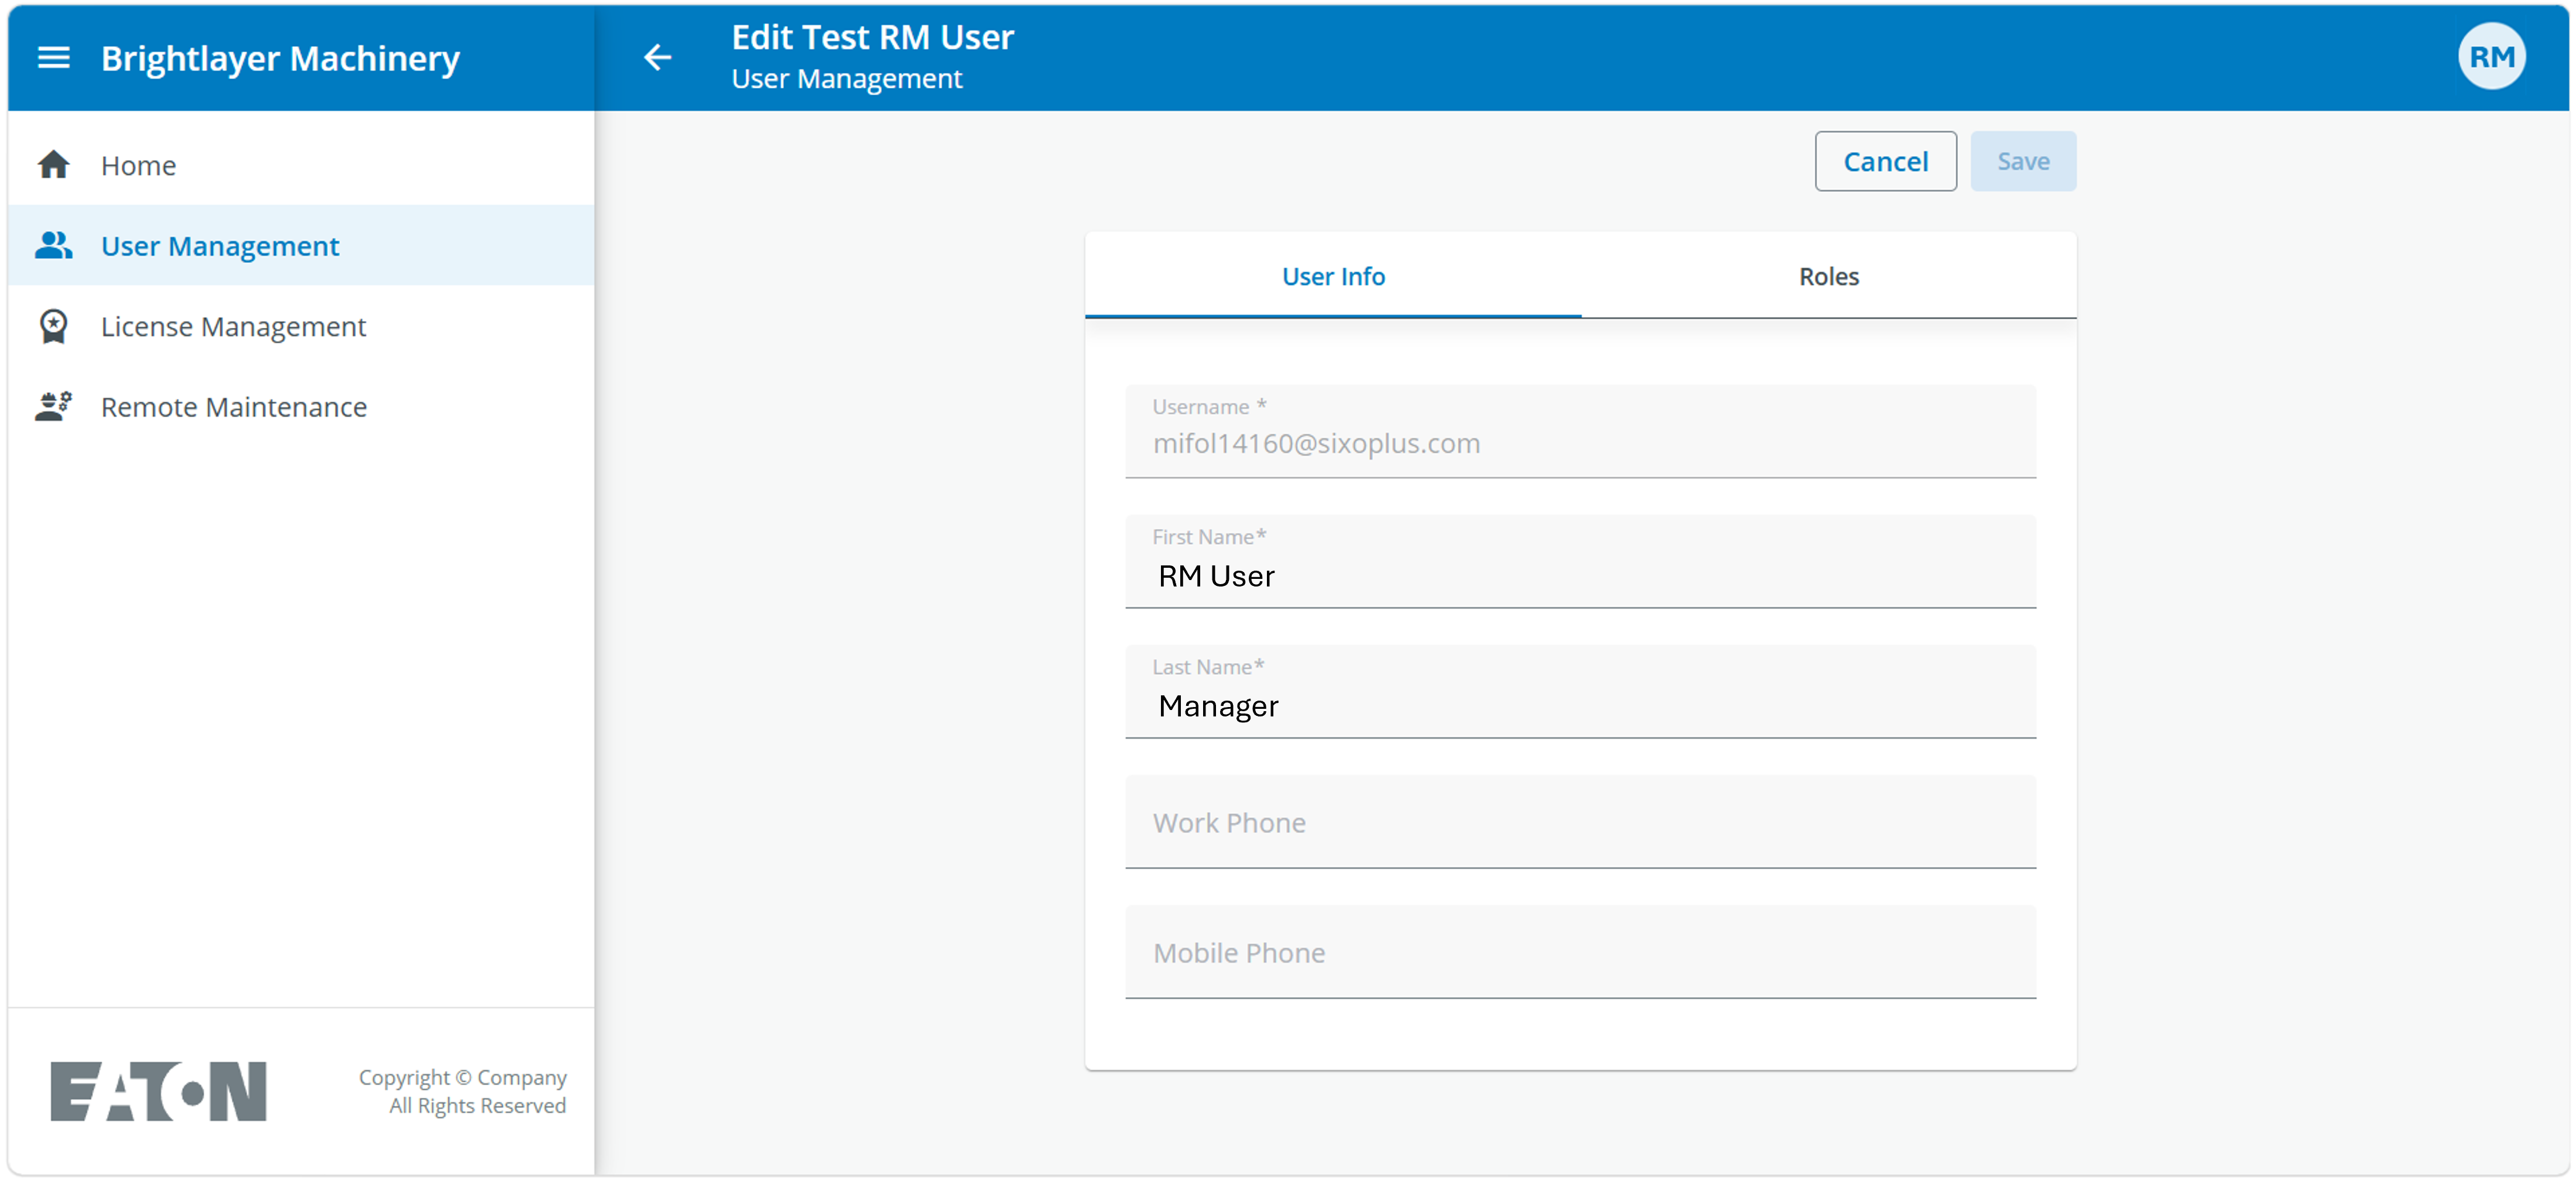
The screen to edit the user data consists of 2 tabs:
User Info The user info can only be edited by the user himself. The e-mail of the user can not be modified. If the e-mail of a user changes, the user needs to be removed from the Organization and be re-invited with the new e-mail address. The user can edit the following fields:
First Name
Last Name
Work Phone
Mobile Phone
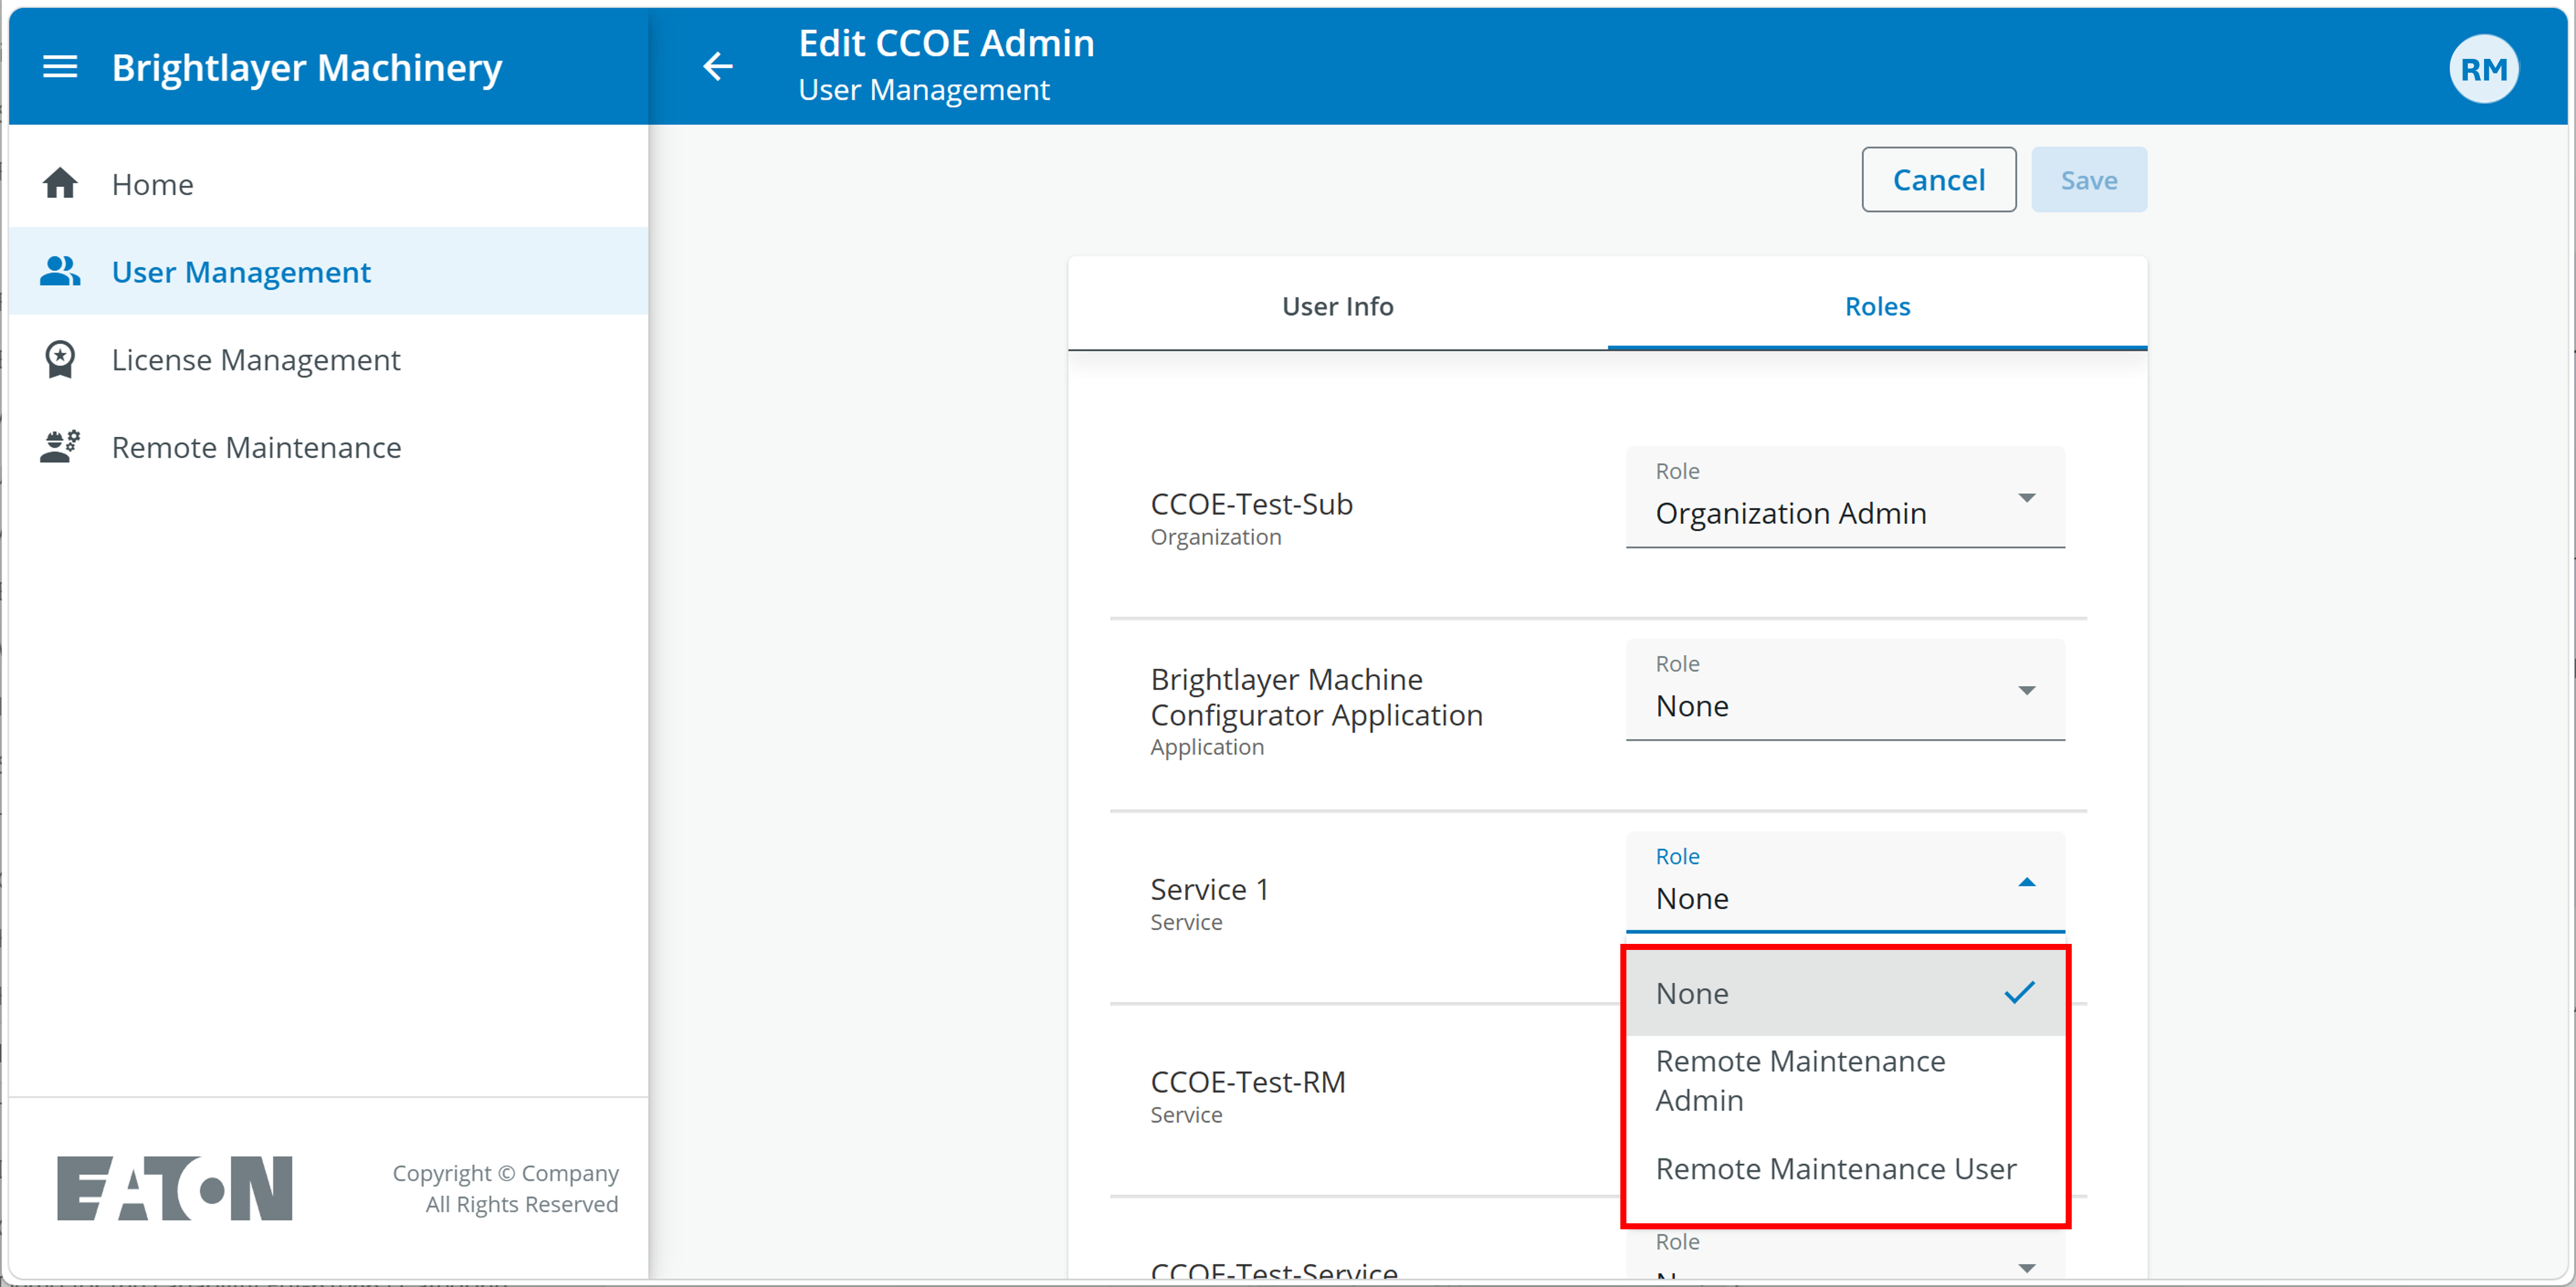
User Roles User roles are grouped per application. Users can have roles in each application. Roles are assigned during the invitation process of a new user but can be edited at any time. The following roles are available:
Organization: Within an organization 3 roles are possible:
Organization Admin. This role has the highest capabilities within an organization. Therefore it is recommended that only a few admins are assigned within an organization. This capabilities are:
Full access to User management: Invite, Add, Remove and Edit users.
Full access to Organization management: Subscribe and Edit Services.
Full access to License management: Purchase licenses, Assign licenses to Services.
Subscription Manager: The main purpose of this role is to purchase licenses that are added to be used in this organization. This may be required in bigger organizations with separate purchase departments. All licenses purchased by the Subscription Manager are automatically added to the license pool of this Organization. It is not necessary that the user with this role would open Brightlayer Portal. He just needs to register once on the portal. Subscription Manager has not other access rights.
None: For users that are neither Organization Admin nor Subscription Manager, this role needs to be selected.
Brightlayer Machine Configurator Application. For this application 3 roles are available:
Configurator Admin: This role is not used within the Remote Maintenance Version of this software.
Configurator User: This is the basic role for every user that does not have an Organization role (like Organization Admin or Subscription Manager).
Important: If the user does not have an Organization role, this role needs to be chosen to be able to save the role assignment for this user.
None: This role should be chosen for users with an Organization role
Service Roles Service Roles are individual per service. Each type of service has different roles. For the Remote Maintenance service the following roles are available:
None: When this role is selected the User does not have access to the respective Remote Maintenance service.
Remote Maintenance Admin: as a Remote Maintenance Admin the user has the following rights;
See all GW-devices and create new GW-devices.
Download the configuration file for a GW-device.
See all User devices
Create and delete connections for his own or for other User devices.
See and download log-files.
Remote Maintenance user: as Remote Maintenance User the user has the following rights:
Create a User device for himself
See all GW-devices
Add and delete a connection to a GW-device for his own User device
License Management
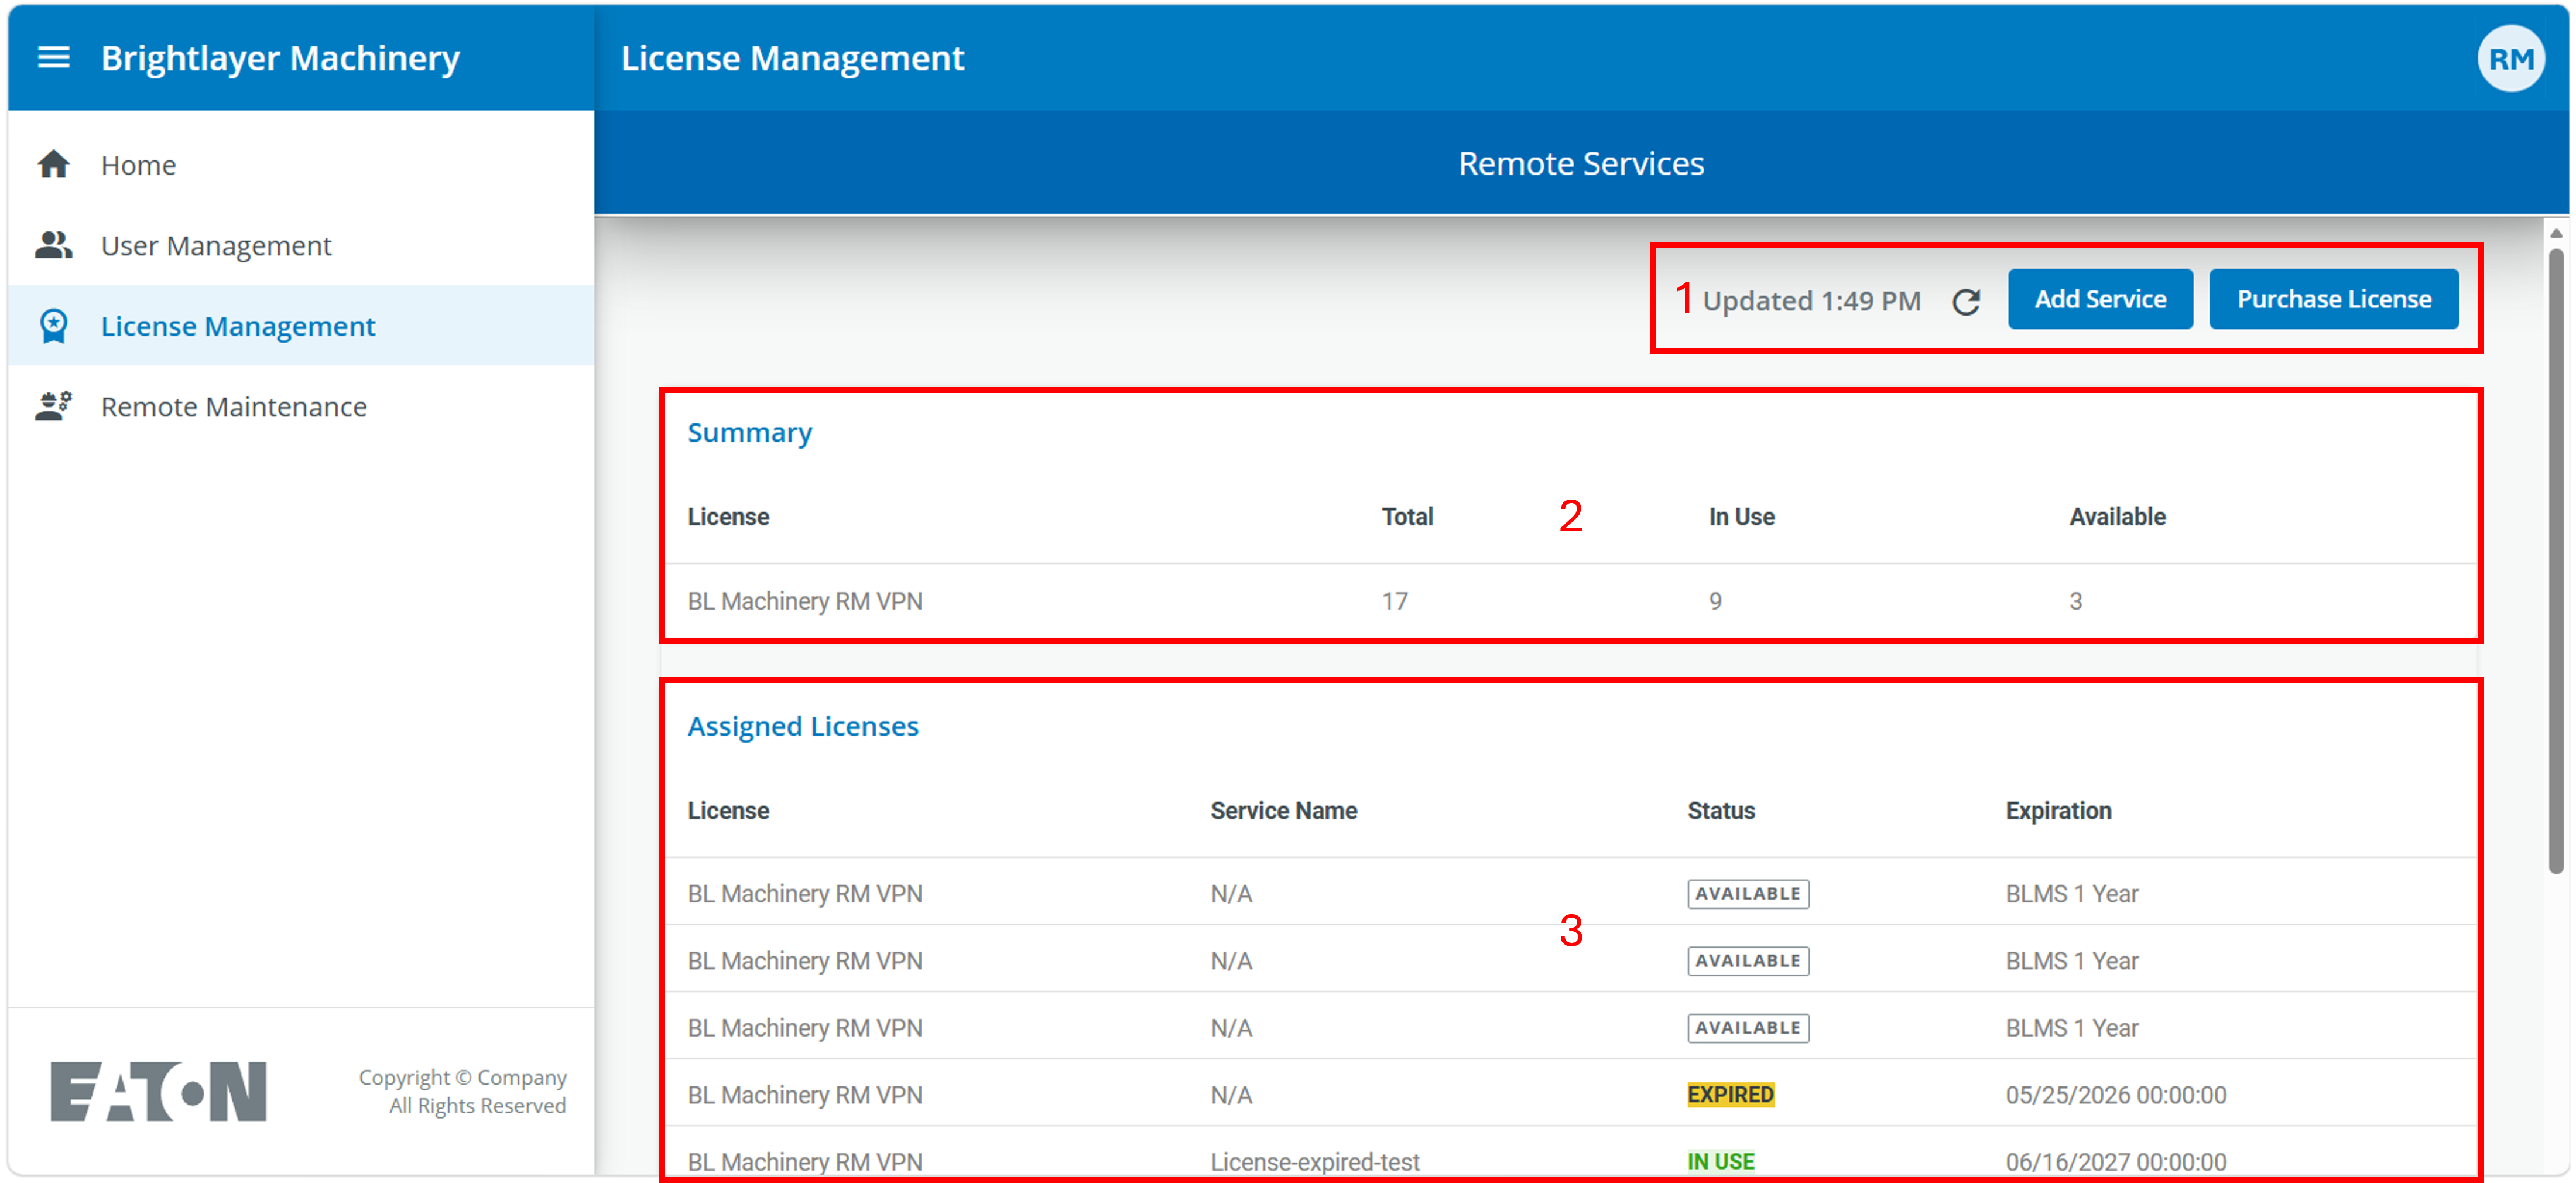
License Management main screen consists of the following sections:
1. Update / Add Service / Purchase License section supports the following features:
Update: Clicking this element would pull the license information from the backend license management system.
Important: Please consider that this update can take up to 1 minute!
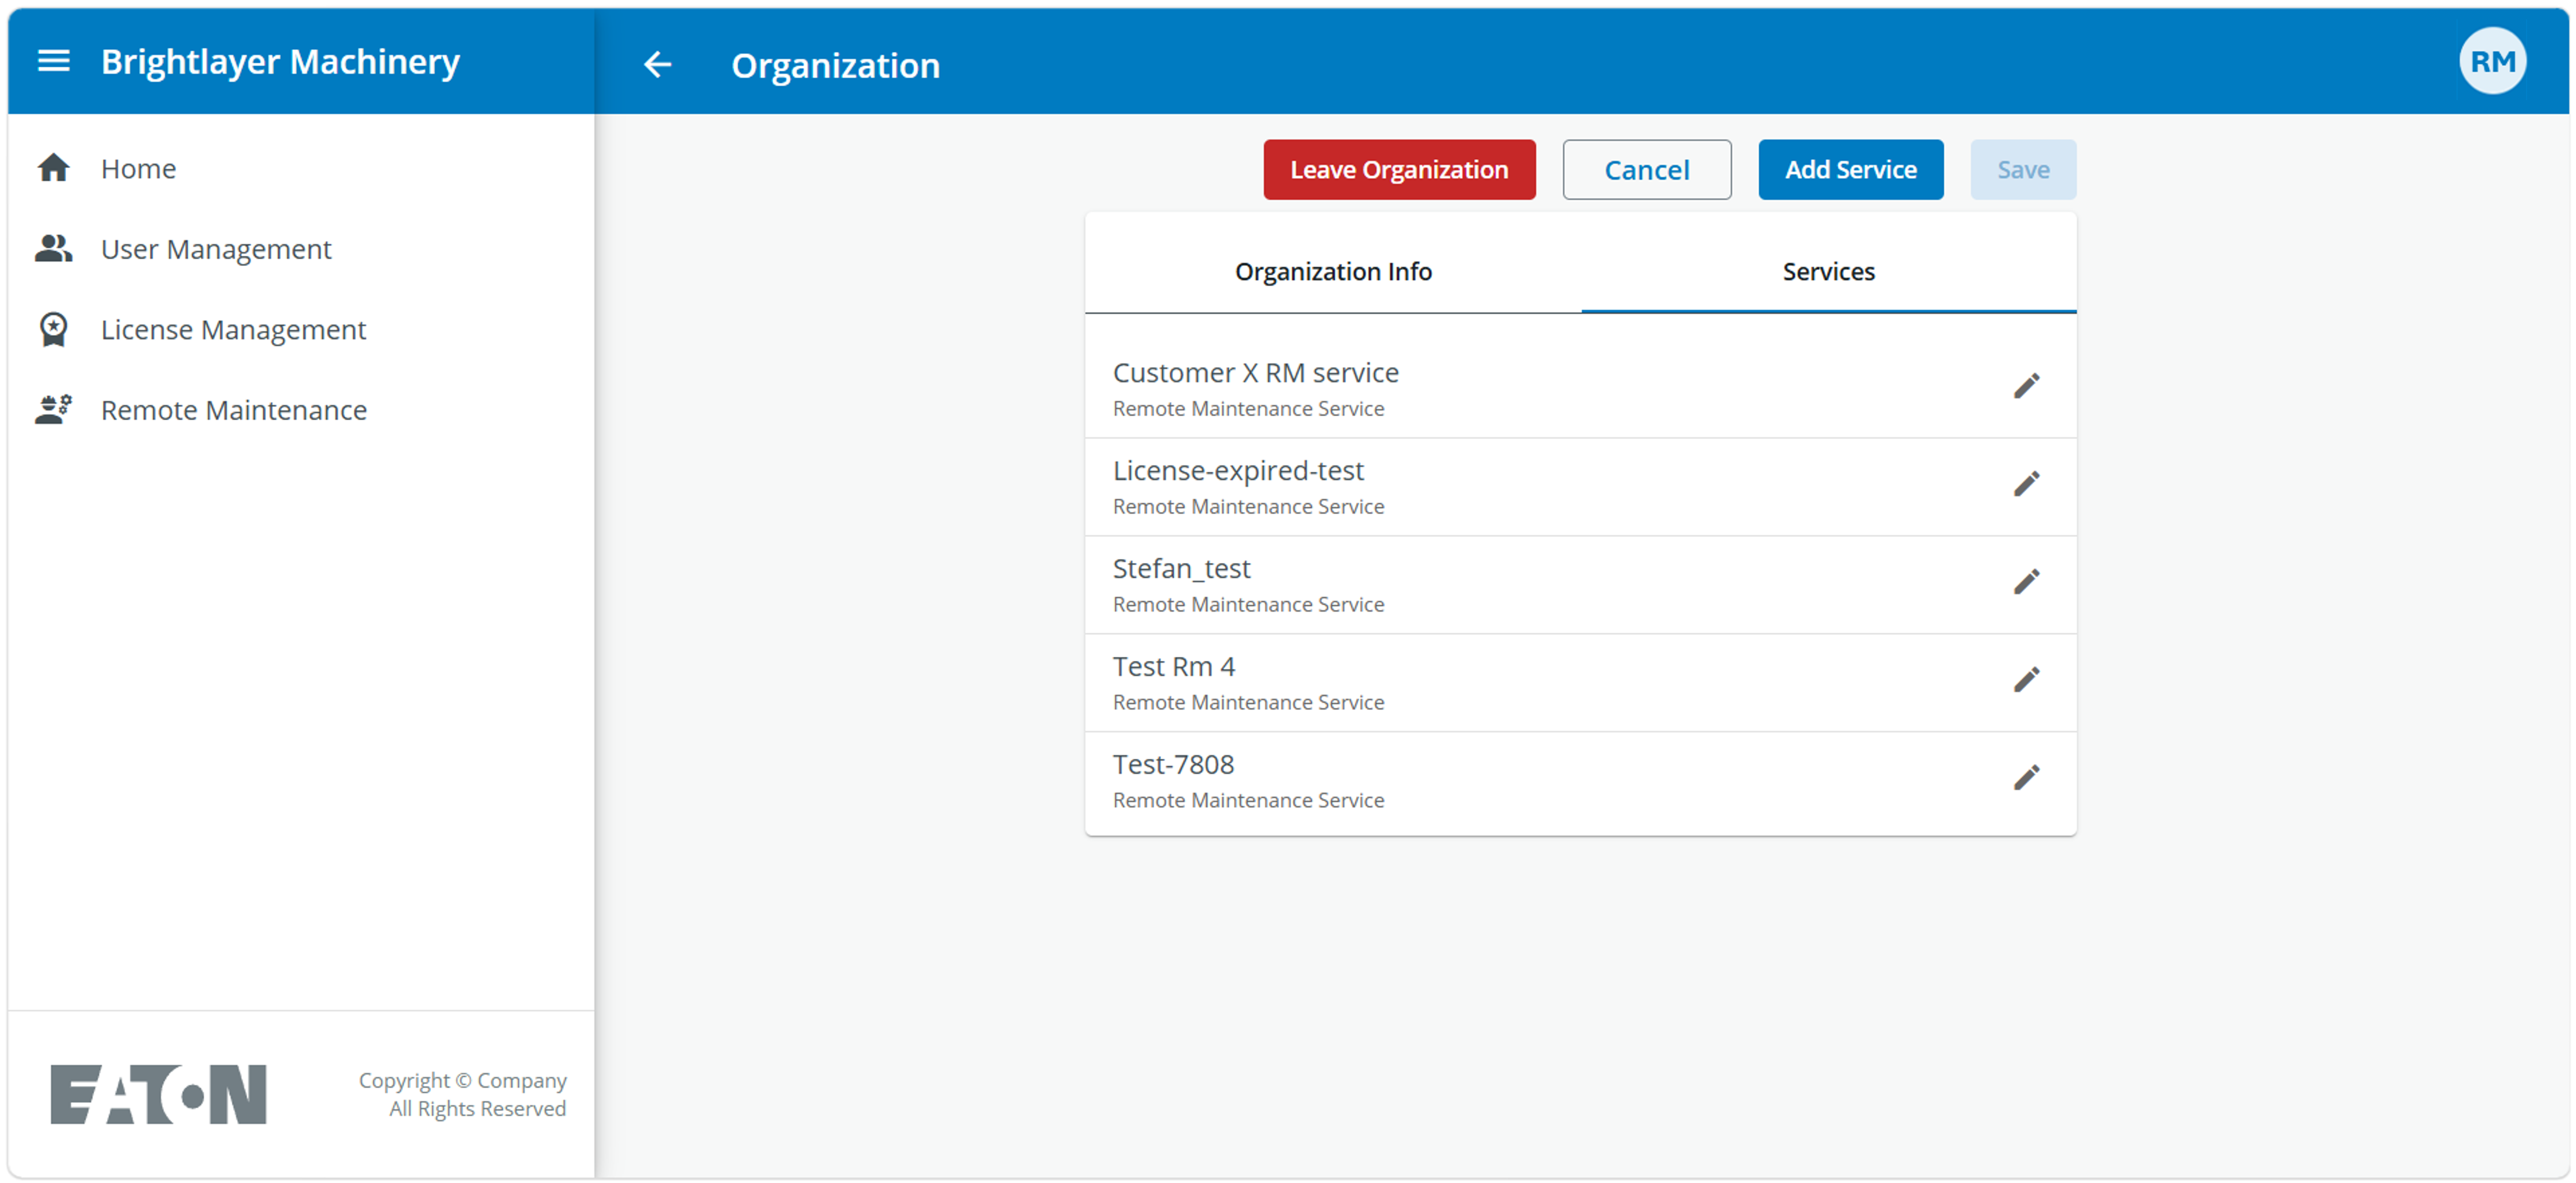
Add Service: Clicking this button would open the Organization management screen. Services can only be added by user with the role of Organization Admin.
Purchase License section: Clicking this button would open Eaton Order Center (EMEA). License orders can be placed on this system. A valid account for Eaton Order Center is required to place orders in the system. Users do not yet have access to Eaton Order Center are requested to contact their responsible sales organization to place orders for licenses via these channels.
2. The License Summary table provides an overview about all licenses that are available to the Organization.
Available: This is a status of a license. When licenses are “Available” they can be assigned to a service. “Available” column shows how many licenses Organization Admin can assign to a service.
In Use: This is the second status a license could have. When a license is “In Use” it is assigned to a service and can be used to execute activities within the service.
Total: This column shows the total number of licenses available to the Organization. Usually it would show the sum of licenses that are “Available” or “In Use”. There is an exception, though. If licenses have expired, they would be added to the total number of licenses as well. Expired licenses can be removed from an Eaton Admin.
3. The Assigned Licenses table Lorent Ipsum.
Subscribing to a Remote Maintenance service
Organization menu
Lorent Ipsum
Organization Info tab
Lorent Ipsum
Organization Services tab
Lorent Ipsum
Managing gateway devices
Adding GW devices to RM services
For this activitiy the User needs to have a RM-Service-Admin role. After selecting “Remote Maintenance” in the main drawer the User needs to choose the RM-service, in which he wants to add the gatway, in the drop down menu at the top left corner of the screen. Afterwards the “GW-device” tab needs to be selected and the User needs to click on “Add Gateway Device”.
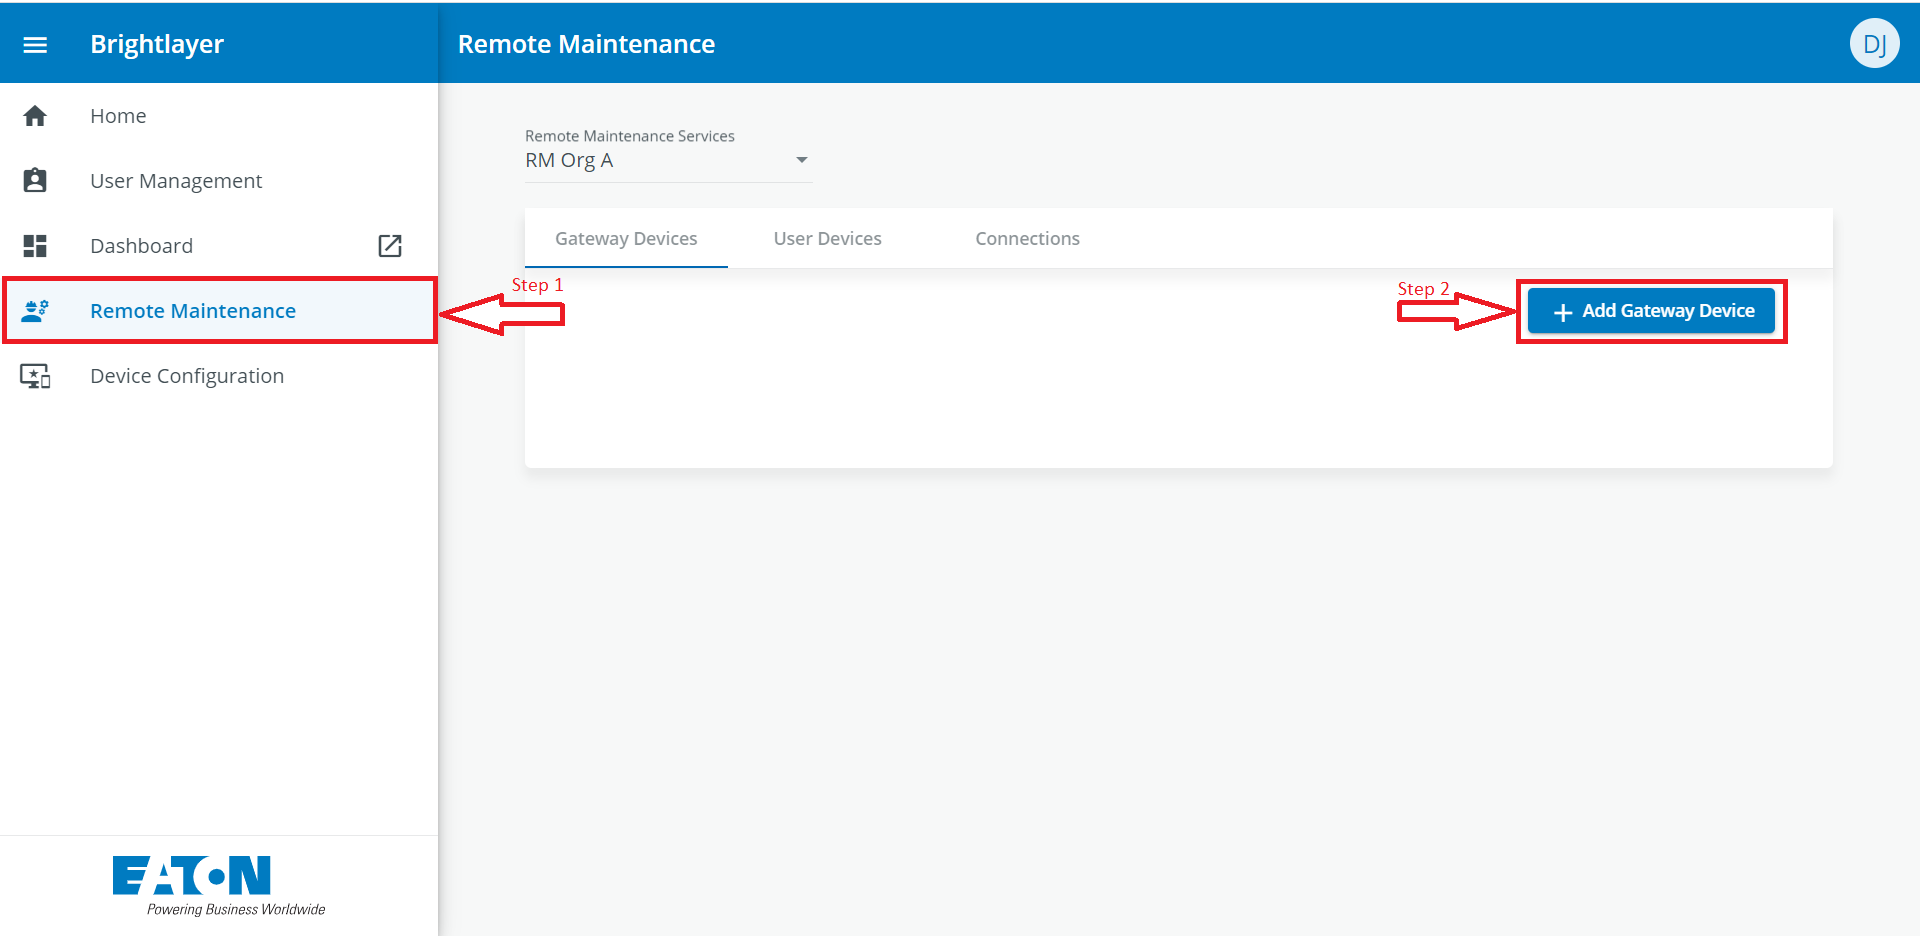
There are two (2) different options of adding a GW device to a remote maintenance service:
Use an existing device from the Brightlayer Machinery Remote Monitoring service that allows remote activation
Using this feature to add a new device to a Remote Maintenance service would allow to fully delete a connection between the VPN-Server and the GW-device. The GW-device would only be connected to the VPN-Server when necessary. The Remote Monitoring service would be used to send an activation message to the GW-device so that it would connect to the VPN-Server. After this connection is established, a full end-to-end tunnel could be set up between a User-device and the GW-device.
Important: This feature is only available under the following conditions:
The user has an active subscription for a Brightlayer Remote Maintenance service and has created a device he wants to connect to
The GW-device needs to be an Advantech ICR router. Currently only those routers are released for this feature.
If one of these conditions is not fulfilled please create a new device.
To connect the RM device with a device from the Remote Monitoring service you need to copy the UUID of the device (Device ID) in the Remote Monitoring service and click the radio button to “Use existing device from Brightlayer Machinery that allows remote activation”. The copied Device ID needs to be entered into the text field. Afterwards click “Validate”. The system will check, if the device (in Brightlayer Remote Monitoring) is existing and can be used for the remote activation. Once validated, the Name of the device will be automatically populated.
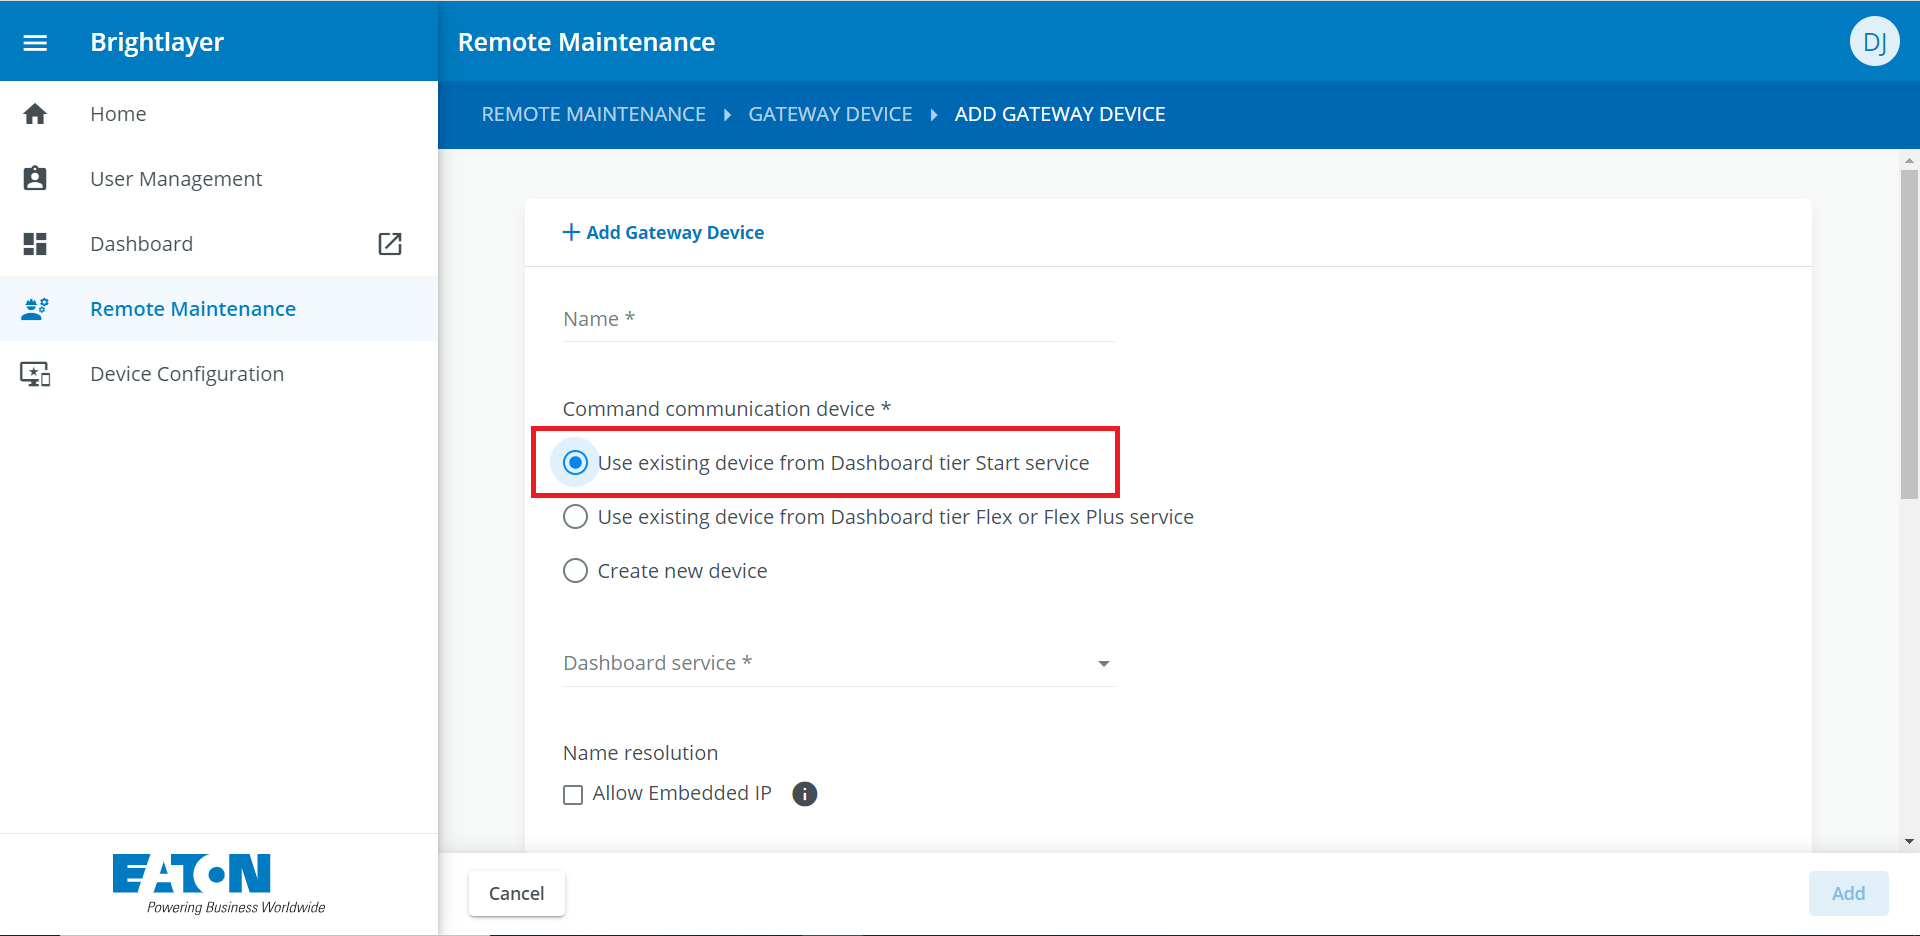
Once the device validation was completed successfully the settings for the Gateway device have to be completed.
Creating a new device
For new device just click the respective radio button. A text field will open and ask for providing a name for the new device. Names have to be unique for all GW-devices within an Organization, even if they are in different RM services.
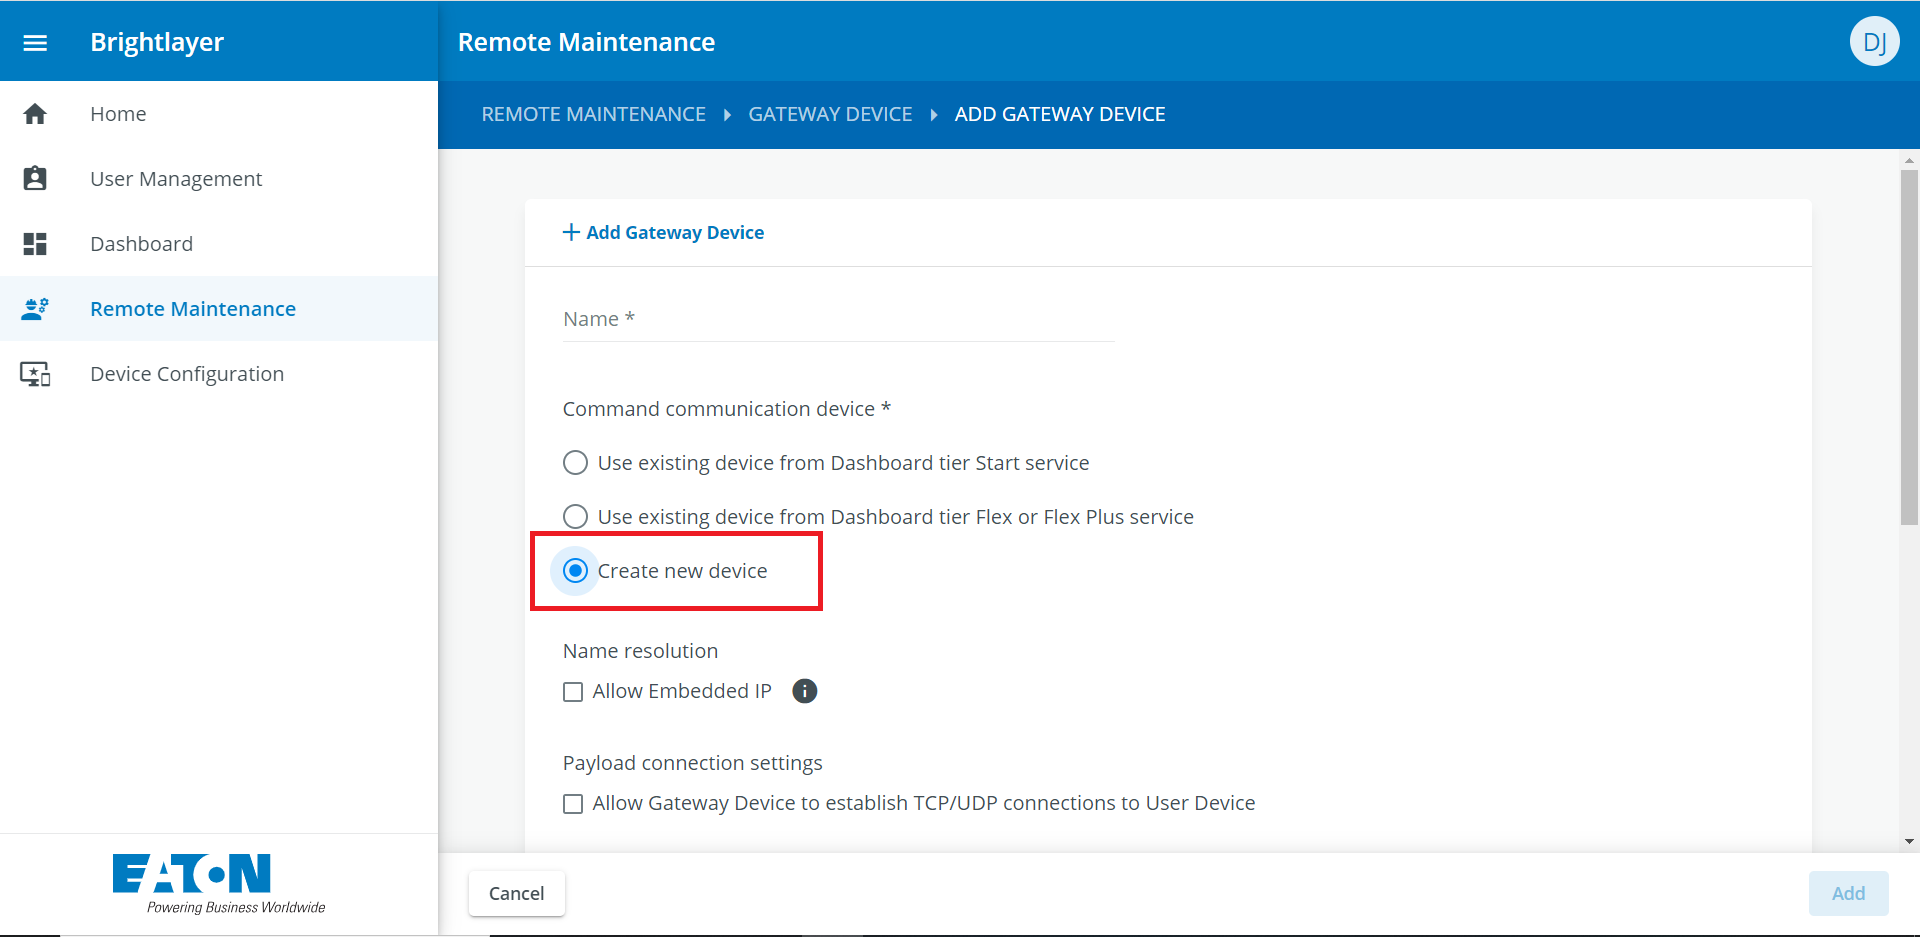
Special settings for Gateway devices
Tick box: Allow embedded IP:
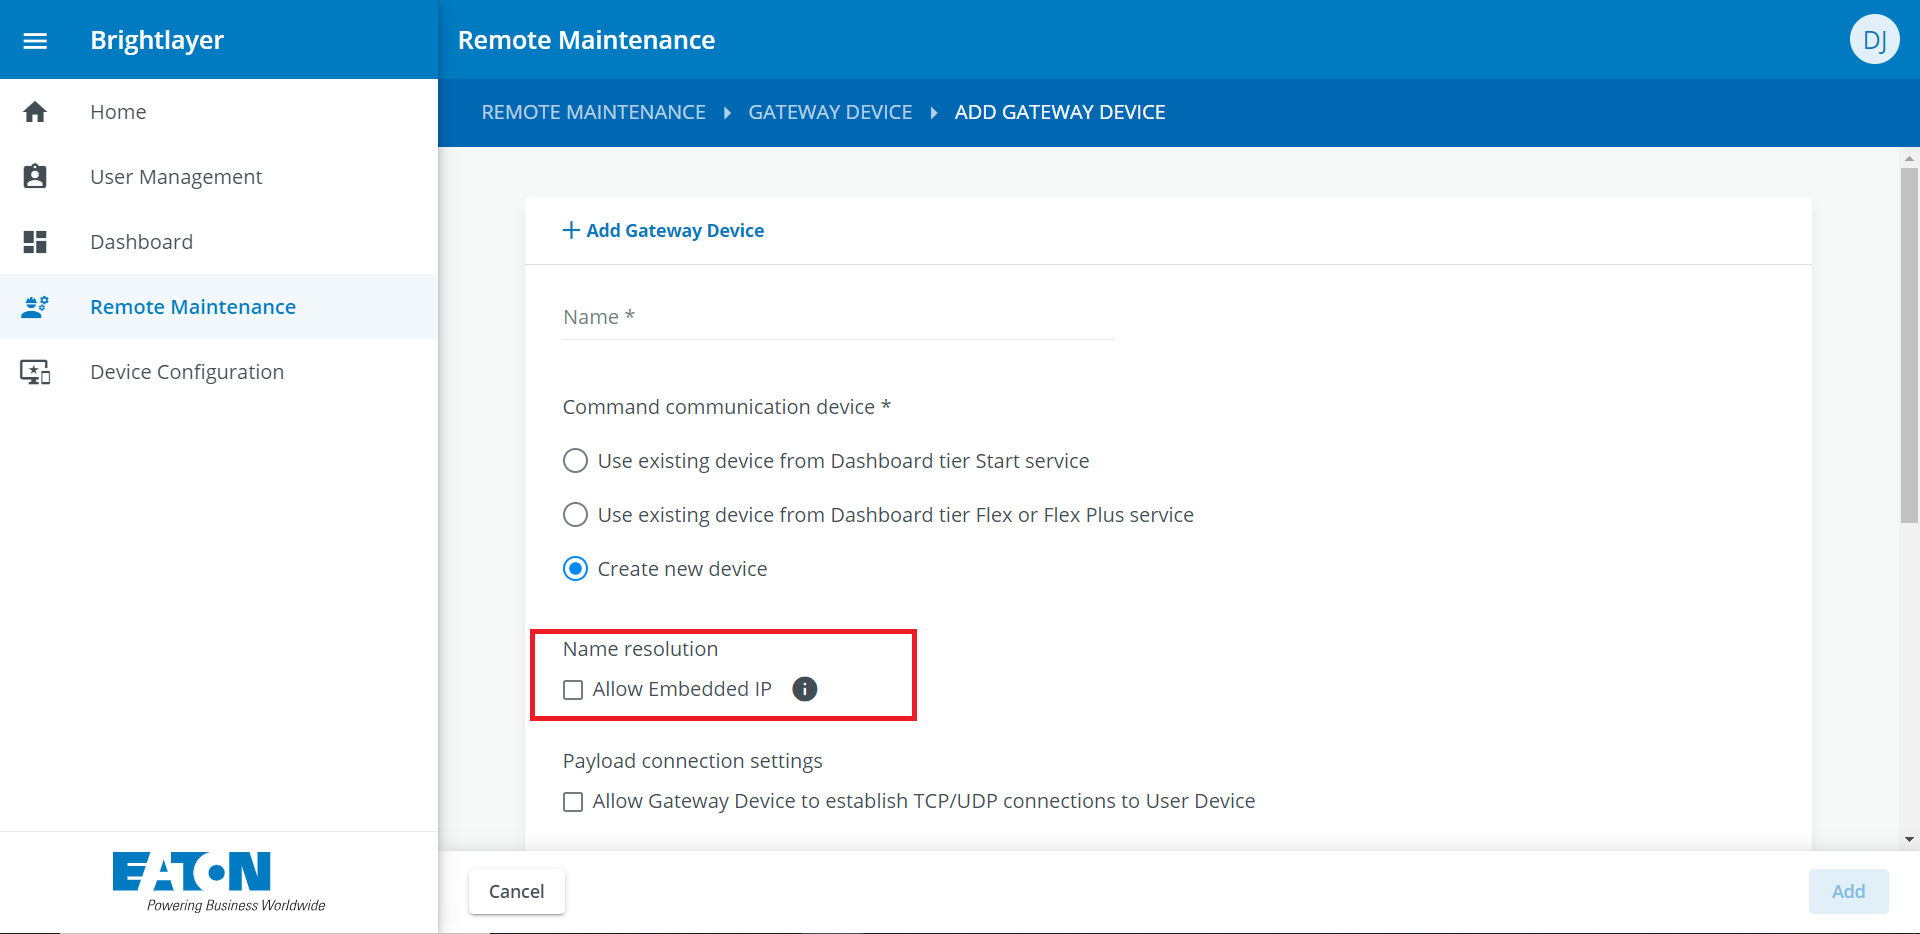
When Allow Embedded IP is active for a gateway then devices in the gateway’s local network can accessed from the User via the remote maintenance connection. To access such a device, the IP address of the device needs to be known. The URL that needs to be entered into the browser to access the device is the following:
IP Address of the device in the network (e.g. 192.168.20.2)
GW device name (e.g. mygateway)
Domain name: “rm.machinery-monitoring.com”
URL to access the device
Example: “192-168-20-2.mygateway.rm.machinery-monitoring.com”
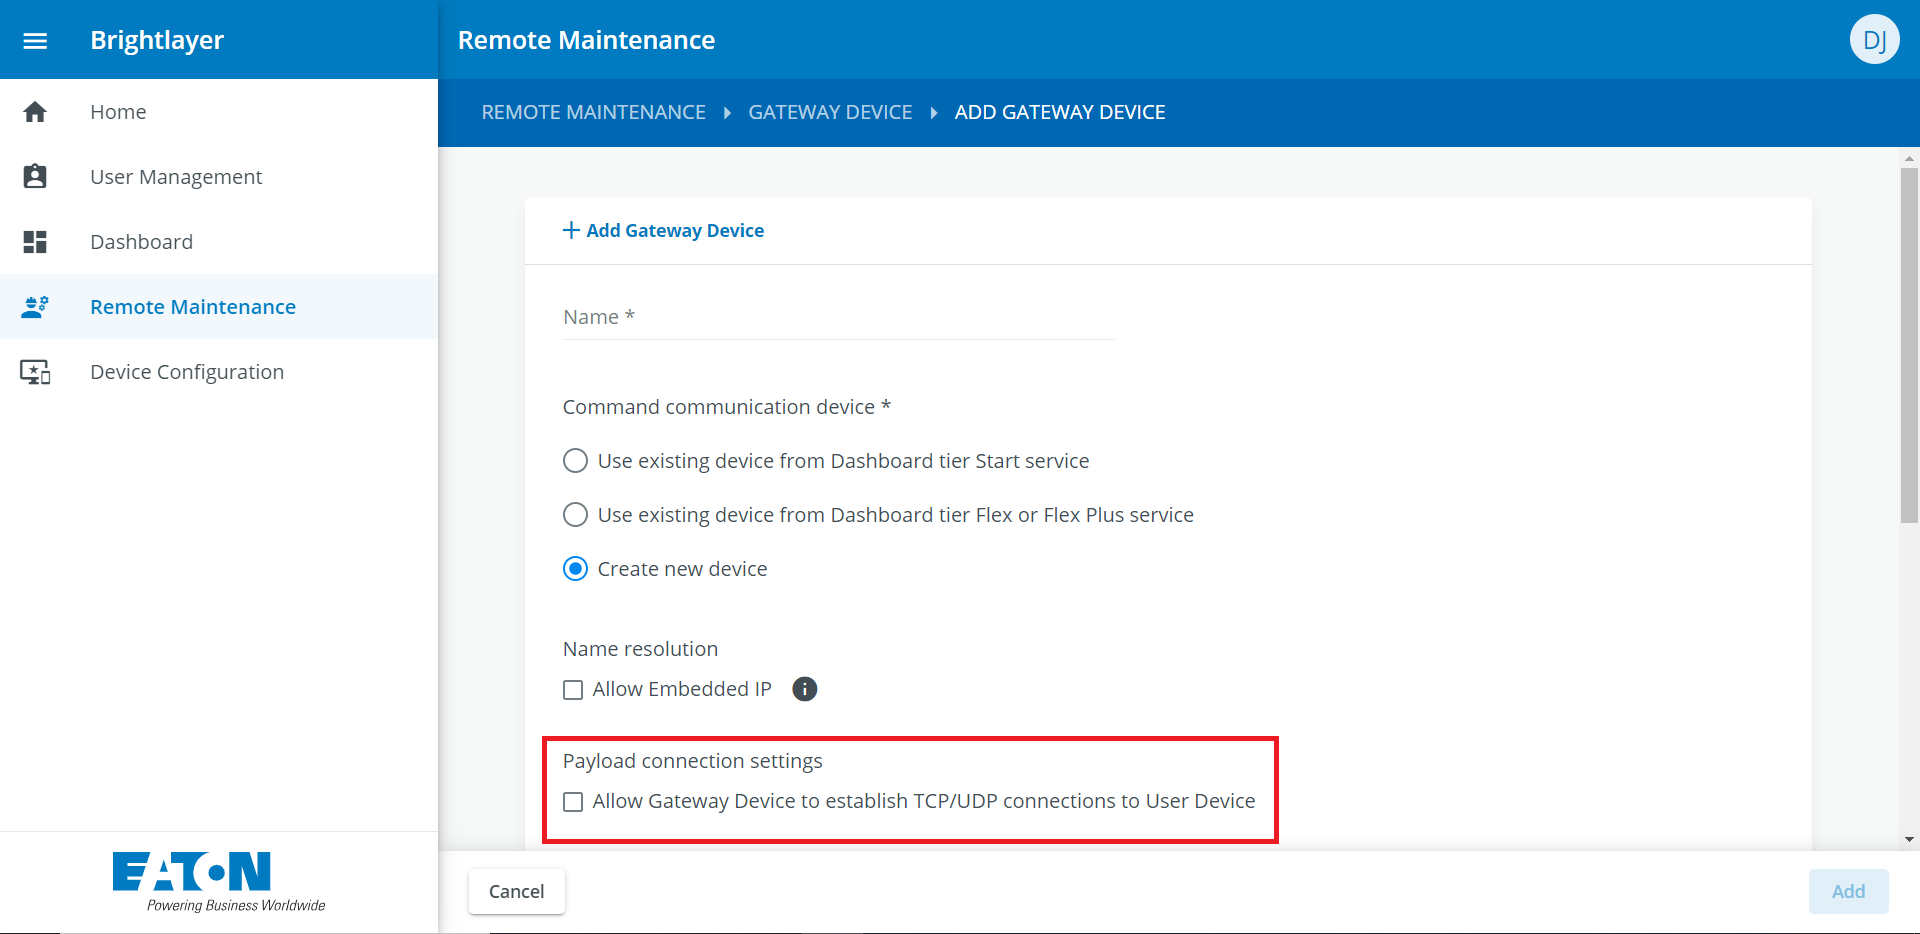
Tick box: Allow Gateway Device to establish TCP/UDP connection to User Device
The Allow Gateway Device to establish TCP/UDP connection to User Device option controls if a device in the Gateway’s local network can establish a payload connection to a User Device. Payload connection here means any TCP/UDP connection within the already established VPN tunnel. i.e. this option has no influence on the VPN tunnel direction and/or who can establish the tunnel.
If the Allow Gateway Device to establish TCP/UDP connection to User Device option is not activated then a connection can be established
from User Device to Gateway Device and Device in the Gateway Device’s local network
but not from a Device within the Gateway Device’s local network
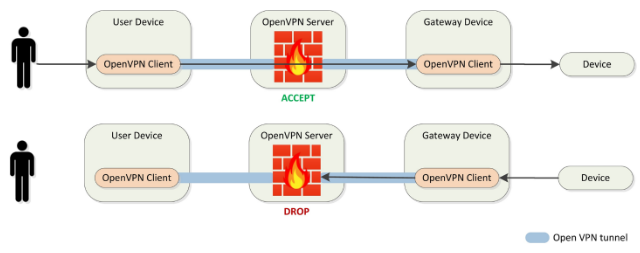
The firewall on the VPN server will recognize that a connection is initialized and will block it.
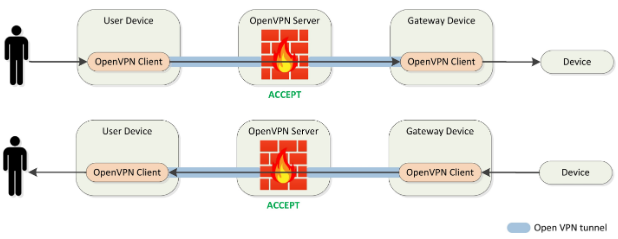
If the Allow Gateway Device to establish TCP/UDP connection to User Device option is activated then a connection can be established
from User Device to a Gateway Device
from Gateway Device and from Device within Gateway Device’s local network to User Device
Security Note
It should be noted that for security reasons the option Allow Gateway Device to establish TCP/UDP connection to User Device should only be added when really required for the communications intended.
FTP Connection
Active FTP communication require the Allow Gateway Device to establish TCP/UDP connection to User Device to be set for a successfull communication. Passive FTP communication will not work regardless of whether this option is used, due to the way how Passive FTP protocol establishes the data connection.
Gateway service restriction
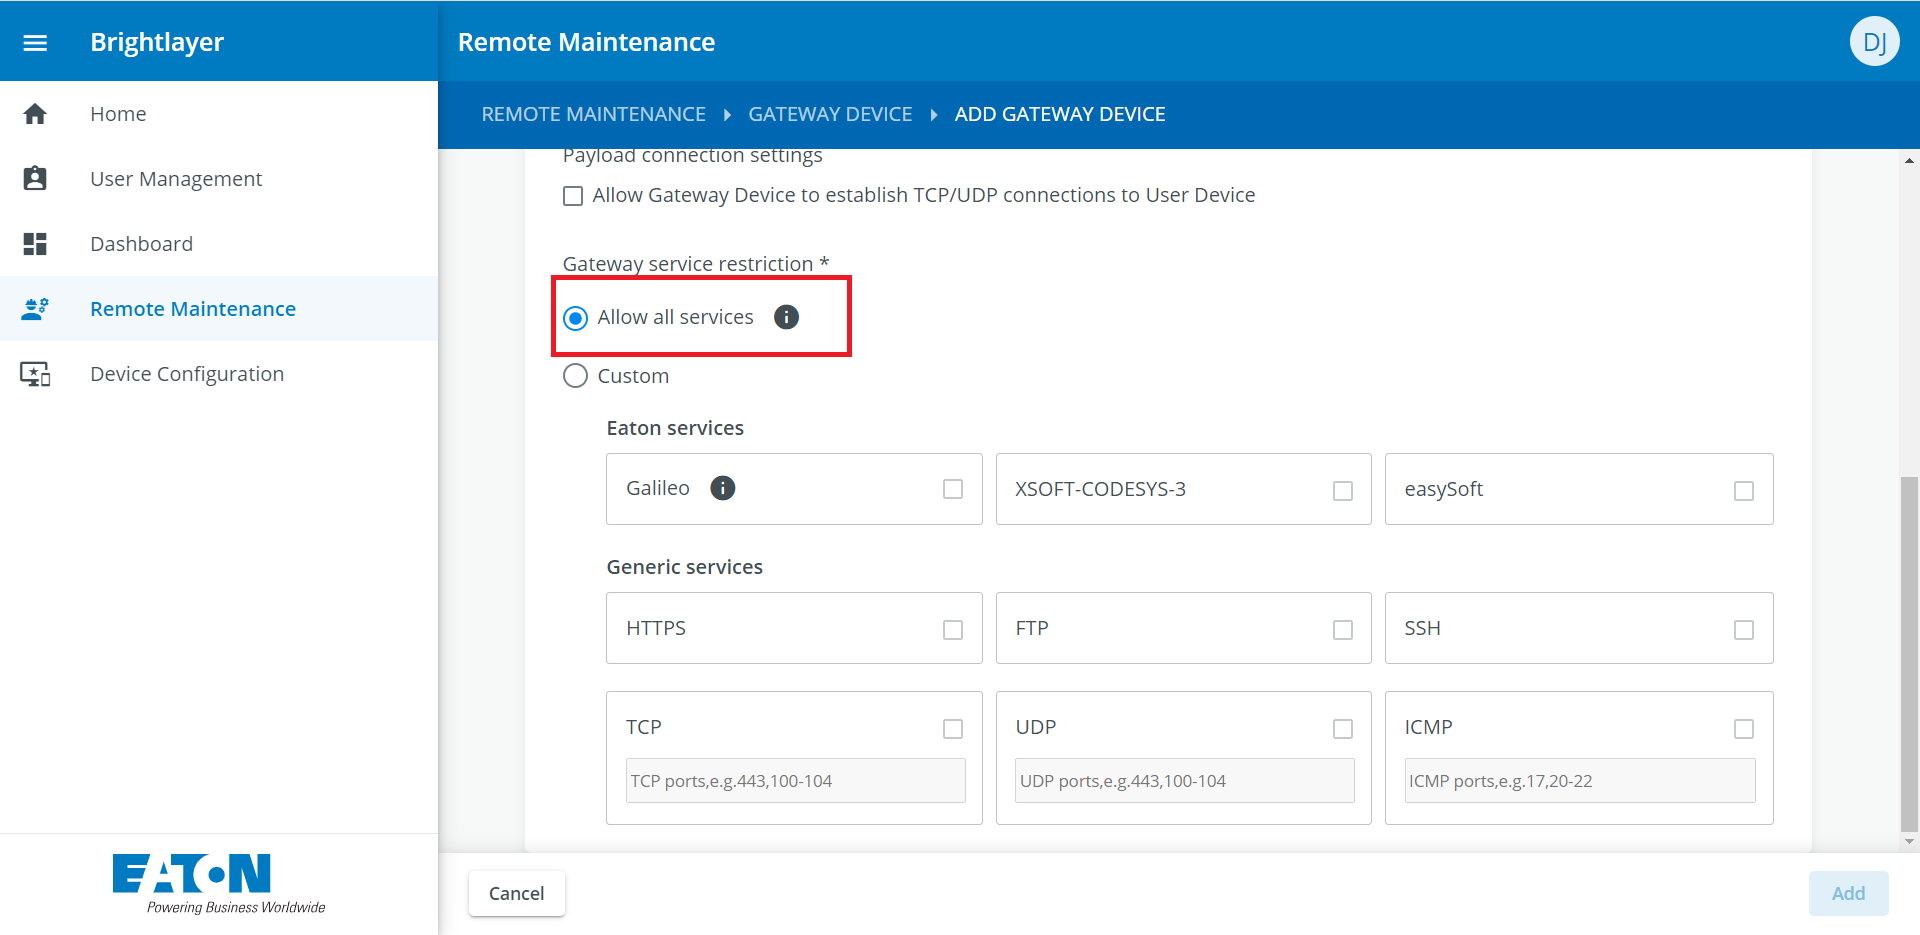
For all new Gateway device that are added it is possible to restrict the access to certain Eaton tools that may be installed within the application.
The option Allow all services is selected per default
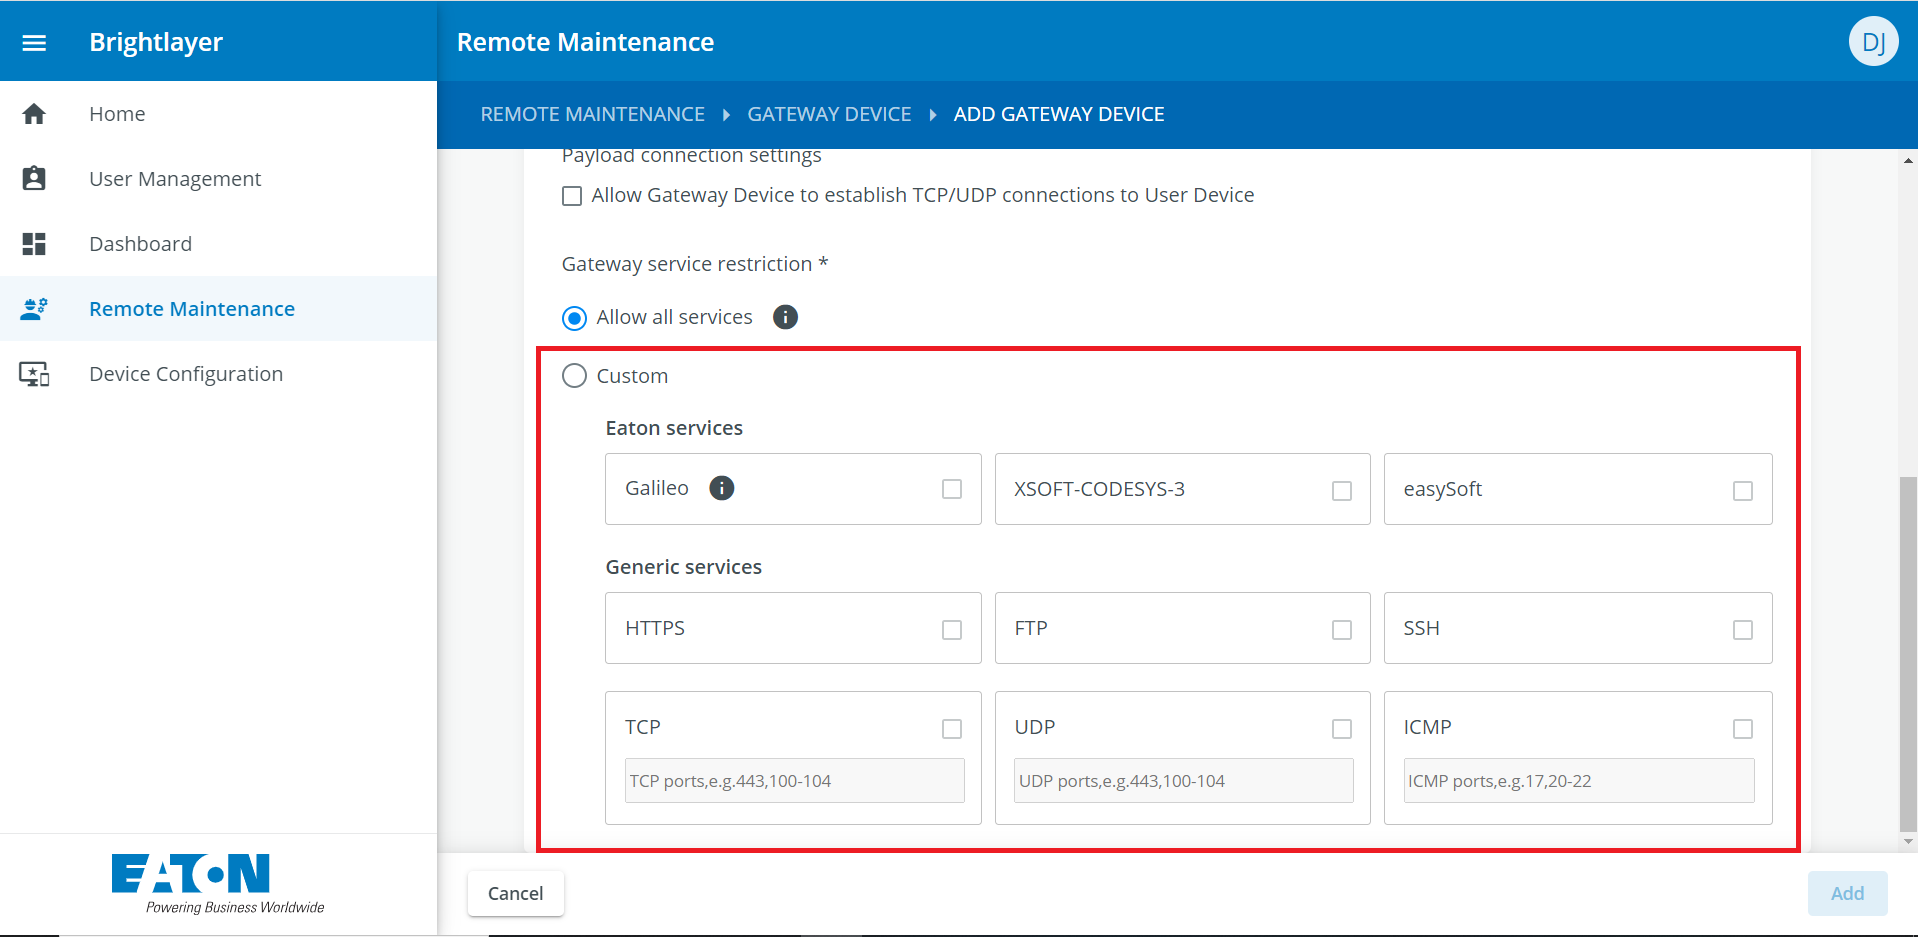
The specific Custom settings are only accessible when Custom is selected.
When clicking on info icon the following information is displayed
When Allow all services is selected no services will be prevented. For security reasons selecting only required protocols and ports for intended operations is highly advisable.
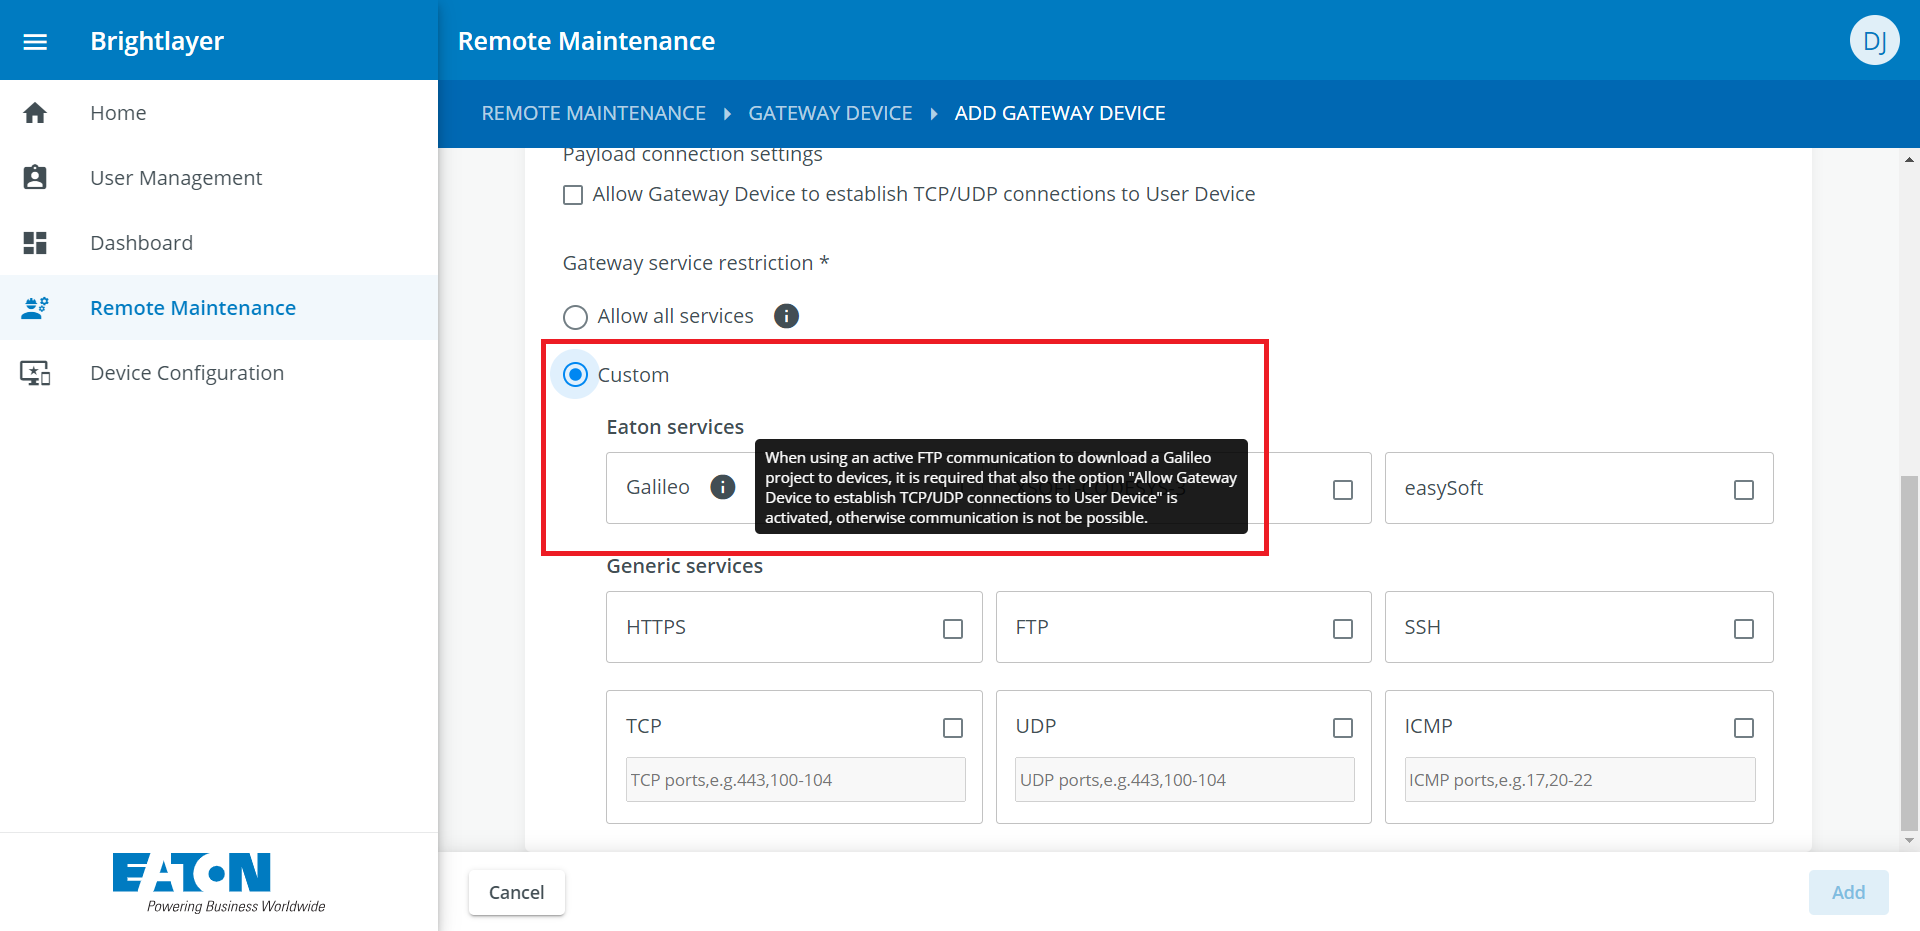
When using an active FTP communication to download a Galileo project to devices, it is required that also the option Allow Gateway Device to establish TCP/UDP connections to User Device is activated, otherwise communication is not possible.
When Galileo is selected the User device has access to the Galileo Design tool
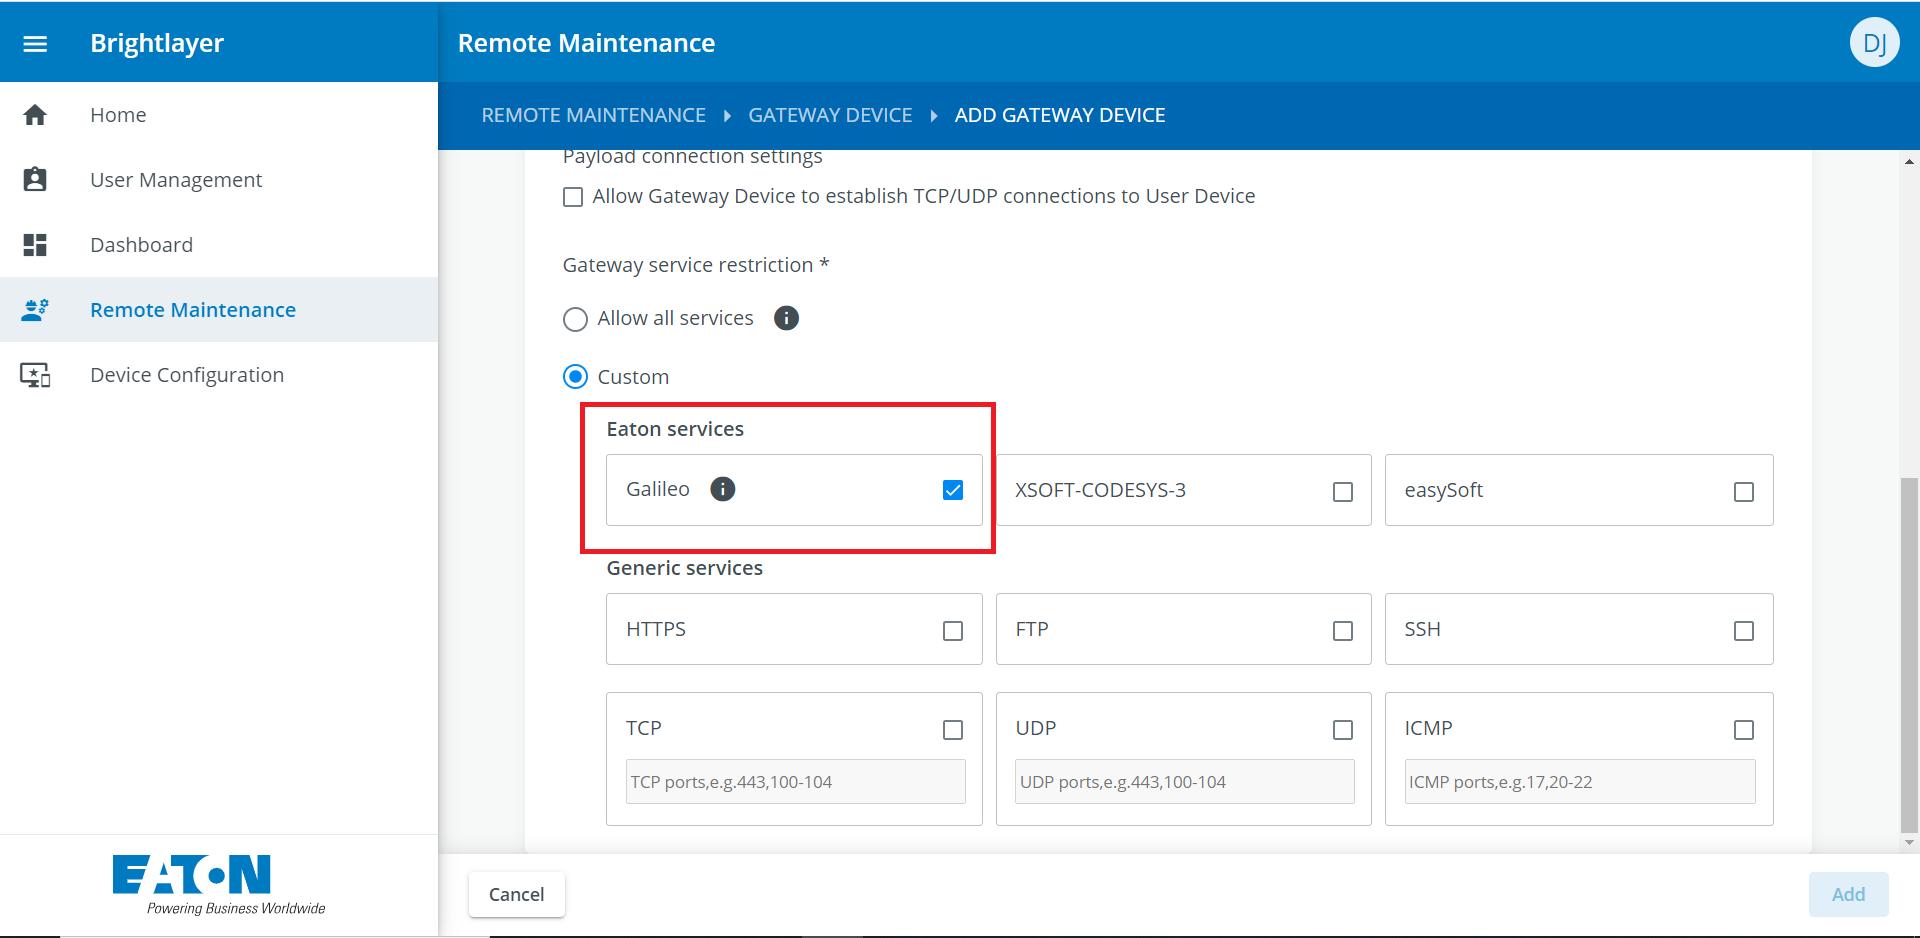
to connect to a panel in the gateway’s local network using active FTP communication
to start/stop Galileo Runtime system execution
When XSOFT-CODESYS-3 is selected the User device is capable:
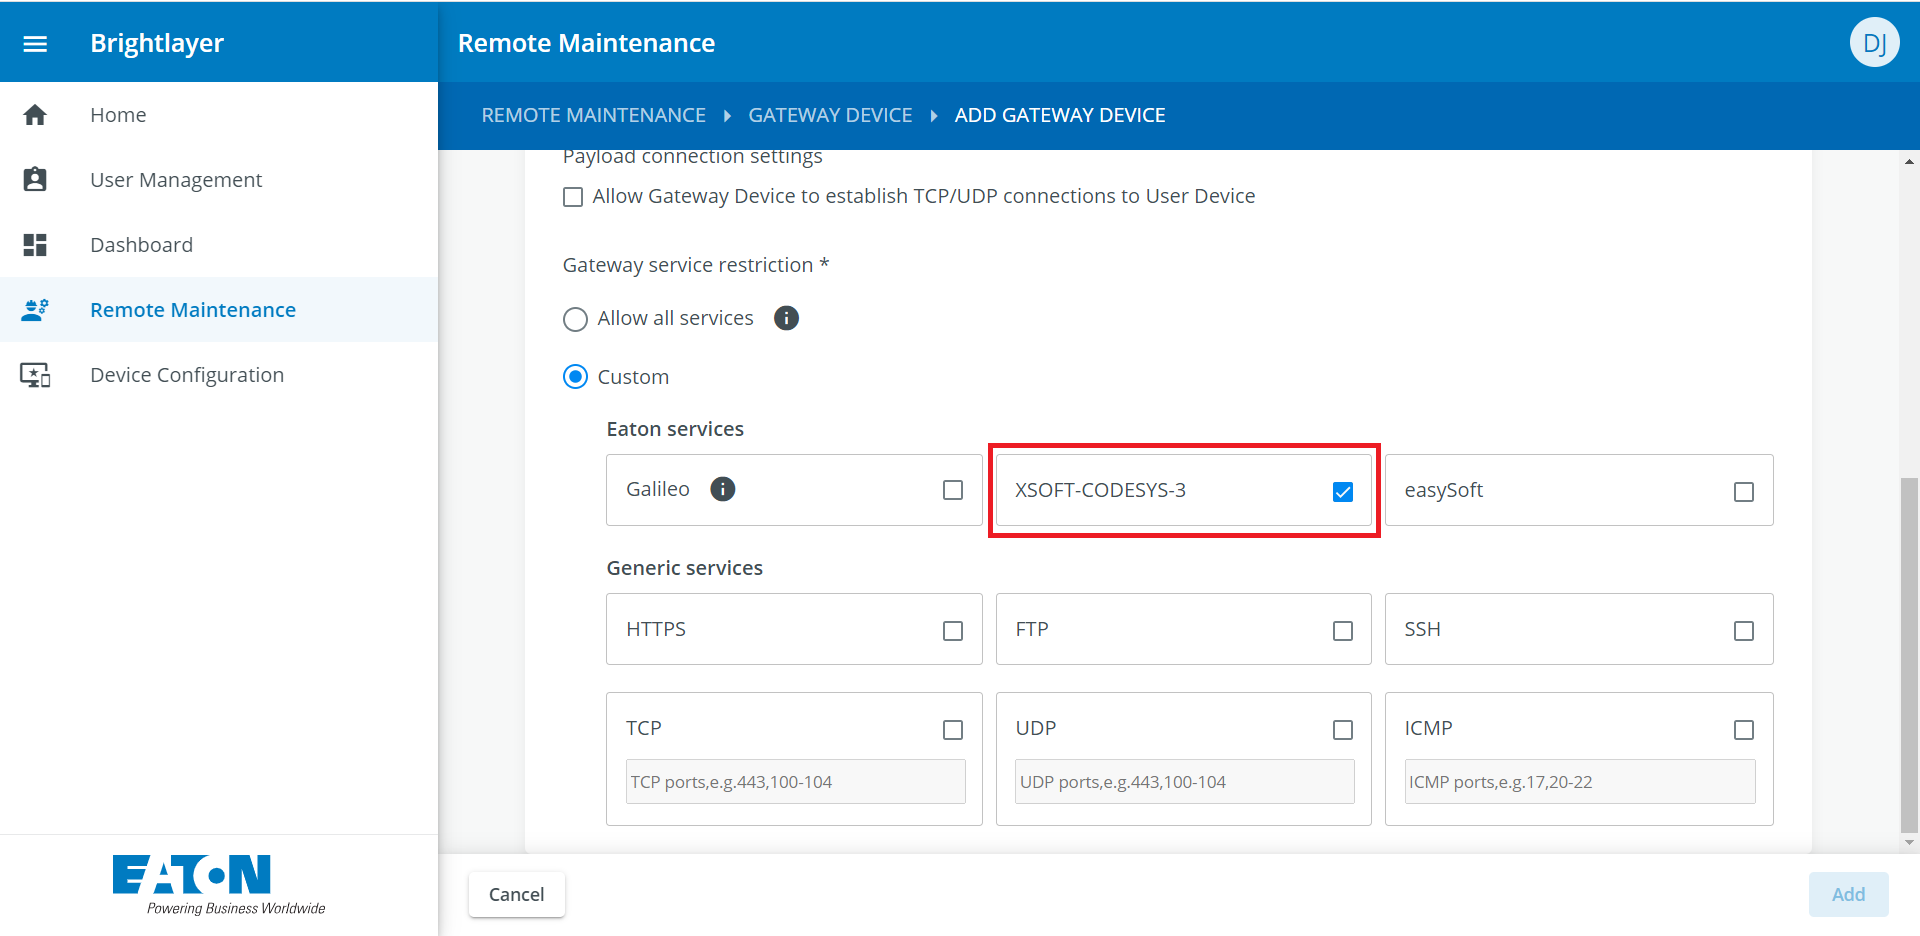
to connect to CODESYS runtime on a panel in the gateway’s local network
to download a new project
to debug project
When easySoft is selected User device is capable:
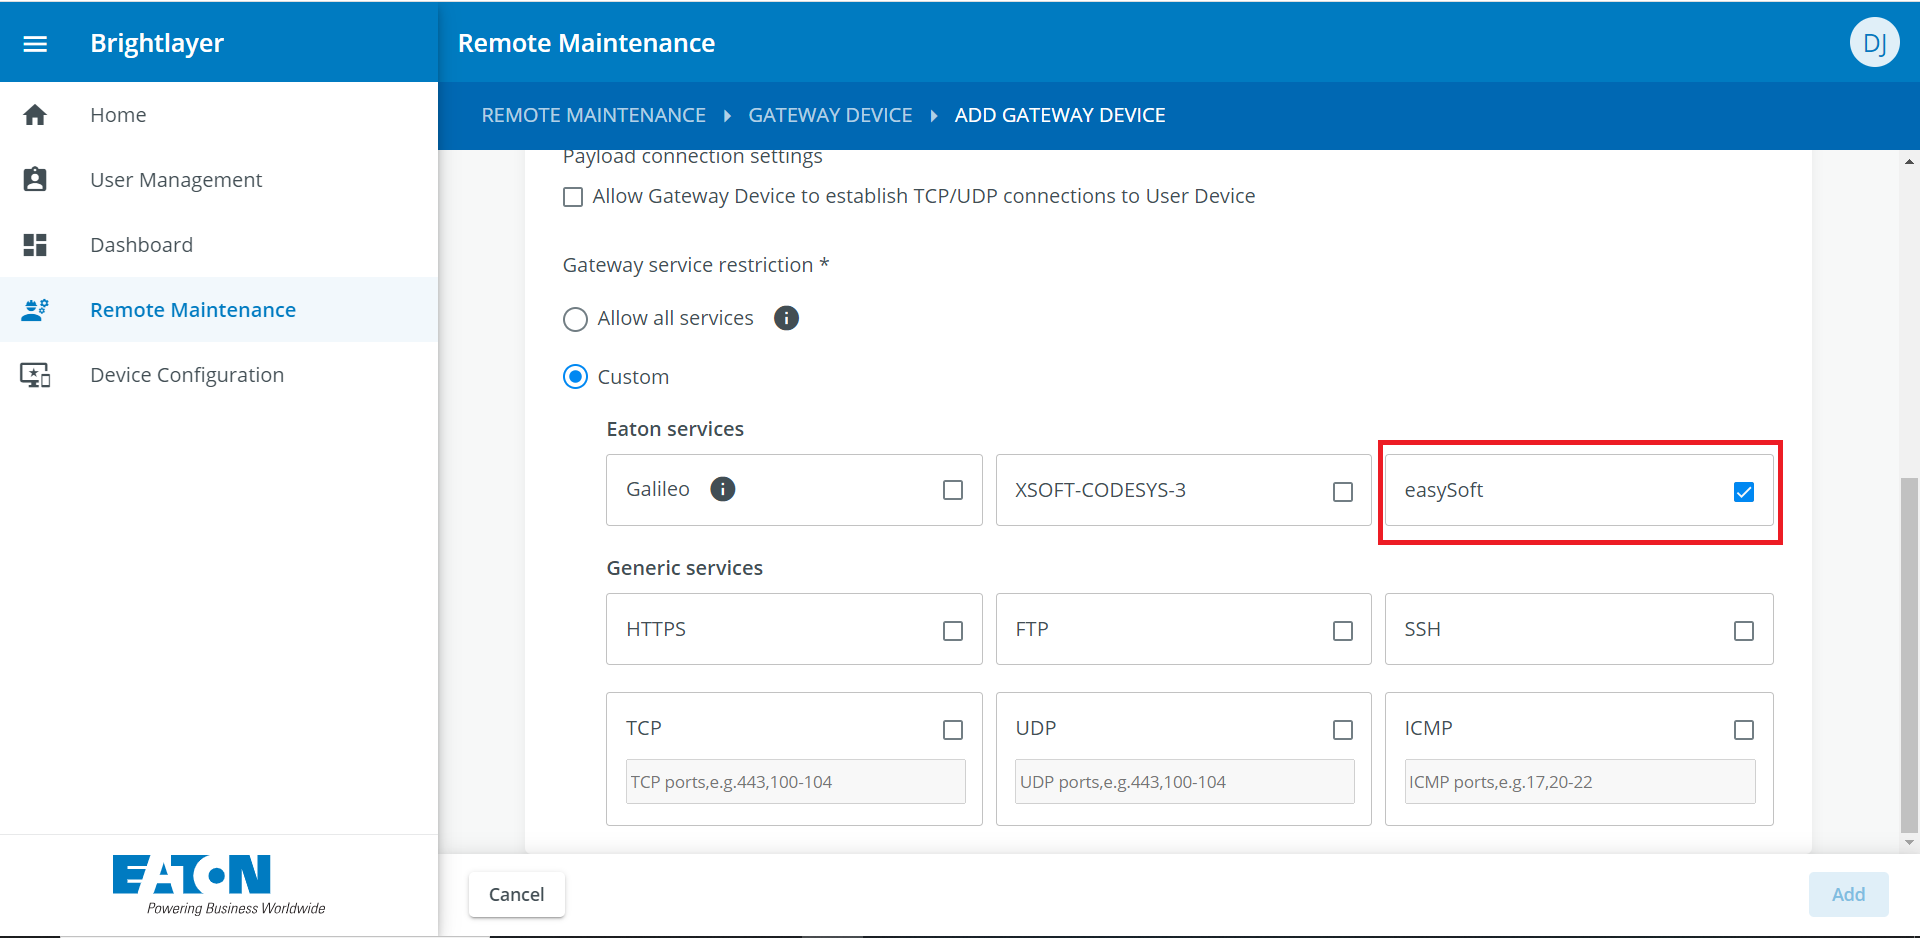
to connect to an easy device in the gateway’s local network
to download a new project
to see device state
Gateway Configuration
Network Topology 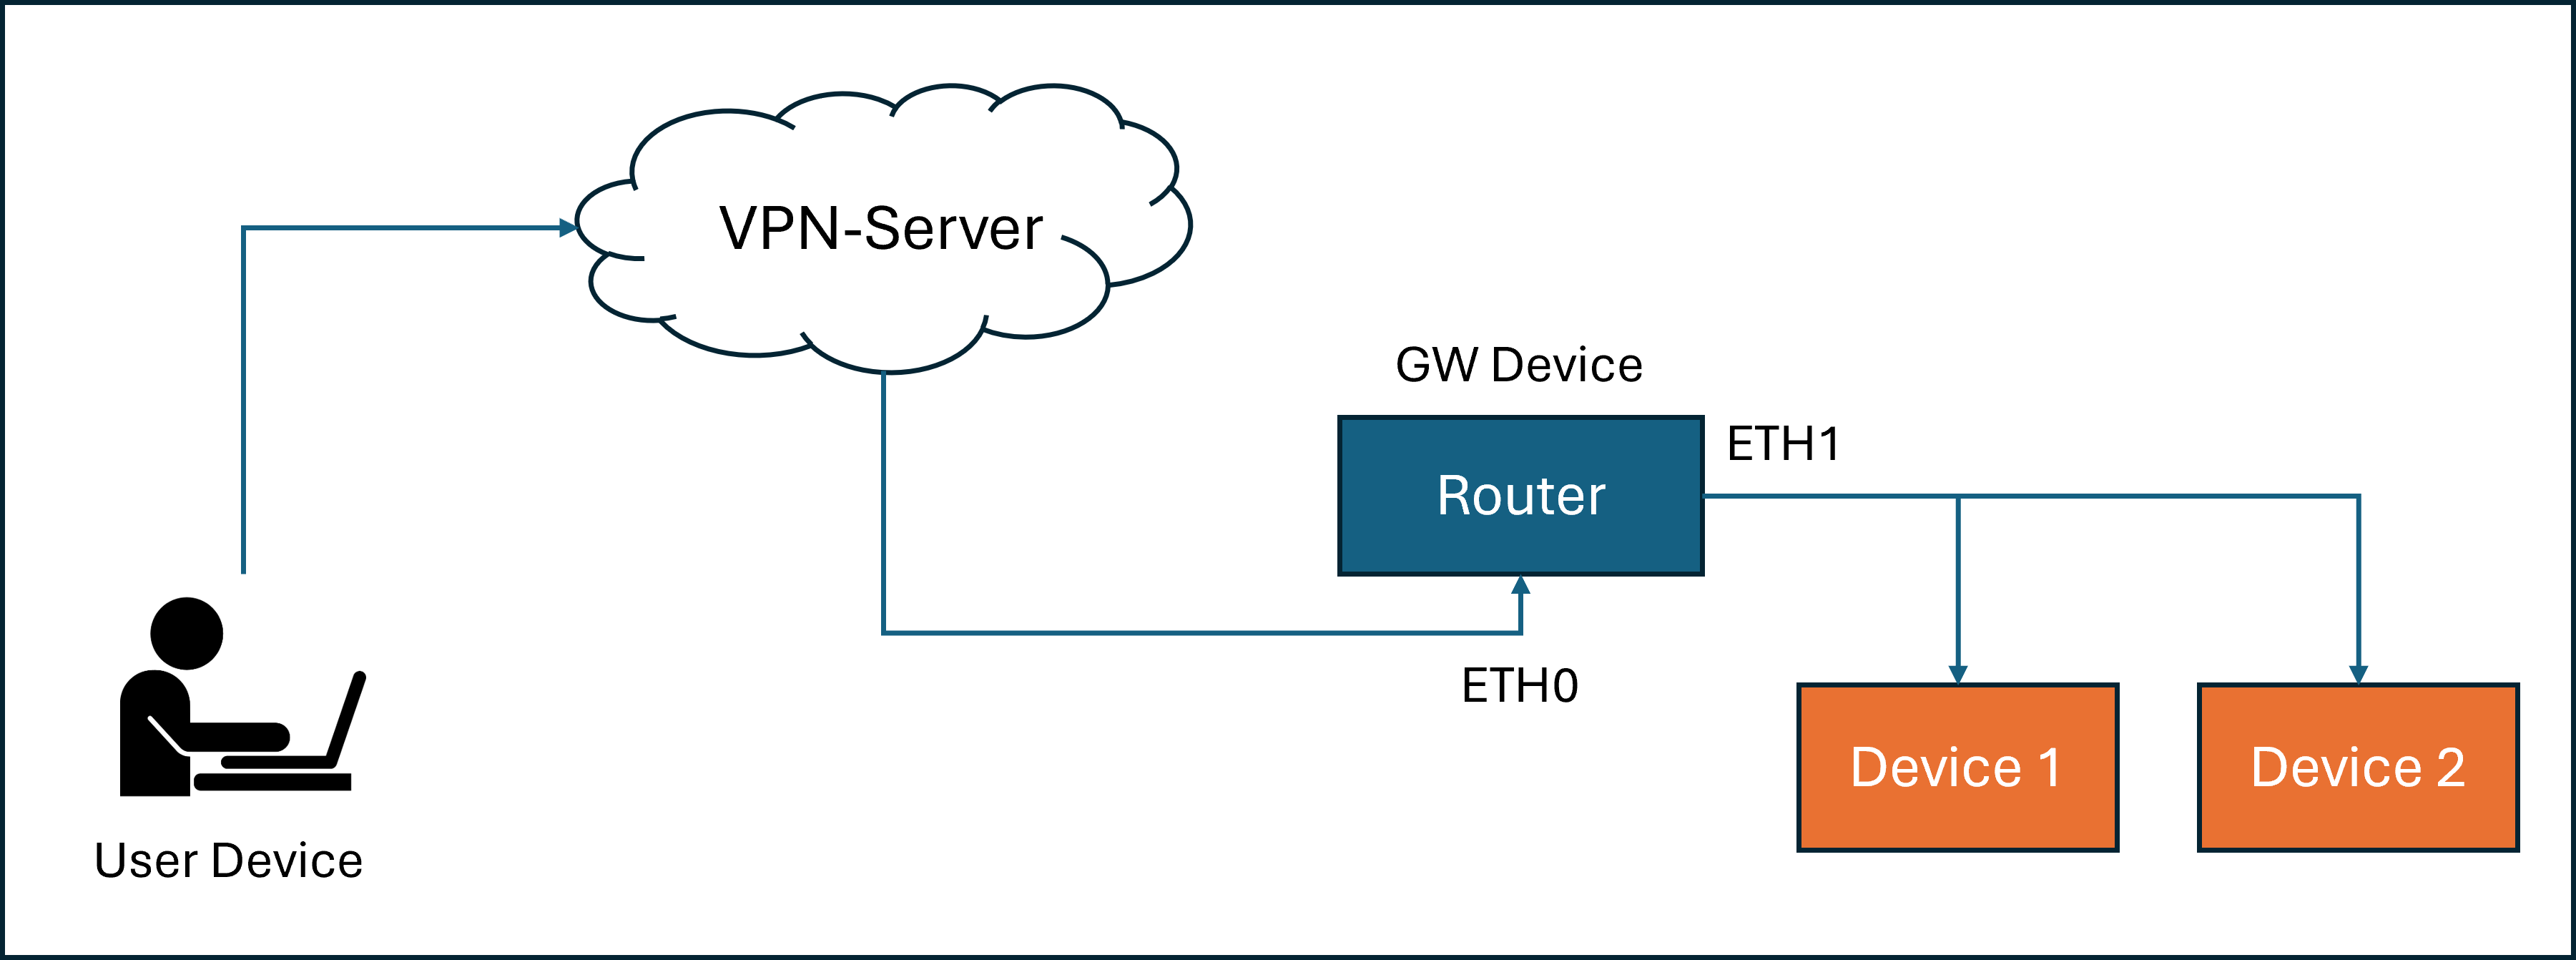
GW device configuration:
In general, all gateways / routers, that can be set up as an OpenVPN client, could be deployed in the Brightlayer Remote Maintenance tool. There are diffrences, though, in the way a gateway needs to be configured to be set up as an OpenVPN client.
Usually, gateways need to be set to a “permanently connected” mode. This means they re-connect to the VPN-server whenever the connection is interrupted. In the Brightlayer Remote Monitoring application those GW-devices would be set to “suspended”, when they are not used for an active connection.
In addition to this standard setup, Advantech ICR routers have been tested and approved to be “remote controlled”. This means, the connection between the Client and the VPN-server is only established, when it is required. The Router / Client has to be configured to receive direct method messages from Brightlayer Machinery Remote Monitoring. When receiving such a message, the Router / Client would connect to the VPN-server and it is possible to set up an end-to-end tunnel with a User Device. Once the connection is deleted in the Remote Monitoring application, the Router / Client will disconnect from the VPN-server.
The following chapters describe, how routers / gateways can be set up for one of those opertion modes:
Gateways/Routers that do NOT support OpenVPN configuration files
Gateways/Routers that support OpenVPN configuration files & remote control
The OpenVPN config file
OpenVPN provides a configuration file that contains all data to set up the Client device. The configuration file that is provided by Brightlayer RM is showing all data to set up a router / gateway as OpenVPN client.
setenv USERNAME "<your-openvpn-username-token>"
# OVPN_WEBAUTH_FRIENDLY_USERNAME=<friendly-username>
# OVPN_FRIENDLY_PROFILE_NAME=<friendly-profile-name>
client
dev tun
remote de-fra.gw.openvpn.com 1194 udp
remote de-fra.gw.openvpn.com 1194 udp
remote de-fra.gw.openvpn.com 443 tcp
remote de-fra.gw.openvpn.com 1194 udp
remote de-fra.gw.openvpn.com 1194 udp
remote de-fra.gw.openvpn.com 1194 udp
remote de-fra.gw.openvpn.com 1194 udp
remote de-fra.gw.openvpn.com 1194 udp
remote-cert-tls server
cipher AES-256-CBC
auth SHA256
persist-tun
nobind
verb 3
socket-flags TCP_NODELAY
push-peer-info

<ca>
-----BEGIN CERTIFICATE-----
<your-ca-certificate-goes-here>
-----END CERTIFICATE-----
</ca>

<cert>
-----BEGIN CERTIFICATE-----
<your-client-certificate-goes-here>
-----END CERTIFICATE-----
</cert>

<key>
-----BEGIN RSA PRIVATE KEY-----
<your-private-key-goes-here>
-----END RSA PRIVATE KEY-----
</key>

key-direction 1
<tls-auth>
-----BEGIN OpenVPN Static key V1-----
<your-tls-auth-static-key-goes-here>
-----END OpenVPN Static key V1-----
</tls-auth>
1. Manual configuration
When following these configuration guidelines it should be possible to use any 3rd party router / gateway as a client on the Brightlayer Remote Monitoring system. Please understand that Eaton can not provide telephone or e-mail support for any 3rd party router / gateway. For support please contact your supplier of the router
Certificate handling
VPN systems require authentication by certificate. The config-file, provided by the Brightlayer RM service, contains 4 certificates: ca, cert, key and tls-auth. Some devices require a PERM certificate, though. If your device requires a PERM certificate for VPN connectivity, you need to convert the certificates from the config-file into a PERM certificate. Tools like openssl or Windows Power Shell can be used to do so. The certificates need to be uploaded to the certificate section in the Device.
VPN setup
When your router / gateway can be configured as a client for a conntection to an OpenVPN remote server it would usually contain a section to set up the VPN data in the configuration menu. All data, required for this configuration, can be taken from the OpenVPN config file as displayed above.
Important: For instant remote connectivity it is essential to set the VPN connection to Permanent connection. Otherwise the GW device may not be accessible any more if a tunnel connection to the device is deleted from the server side. Please refer to the manual of your router / gateway to find out how this operational mode is configured.
Other important settings for the client device are:
Server address
Server port
Protocol
Those settings can be taken from the config-file. In the example above it is:
remote de-fra.gw.openvpn.com 443 tcp
Which means:
Server address: de-fra.gw.openvpn.com
Server port: 443
Protocol: tcp
For all additional settings we recommend to contact the supplier of your router / gateway.
2. Router configuration for remote control
The routers, that are currently approved to use the remote control feature on the Remote Maintanance application, are the Advantech ICR-series routers. This chapter provides a user guide on how to set up the router so that it supports the remote control feature of the Brightlayer Remote Maintenance service.
Installing the Advantech router apps
The functionality of Advantech routers can be amended by installing router apps on the devices. We recommend to always download the latest version of the router apps directly from the Advantech web page: Advantech router apps weg page.
The following router apps will be required for a full support of all Brightlayer services:
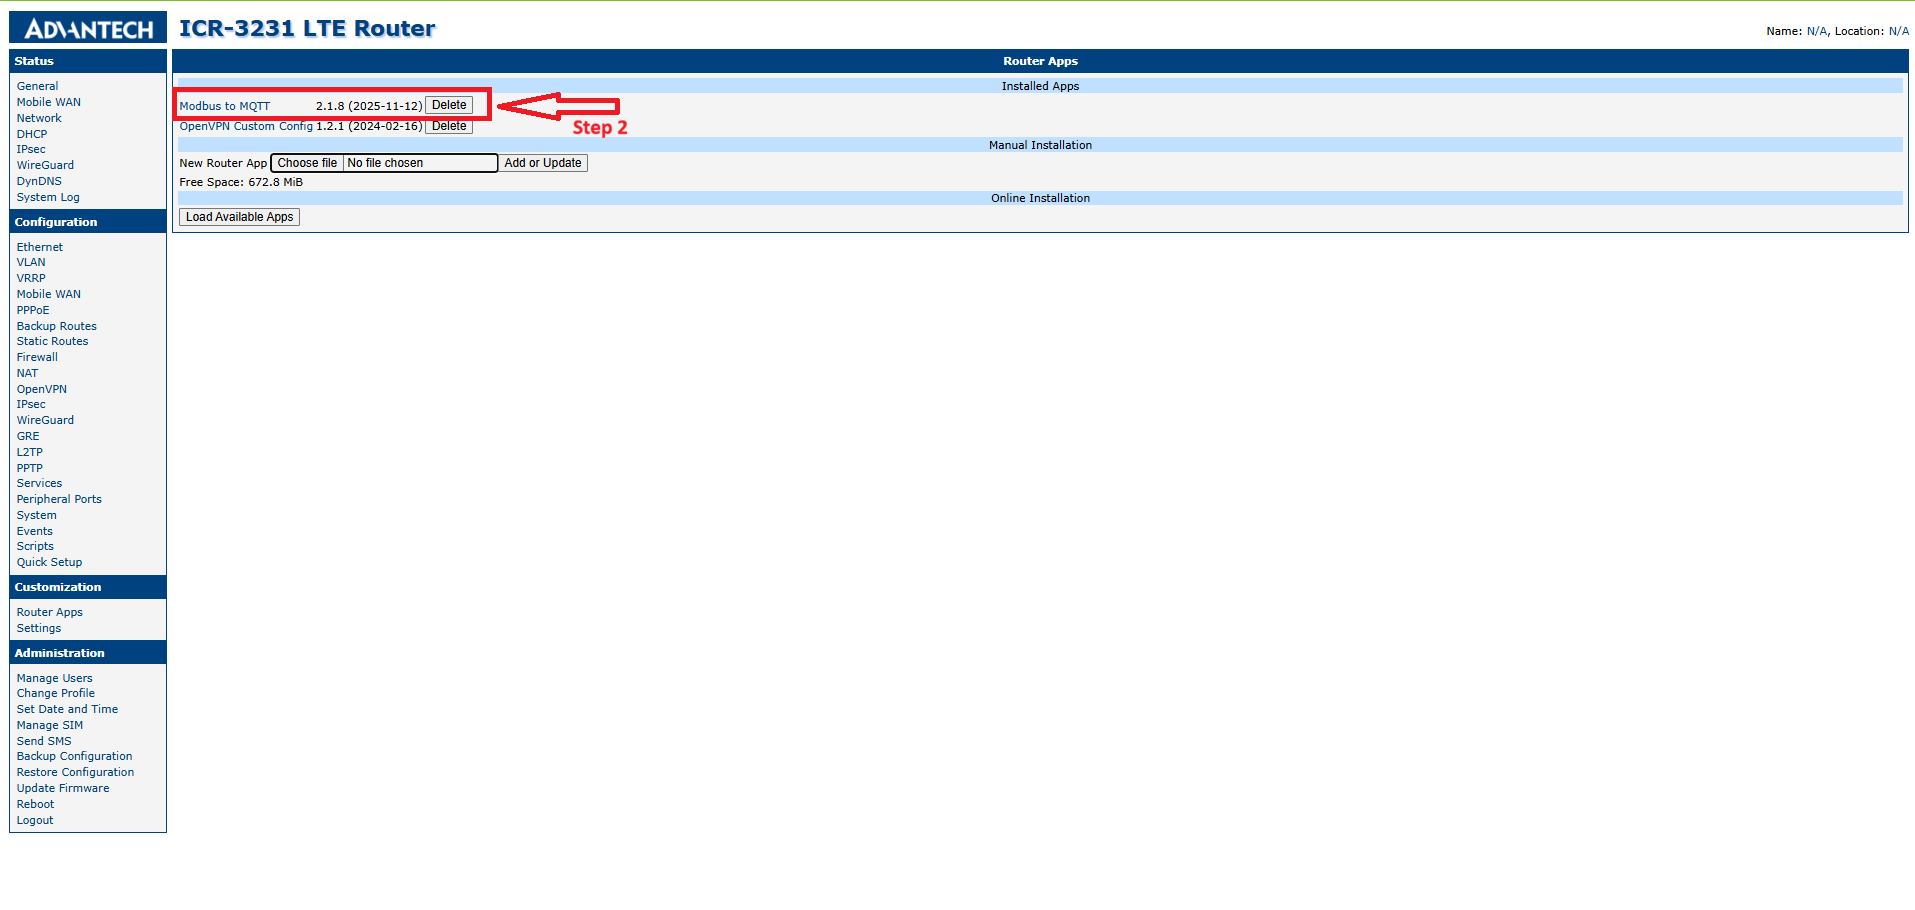
After logging in to the Configuration page of the device you should open the Router Apps screen in the Customization section of the menu. Router apps can be added by using the “Choose File” and “Add or Update” buttons.
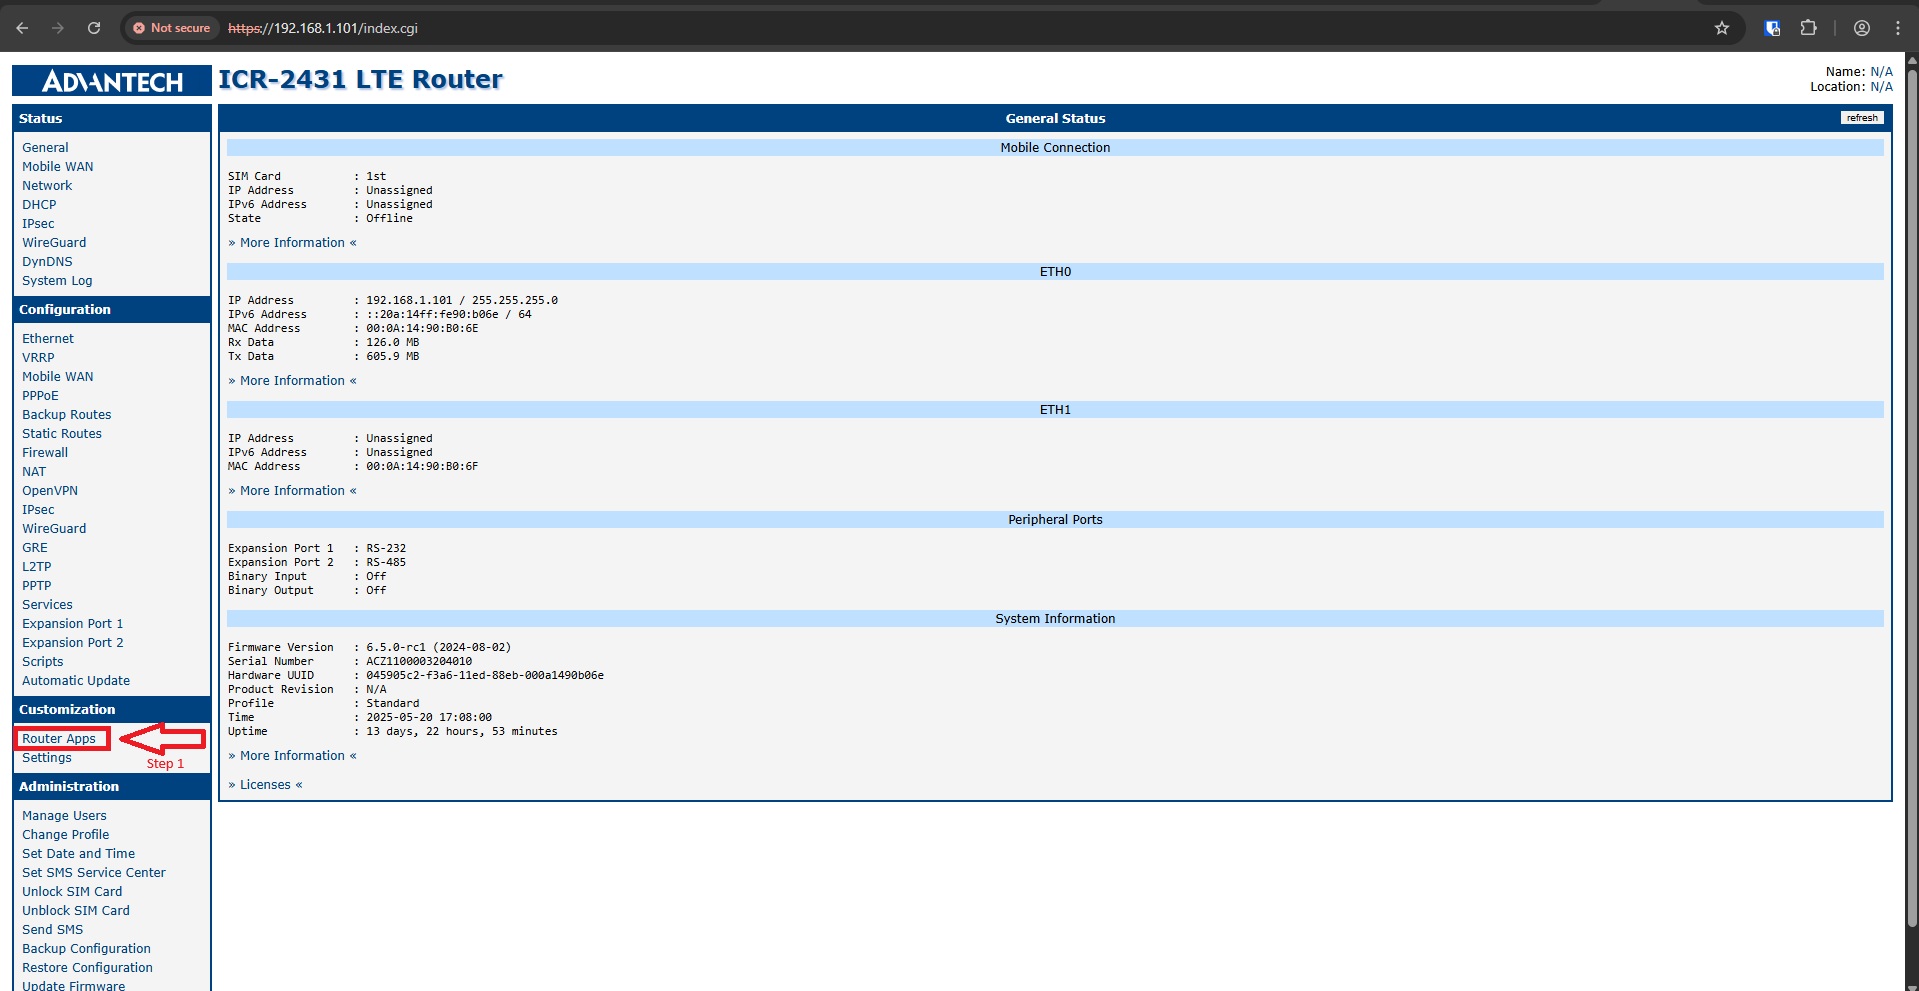
Router apps can be added by using the “Choose File” and “Add or Update” buttons.
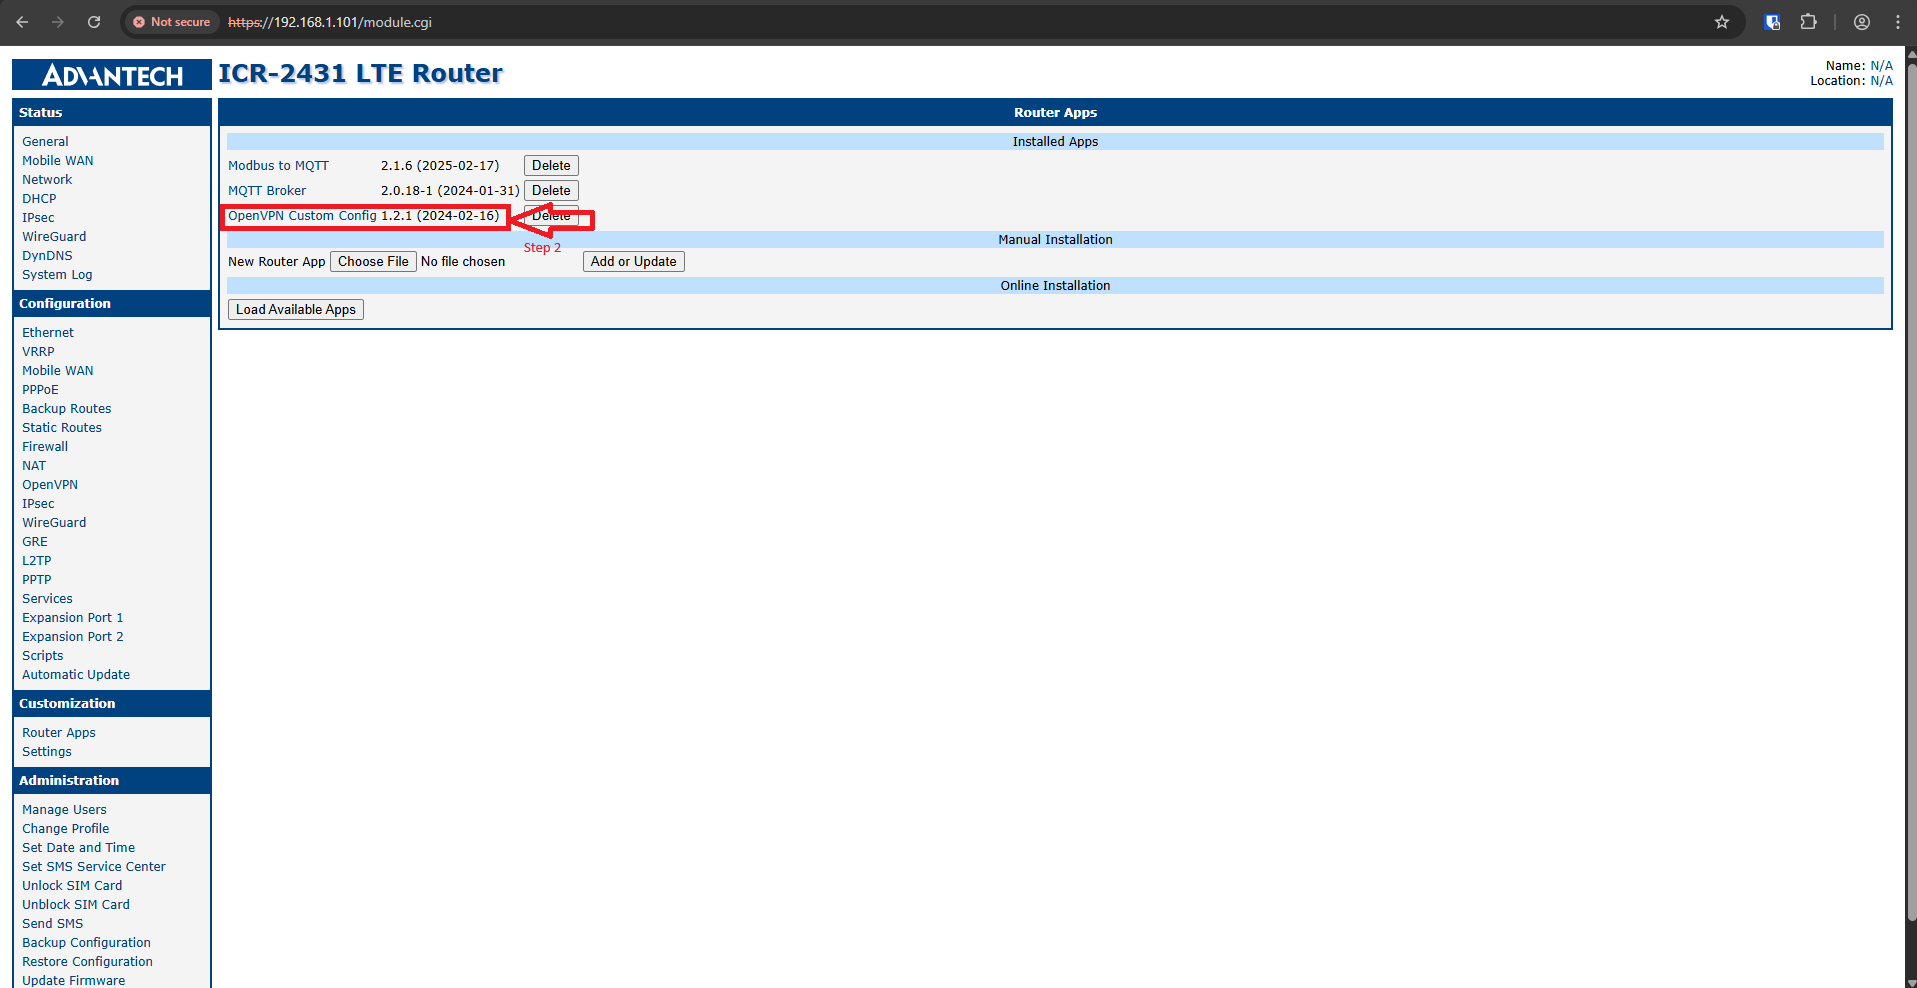
Once all router apps are installed, start the configuration with the “OpenVPN custom config” router app.
Configuring the OpenVPN custom config router app
Click on “Tunnel 1” to start the configuration
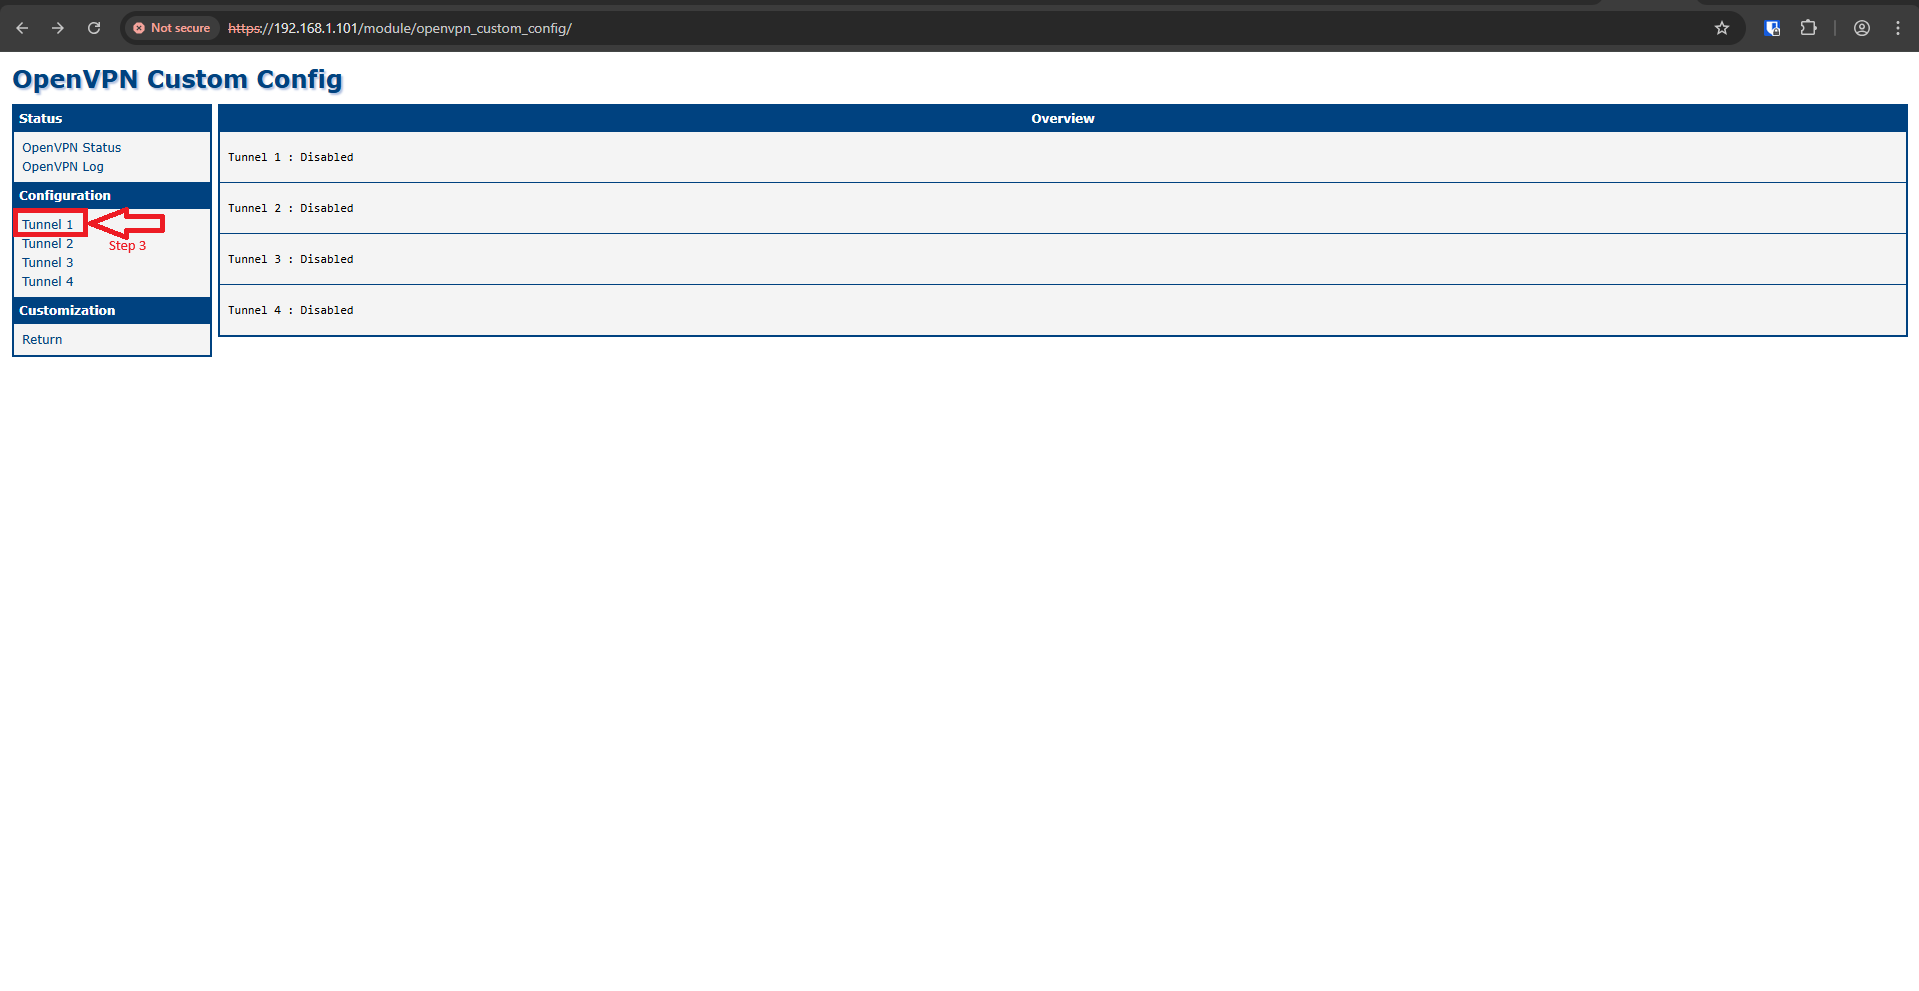
Select the “Enable Tunnel 1” checkbox. Next, copy all the content from the downloaded configuration file into the textbox, and then click on “Apply”.
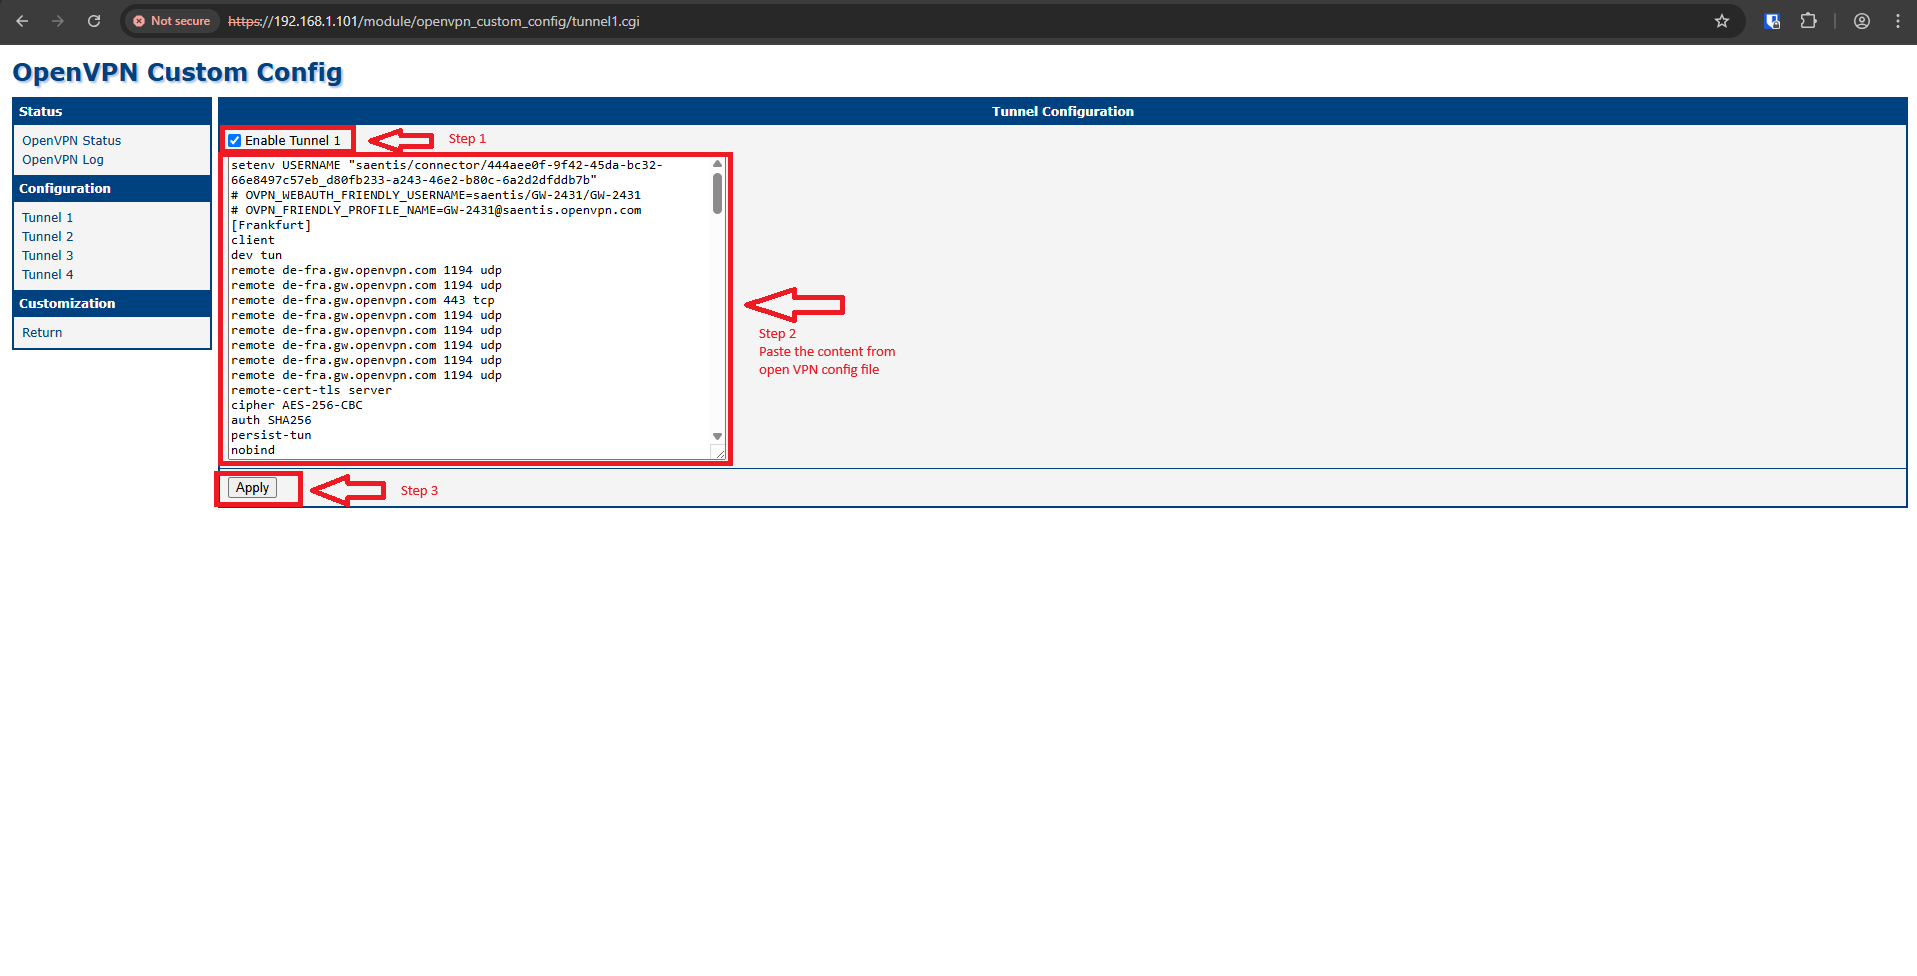
Configuring the remote control
Remotely controlling the VPN tunnel to an Advantech router contains the 2 steps for setting up the tunnel and deleting the tunnel:
Setting up the VPN tunnel: In this szenario the VPN tunnel is set up by sending an direct message to the router. This message is used to activate the VPN tunnel in the router.
Deleting the VPN tunnel The same method is used to disable the tunnel from the Brightlayer Remote Monitoring application.
Setting up the Direct Method communication
Cloud to Device messages from Brightlayer are sent in the Direct Method format. To configure the router to receive those messages and use them for enabling the VPN tunnel. This format has to be set up in the Modbus to MQTT router app.
Open the Router Apps screen in the Customization section of the menu
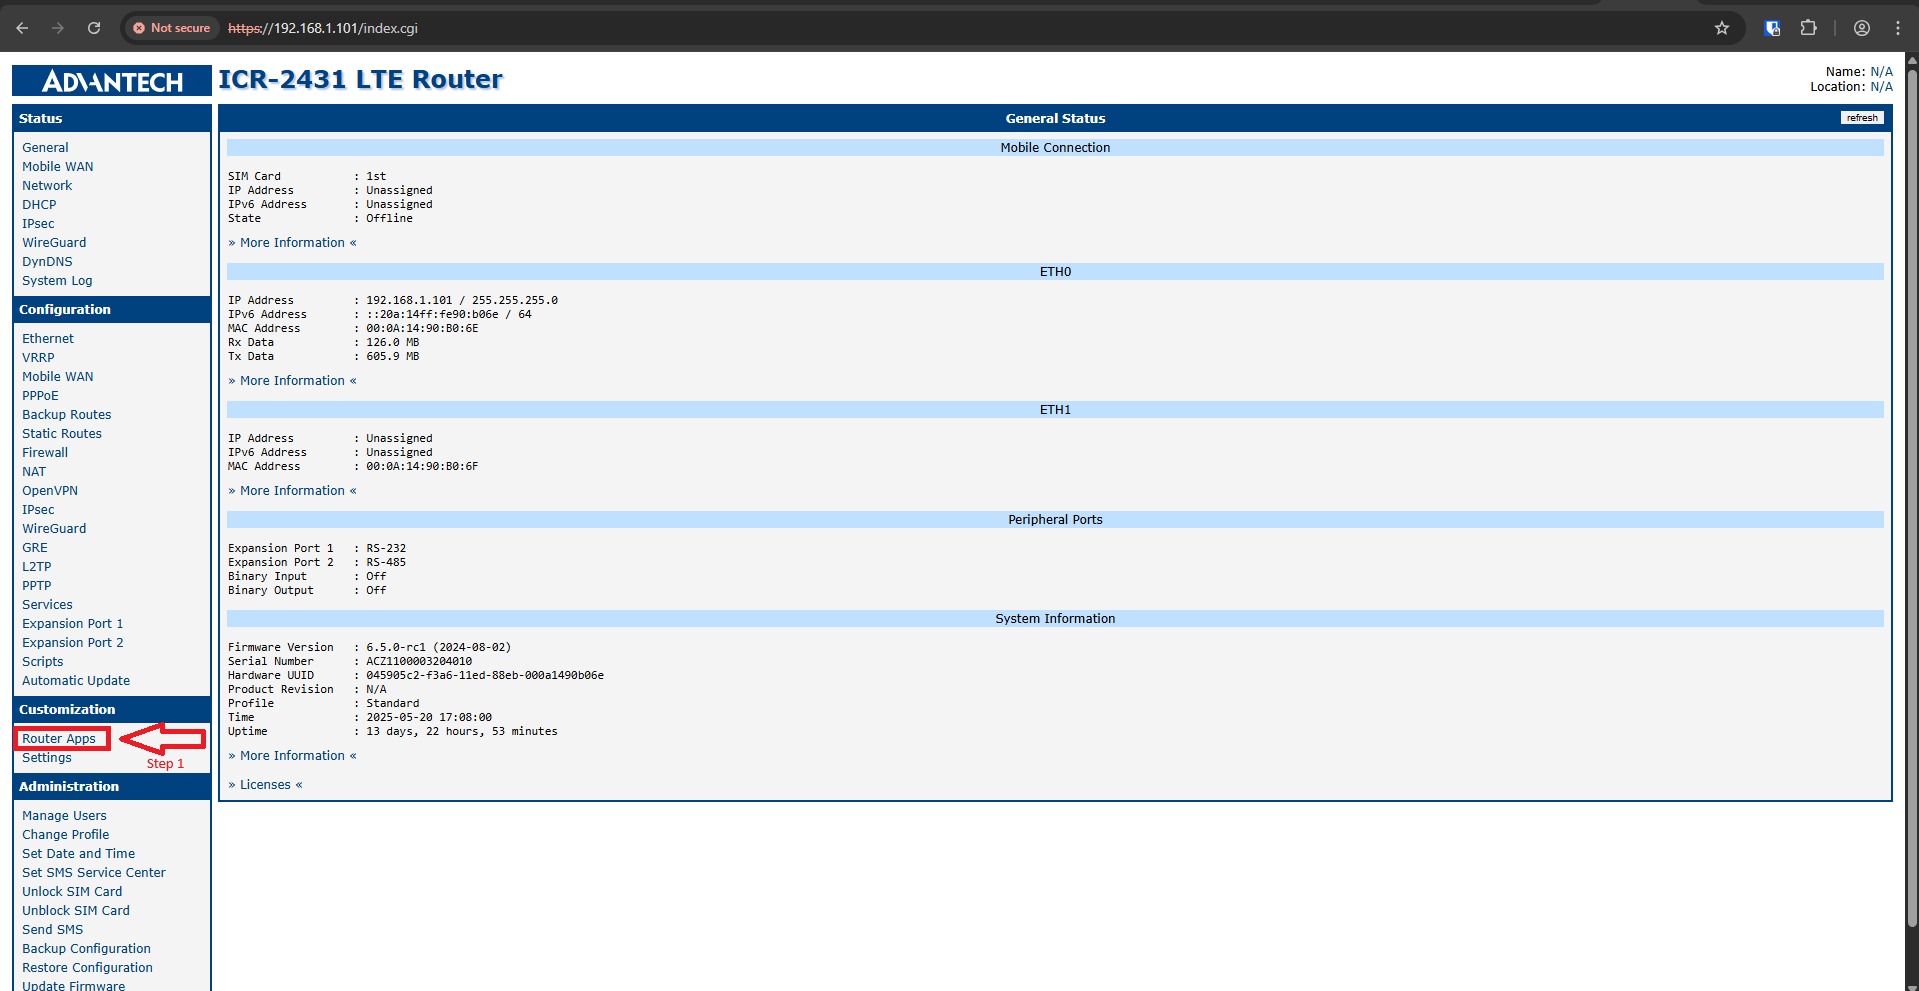
Open the Modbus to MQTT router app. From the “Configuration” menu select Direct Methods Settings:
Configure the following:
Select “Enable” in the Direct Method drop down
Select “1” in the Rule Index drop down
Put the following text in the corresponding text fields:
Topic “$iothub/methods/POST/#”
Response Content when Success
Response Content when Failure
Message Handler Script
#!/bin/sh
json_data="$1"
echo "script msg $json_data"
status_value=$(echo "$json_data" | jq -r '.params."10420585"')
echo "10420585: $status_value"
if [ "$status_value" = "1" ]; then
    echo "OpenVPN Enable"
    sed -i 's/MOD_OVPN_CC_TUNNEL1_ENABLED=[01]/MOD_OVPN_CC_TUNNEL1_ENABLED=1/' /opt/openvpn_custom_config/etc/settings
    /opt/openvpn_custom_config/etc/init restart
else
    echo "OpenVPN Disable"
    sed -i 's/MOD_OVPN_CC_TUNNEL1_ENABLED=[01]/MOD_OVPN_CC_TUNNEL1_ENABLED=0/' /opt/openvpn_custom_config/etc/settings
    /opt/openvpn_custom_config/etc/init restart
fi
exit 0 # return 0 for Response Content when Success
Press the “Apply” button to save your changes.
Managing user devices
All subscribers have the ability to create a user device within the RM service. However, each user can only have one user device created in any of the RM services they have access to. Additionally, a single user device in the RM service can establish a connection to only one GW (Gateway) device within the same RM service.
In the User Device tab the list of existing user devices in the respective RM service is shown. Four activities are possible in this tab:
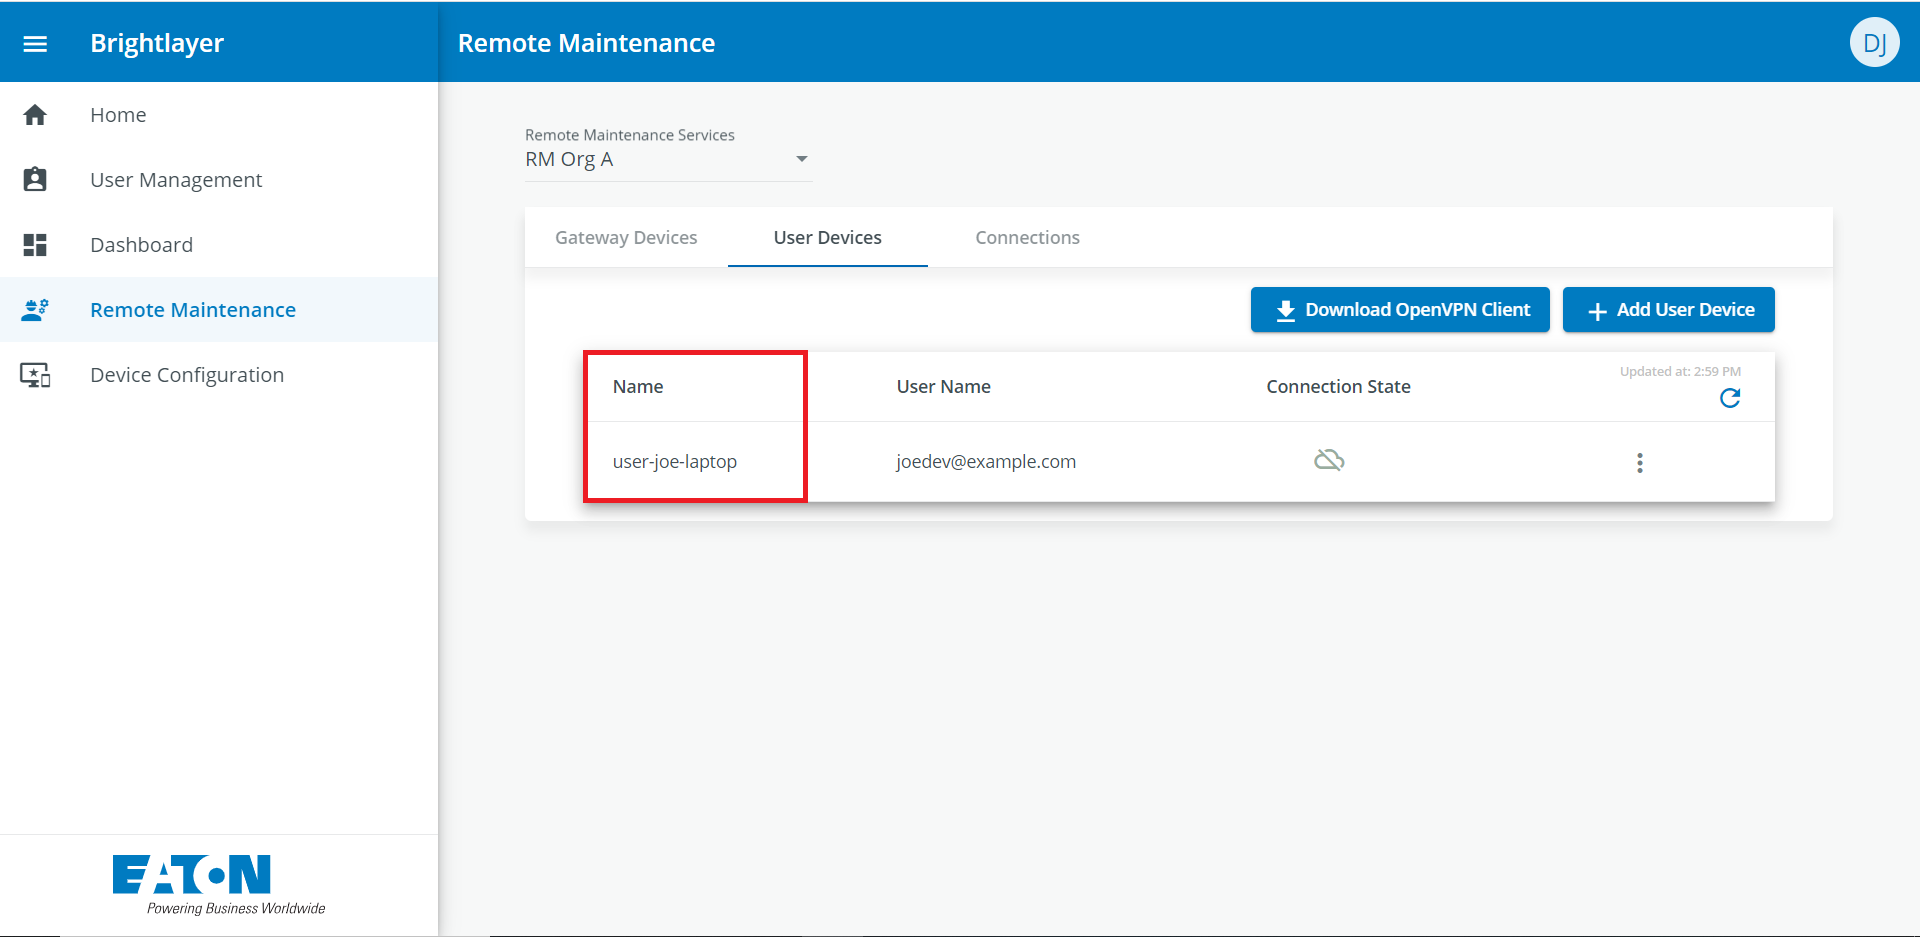
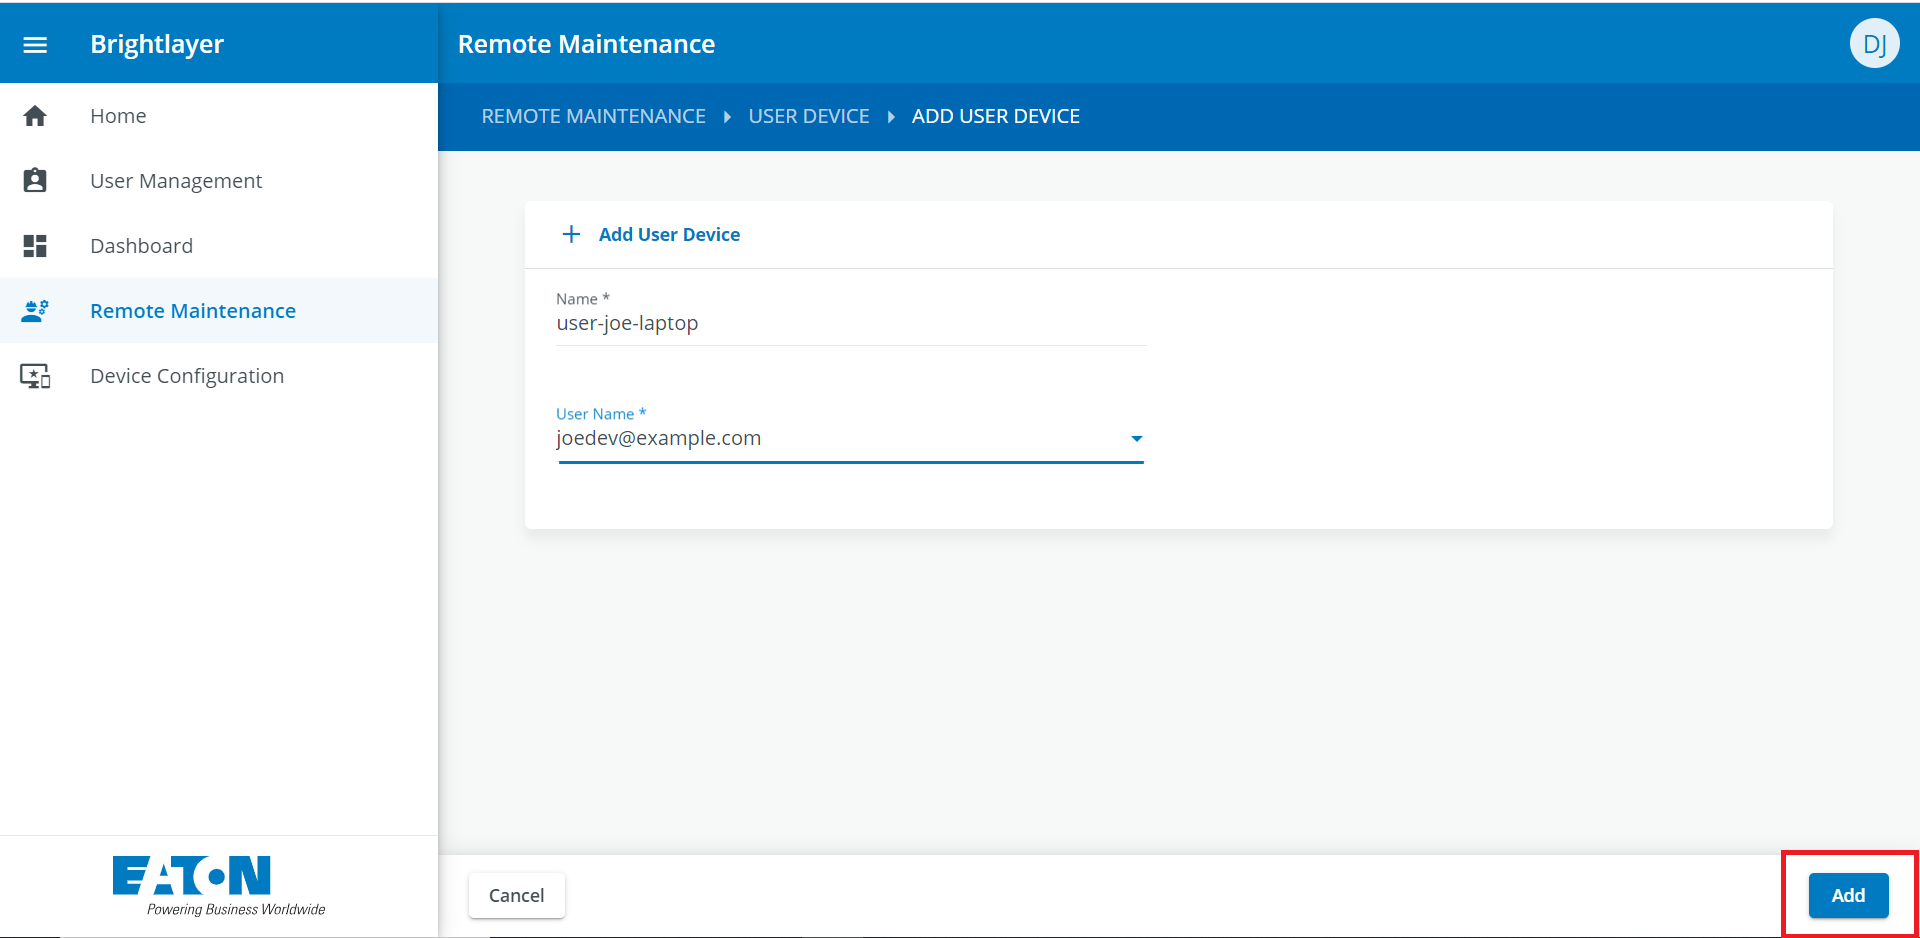
Add User Device button. Clicking on that button will open the Add User Device page.
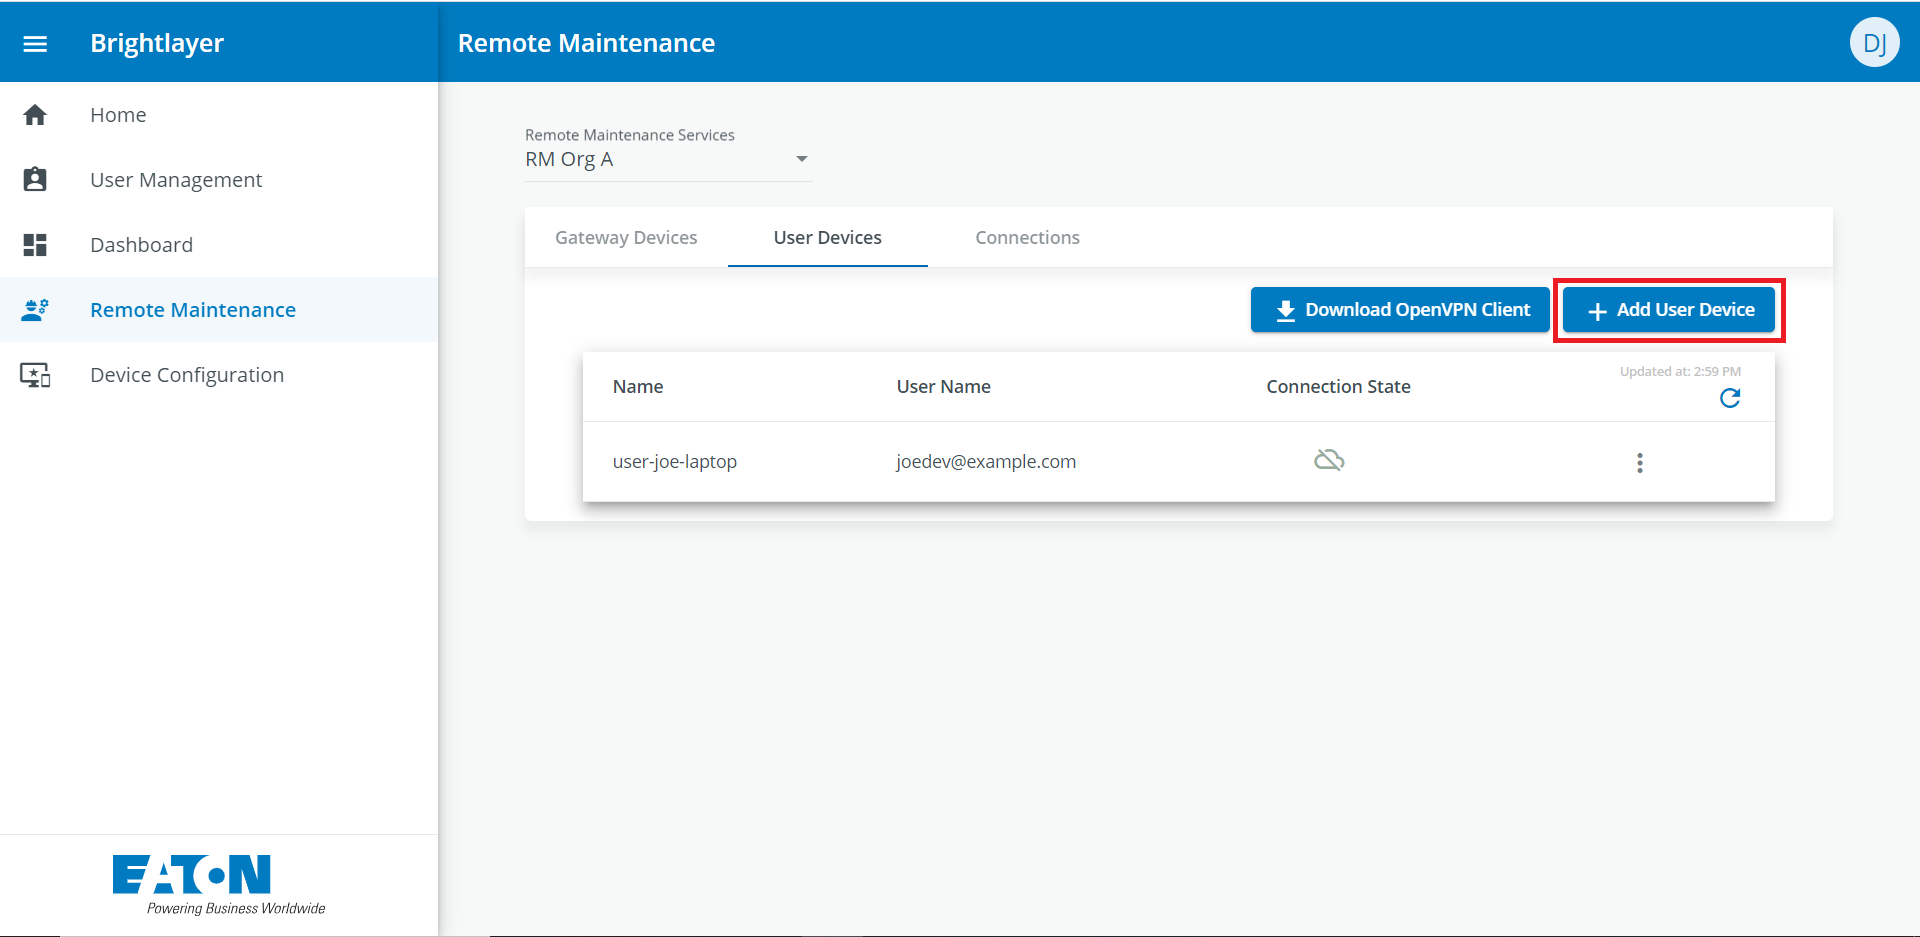
On this page a name has to be assigned to the User Device. Afterwards a user can be selected from the drop down User Name. This drop down would show the e-mail address of all users that have access to the service.
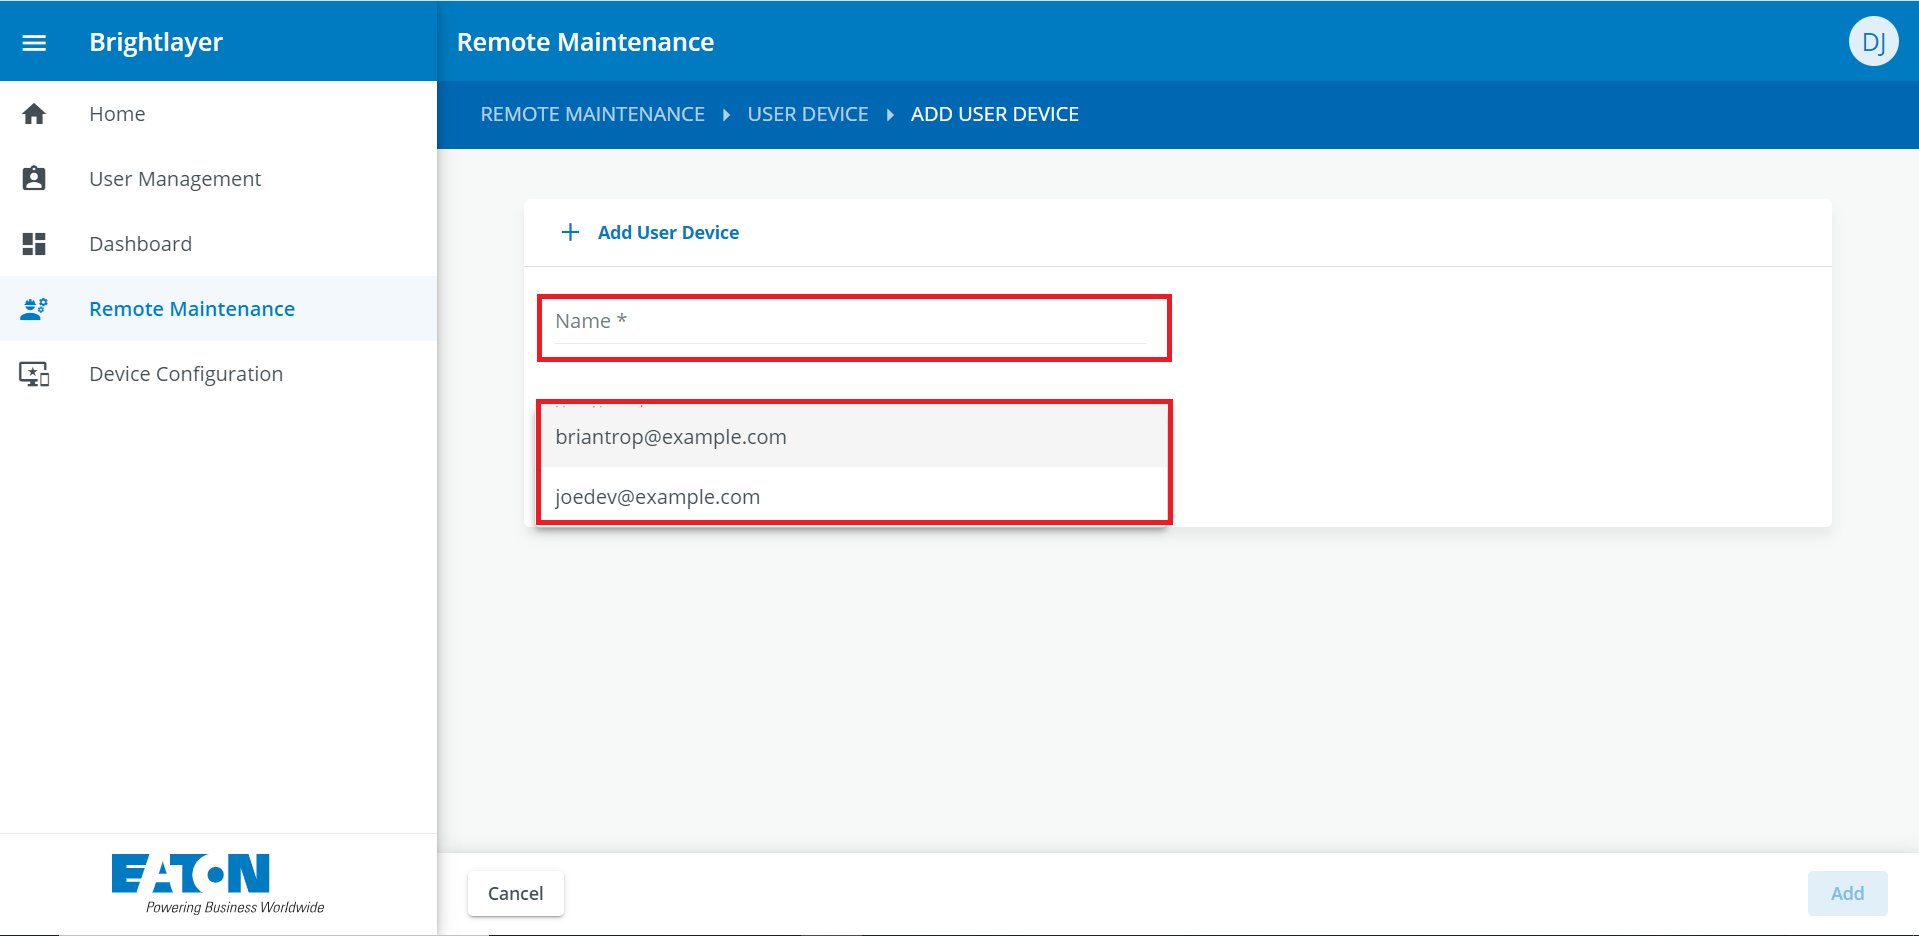
After these fields have been filled in, the User Device can be added by clicking the Add button.
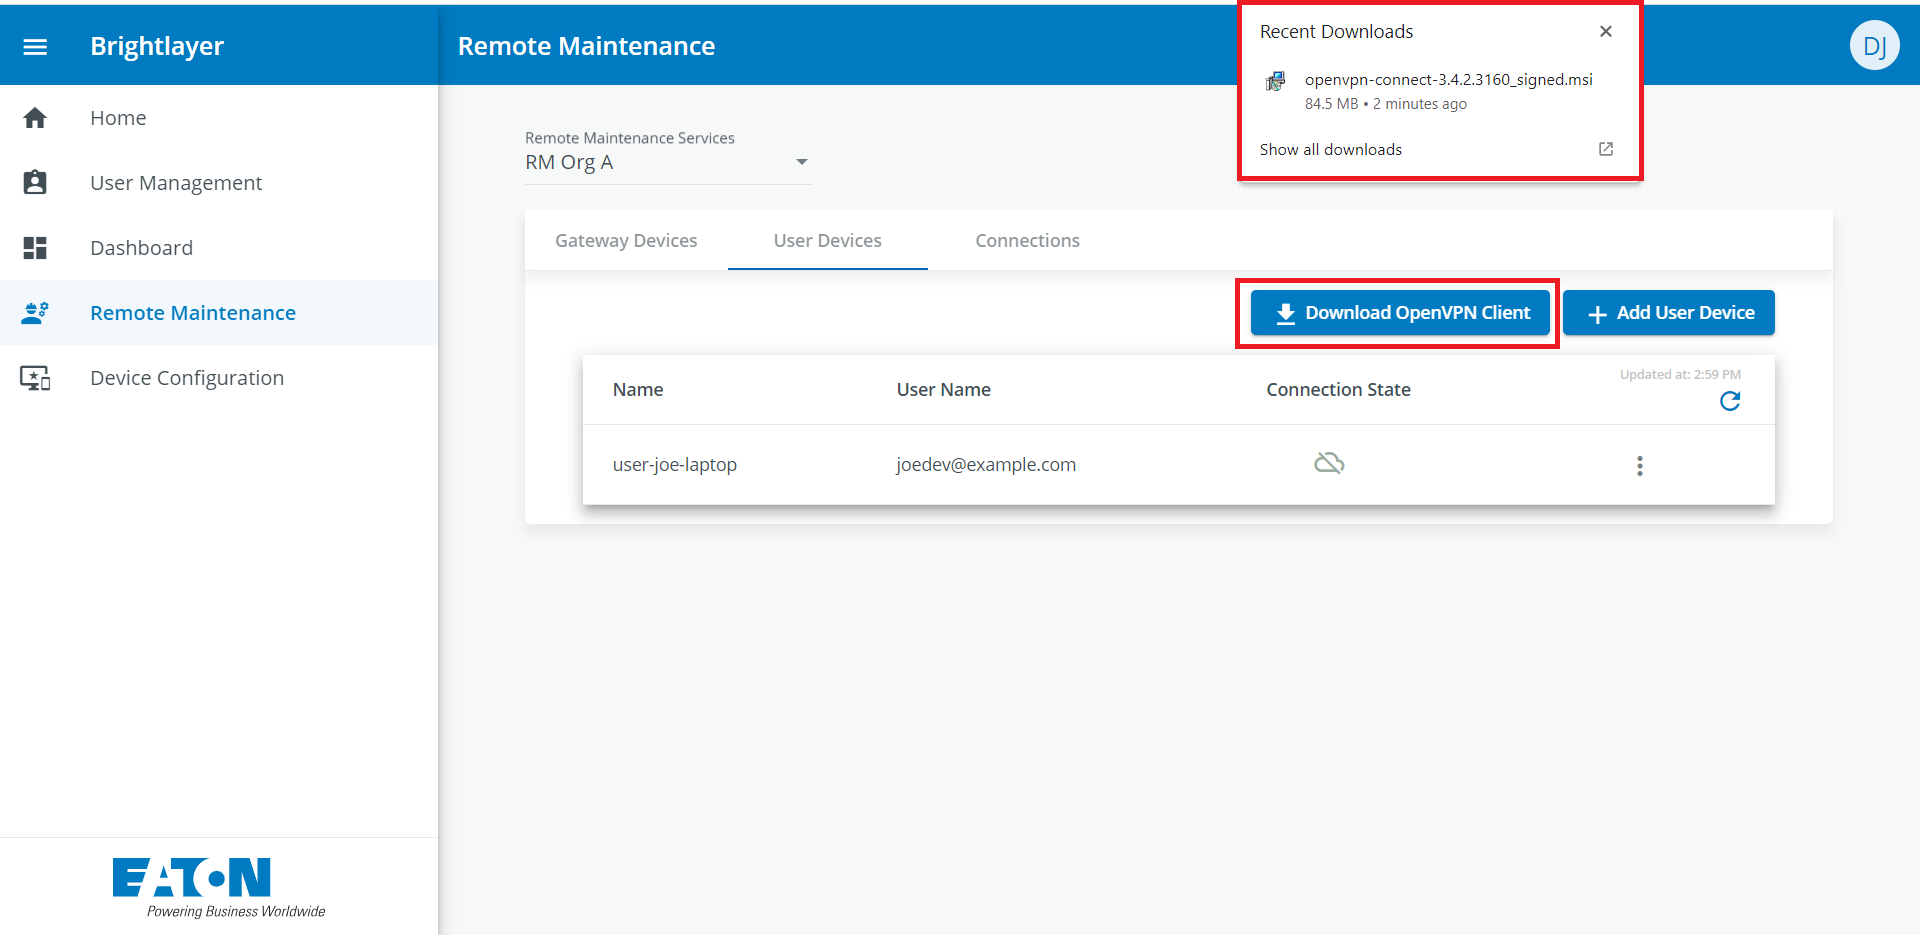
Download OpenVPN Client button. Clicking on this button will start a download of the OpenVPN Client application to the download folder of the computer. To utilize the remote maintenance feature and establish a remote connection to a GW device, you must install the client application.
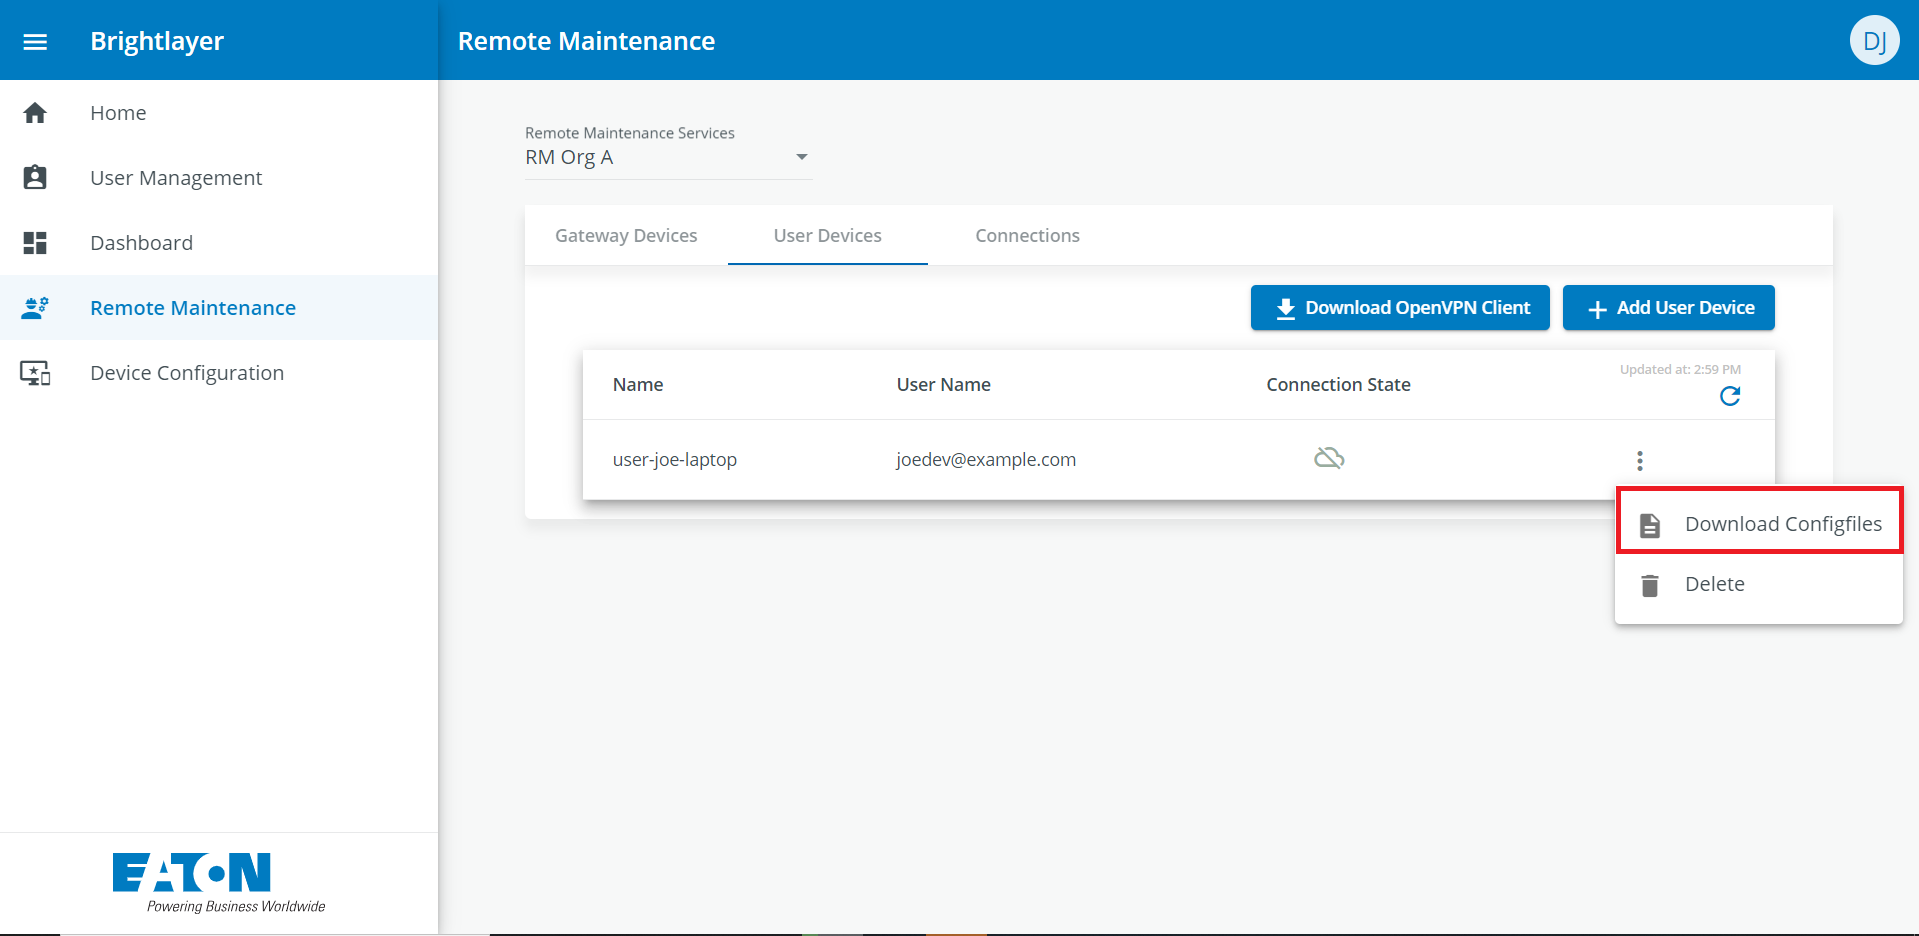
In the context menu (3 dots) of each User Device the Configuration Files for the OpenVPN Client can be downloaded. After Download the Configuration files have to be uploaded to the OpenVPN Client that is installed on the computer of the User Device.
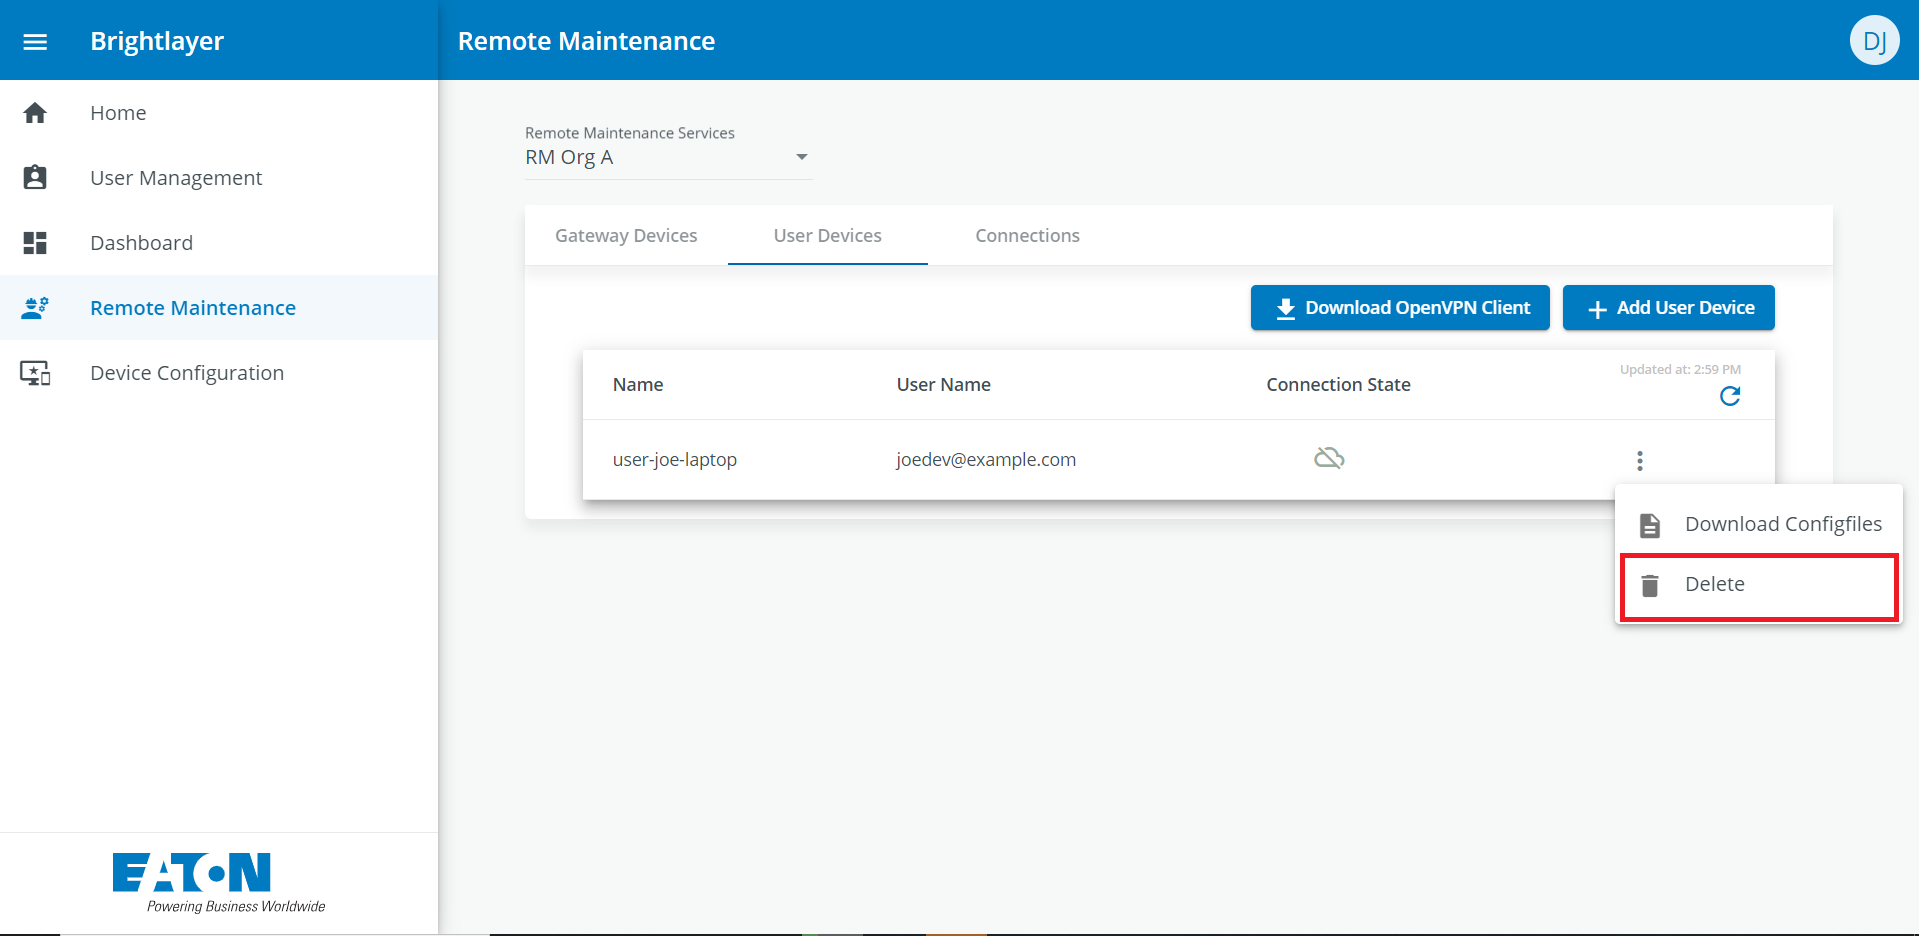
In the context menu (3 dots) there is also an option to delete the User Device
Managing connections
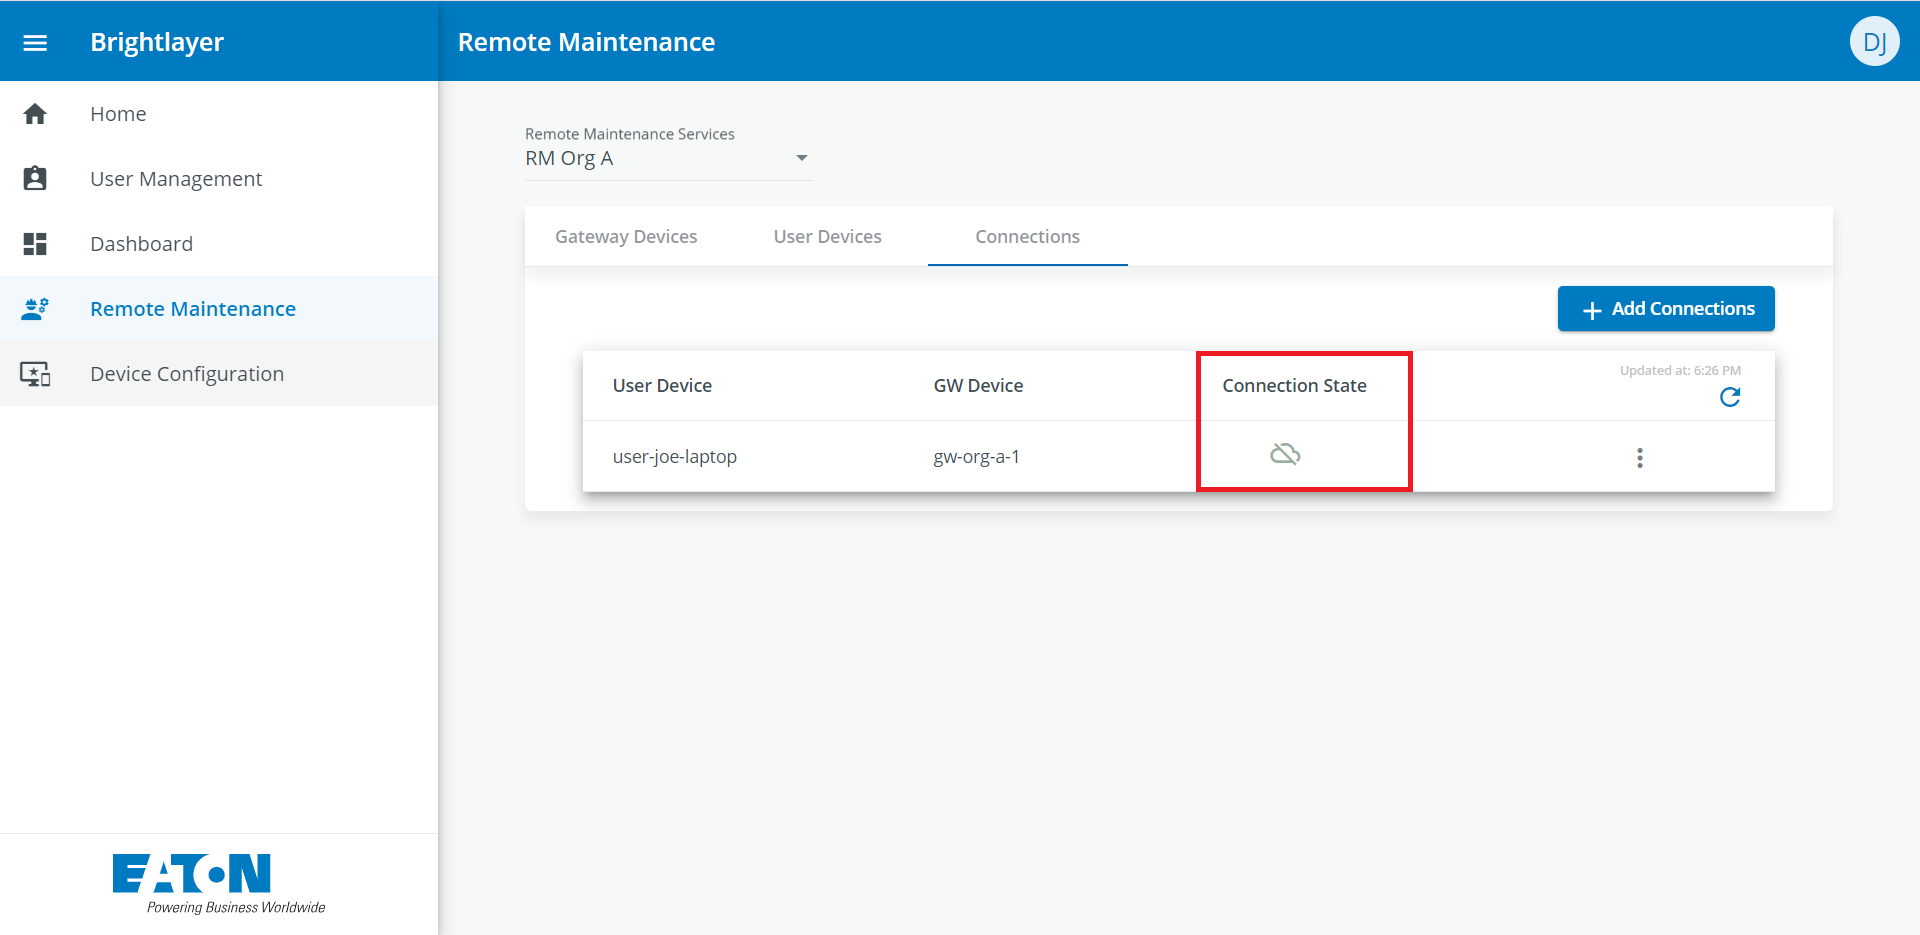
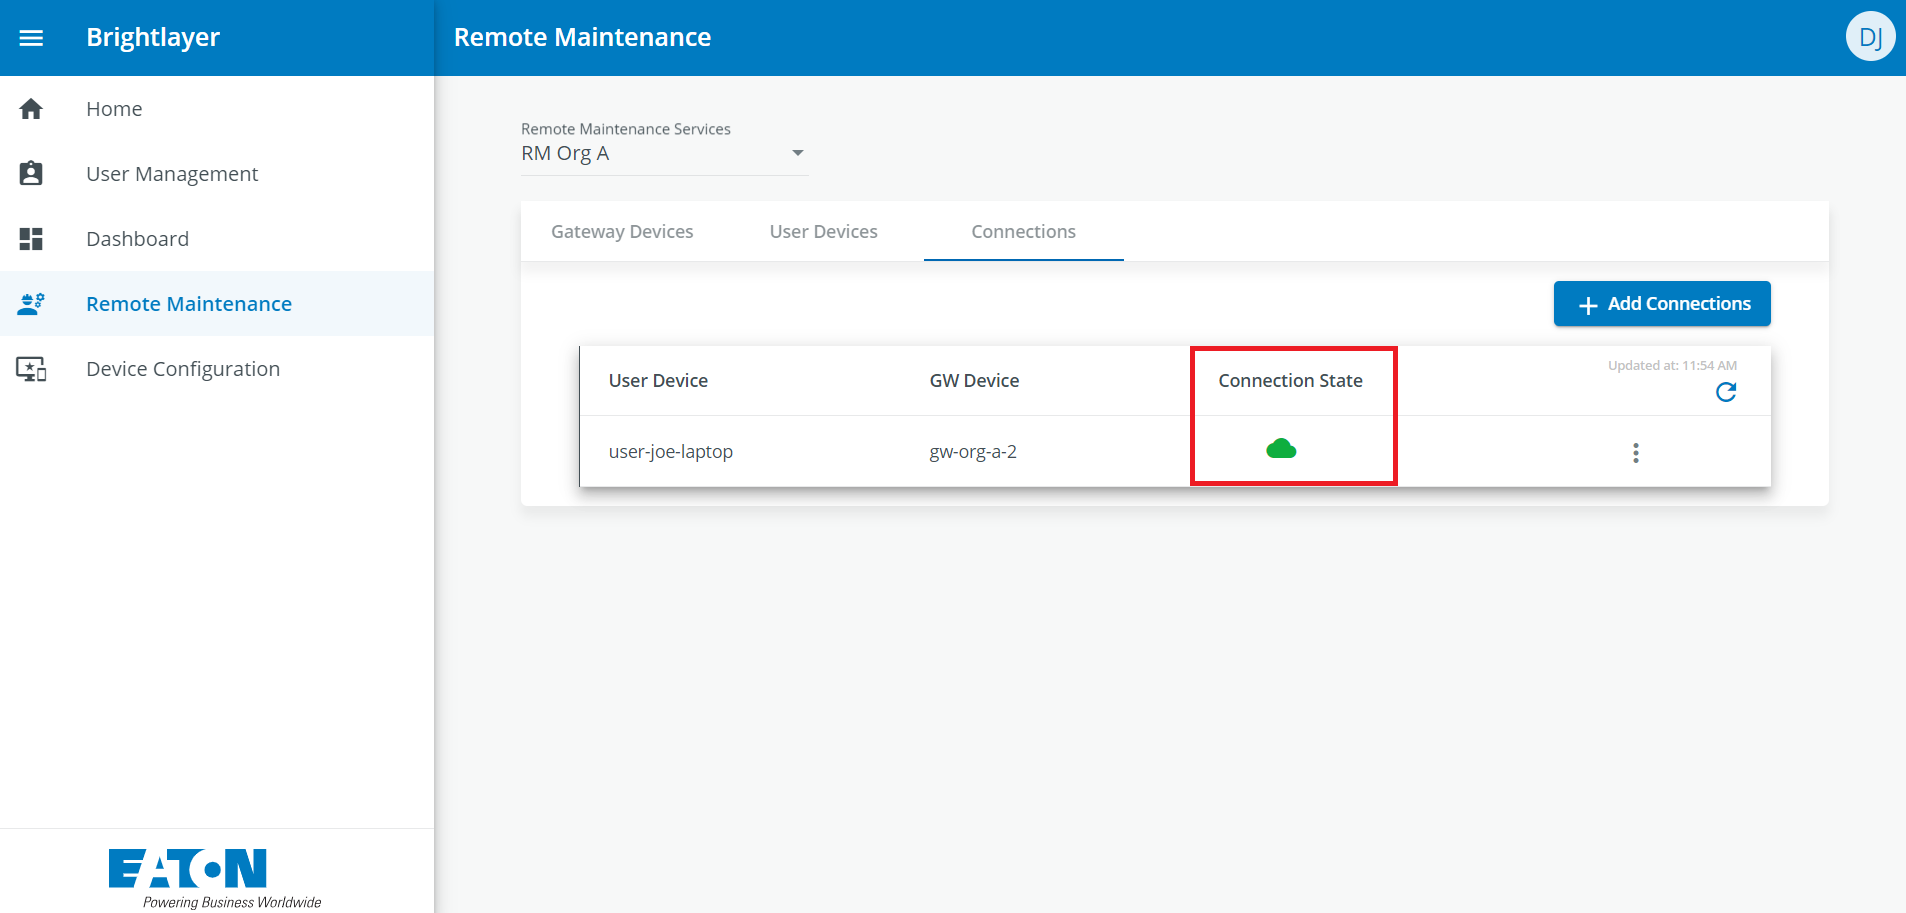
In all 3 tabs (Gateway device, User Device, Connections) the connection status is indicated behind each device or connection:
Icon striked out cloud: Not connected. The device is currently not connected and may not be available.
Icon green cloud: End-to-end connection is established. Both devices are connected to the server.
Best Network Practices
Best practices to manage VPN
Access Control: Implement strict access controls to restrict VPN access to authorized users or devices. Utilize robust authentication methods such as username-password pairs, digital certificates, or two-factor authentication (2FA) to ensure only legitimate users can establish VPN connections. This helps prevent unauthorized access to your network.
Check regularly whether all users still have a legitimate interest in using the VPN network or whether, for example due to a change in the user’s tasks, an access right is no longer necessary or should be excluded. Consistently delete users with expired access rights.
Access control is the first line of defense against unauthorized access to your network. By enforcing strong authentication, you ensure that only trusted individuals or devices can connect to your network through the VPN.Firewall Rules: Configure firewall rules on the VPN server to control incoming and outgoing traffic. Explicitly define what traffic is allowed and what should be blocked. Follow the principle of least privilege, allowing only the minimum necessary access to resources.
Firewall rules act as a gatekeeper for your network, preventing unwanted traffic from entering and protecting sensitive resources. Properly configured firewall rules are essential to secure your network and VPN.Network Segmentation: Isolate the VPN network from other networks as much as possible. Avoid connecting the gateway machine’s network to other networks without appropriate network devices, such as firewalls, routers, or switches, to ensure proper isolation and security.
Network segmentation helps contain potential threats within specific segments of your network, reducing the risk of lateral movement by attackers. Connecting networks without proper isolation can expose your entire network to vulnerabilities.Encryption: Implement strong encryption for data transmitted over the VPN connection. OpenVPN typically uses SSL/TLS for encryption. Configure encryption settings to use strong ciphers and key exchange methods to safeguard data privacy and prevent eavesdropping.
Encryption ensures that data traveling over the VPN tunnel remains confidential and secure. It protects sensitive information from interception and unauthorized access.Logging and Monitoring: Set up logging and monitoring tools to track VPN traffic and server activities. Regularly review logs to detect and respond to any suspicious or anomalous behavior. Monitoring helps in identifying security incidents promptly.
Logging and monitoring are crucial for identifying security breaches, troubleshooting issues, and maintaining the overall security of your VPN infrastructure. They provide visibility into network activities.User Training: Educate users on secure VPN usage practices. Instruct them on how to choose strong passwords, recognize phishing attempts, and follow company policies for remote access. User awareness is an essential part of network security.
Users can inadvertently introduce security risks if they are not aware of best practices. Training helps users become security-conscious and reduce the likelihood of security incidents caused by human error.Incident Response Plan: Establish an incident response plan that outlines steps to take in the event of a security incident or breach related to the VPN. Define roles and responsibilities for incident management.
Having a well-defined incident response plan ensures that your organization can respond effectively to security incidents, minimizing potential damage and downtime.